Step 9 - Add Response Codes
Introduction to Step 9
In this step you will be creating a set of response codes to more accurately reflect the kind of responses you could receive.
In this scenario, assume that the debtor agent’s accounting system (external domain) supplies a number of different responses, rather than the simple 'AcceptOrReject' response that you have used up to now.
Three different responses are possible in this use case:
-
Account Valid
-
Account Invalid
-
Account Blocked
Create a Response Code Library
First let’s create a response code library to house your new response codes.
From the left menu right-click on the model, press New>v2Flo>Response Code Library.
Add Response Code Sets to the Library
Now you can add a set of response codes, followed by the individual codes.
-
Click 'Add Response Code Set'
-
Name the set 'Account Verification Response Codes'
-
Click 'Add Response Code'
-
Add the three codes, with a description
-
For the 'Account Invalid' and 'Account Blocked' codes, check the 'Is Failure' box
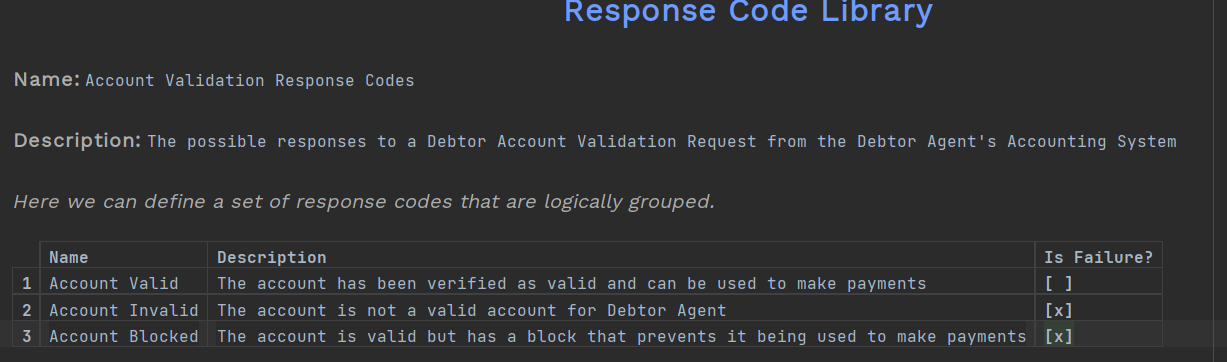
The 'Is Failure' column tells the DSL that these response codes should be stored as part of the payment, i.e. it’s a reason that means the payment itself has failed, rather than being something the flow can recover from.
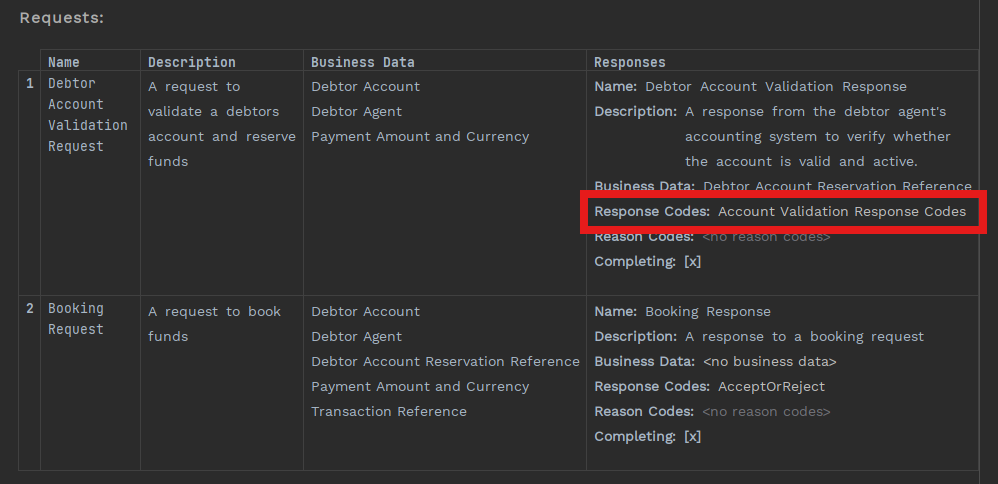
Update the Debtor Account System Request
Now you have created a response code set, then you can replace the set you originally set up in the 'Debtor Account Validation Request'.
-
Double click 'Debtor Agent’s Accounting System' external domain on the left menu
-
In the 'Responses' column place the cursor after 'Response Codes'
-
Press Ctrl+Space and select the new response code set you have just created
Update Input Behaviour
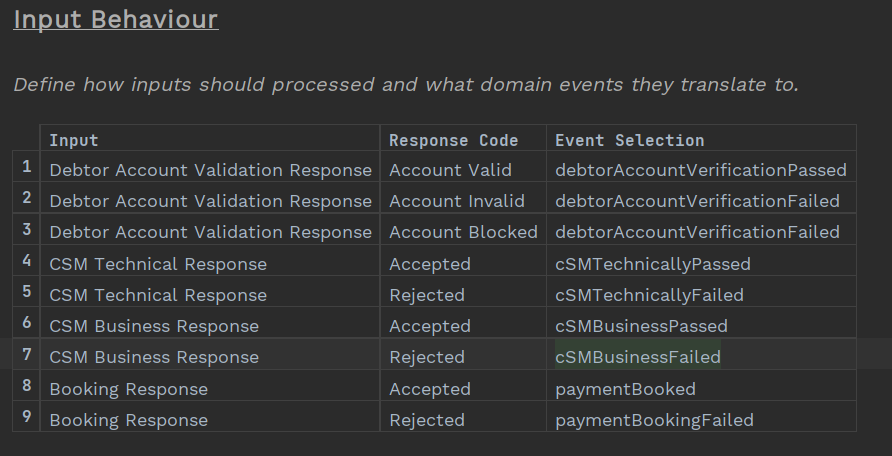
Now you have three responses, rather than two, you need to update the input behaviour to tell the flow what to do in all three cases.
-
Double-click the flow on the left menu
-
Find 'Input Behaviour'
-
You will see that some of the input are now underlined red - this is because the response codes (AcceptOrReject) are no longer valid for that response, they have been replaced by the new code set
-
Ensure you have an entry for each of your new response codes (hint: this will require updating two rows and adding a new one)
| Your list of responses are probably in an order that don’t make sense. Use the keyboard shortcut Ctrl+Shift+up/Ctrl+Shift+down to move the rows around to make it look how you want it to. You can see more keyboard shortcuts here. |
Your final input behaviour table should look something like this.
Would you ever actually implement like this?
No you probably wouldn’t - this is just an example for the purposes of a tutorial. In reality, you would keep Accept or Reject as the response code set, since the new codes only actually have 2 outcomes - pass or fail - so why introduce the complexity of adding new input behaviours that achieve nothing new?