Step 7 - Add Reason Codes
Introduction to Step 7
In this step you will add a Clearing and Settlement Mechanism (CSM) and introduce two new concepts:
-
A Reason Code Library
-
A Non-Completing Response
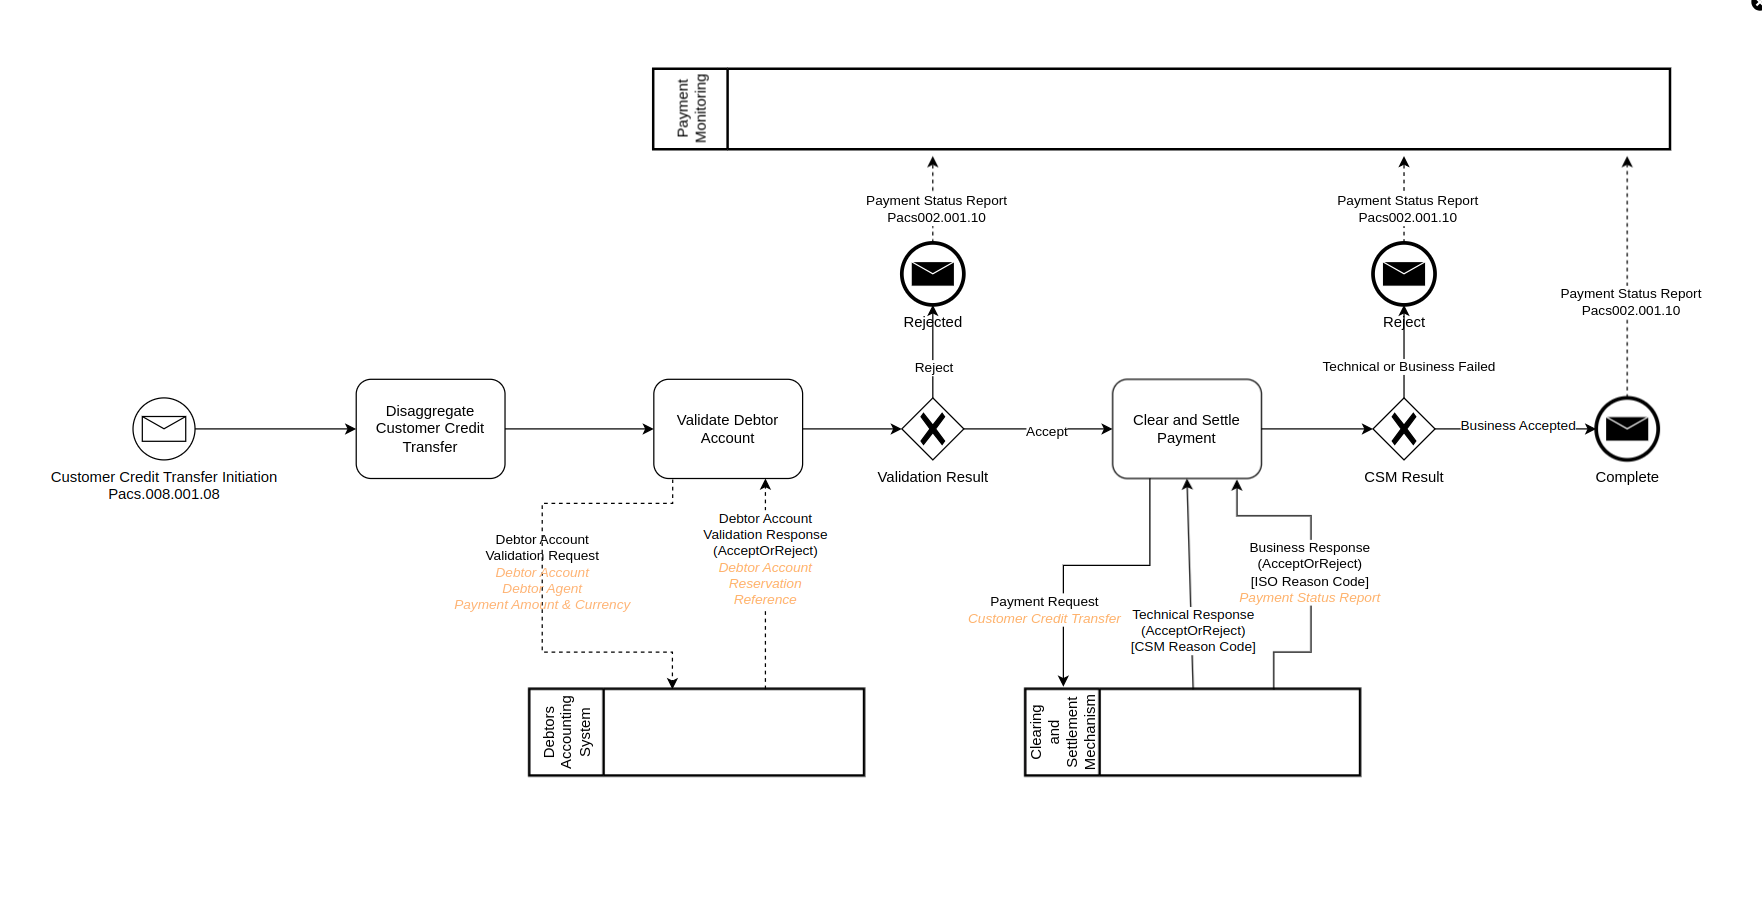
In this scenario the payment is sent as a Pacs008 to a scheme that provides a technical ack or nack.
If the CSM provides a nack it will also provide a bespoke reason code. In this scenario it will be one of the following codes:
-
REJ1 - Sender not recognised
-
REJ2 - Syntax Error
If the CSM agent provides an ack then the payment flow waits for a confirmation that the scheme has completed validation of the instruction.
The CSM will then send a Pacs002 with a 'TransactionStatus' containing either 'ACCP' (Accepted Customer Profile) or 'RJCT' (Rejected).
If the CSM has rejected the payment at this stage they will provide an ISO 'StatusReasonCode'.
The order of rejected responses from the CSM are not guaranteed - the business rejection could be received before the technical rejection.
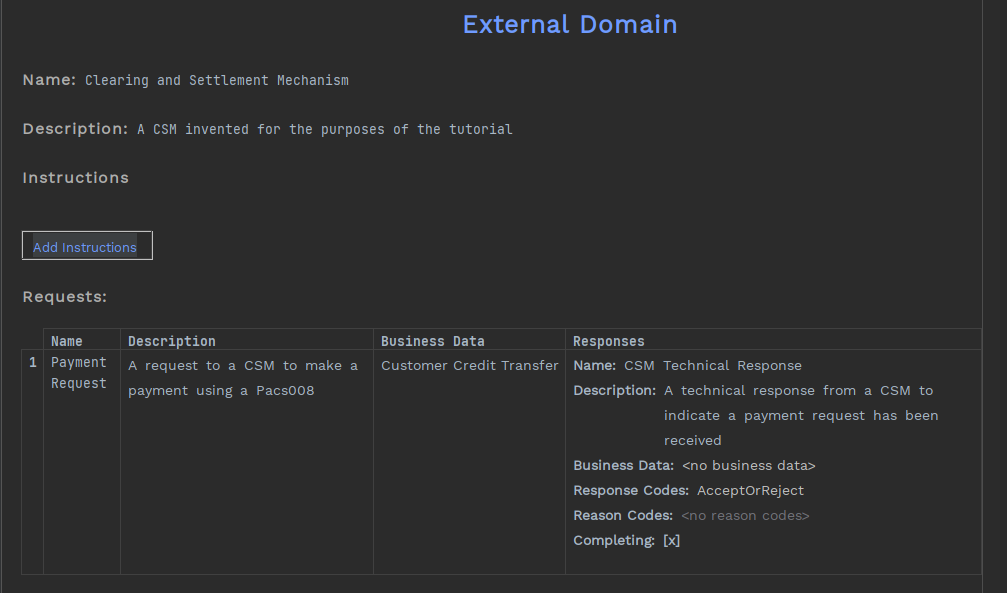
Add a new External Domain
Similar to previous steps you need to add another external domain - this time to represent the CSM.
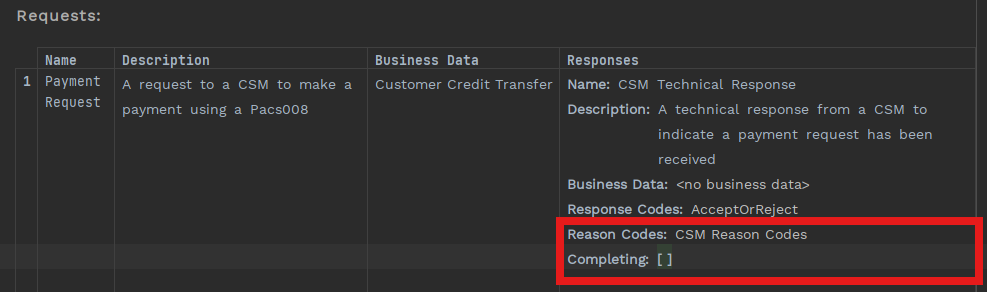
Let’s start by creating one and start building the technical response from the CSM. The response code will be 'AcceptOrReject', but stop at the 'Reason Codes', as follows:
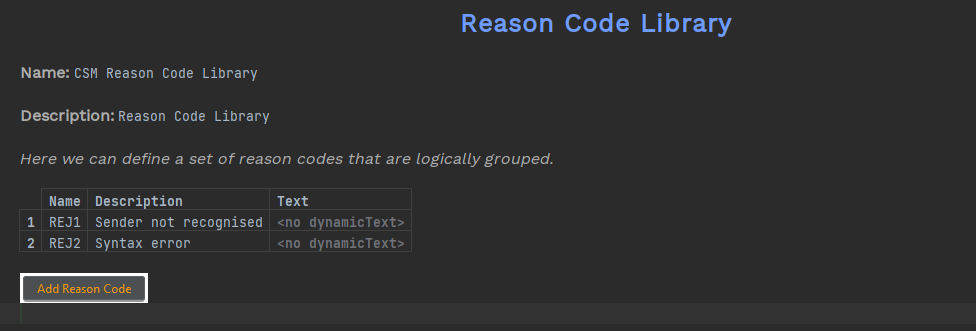
Create a Reason Code library
You can now create a library of the reason codes that the CSM uses for the technical response:
-
Right-click on the model from the left hand menu
-
Select New>v2Flo>Reason Code Library
Now you have created a reason code library, you can populate it with the reason codes in the scenario:
Now you can assign the reason code set you have created to the 'Payment Request'. While you are there, untick the 'Completing' box - the payment flow needs to wait for a second response before it can continue to the next step.
Complete setting up the Payment Request
Let’s finish off the 'Payment Request'. Remember that the CSM sends two responses - first a technical response and then a business response (the result of the instruction validation).
In the 'Responses' cell place the cursor beneath 'Completing', press Return, and a new empty response is created.
Fill it in up to the Response Code section:
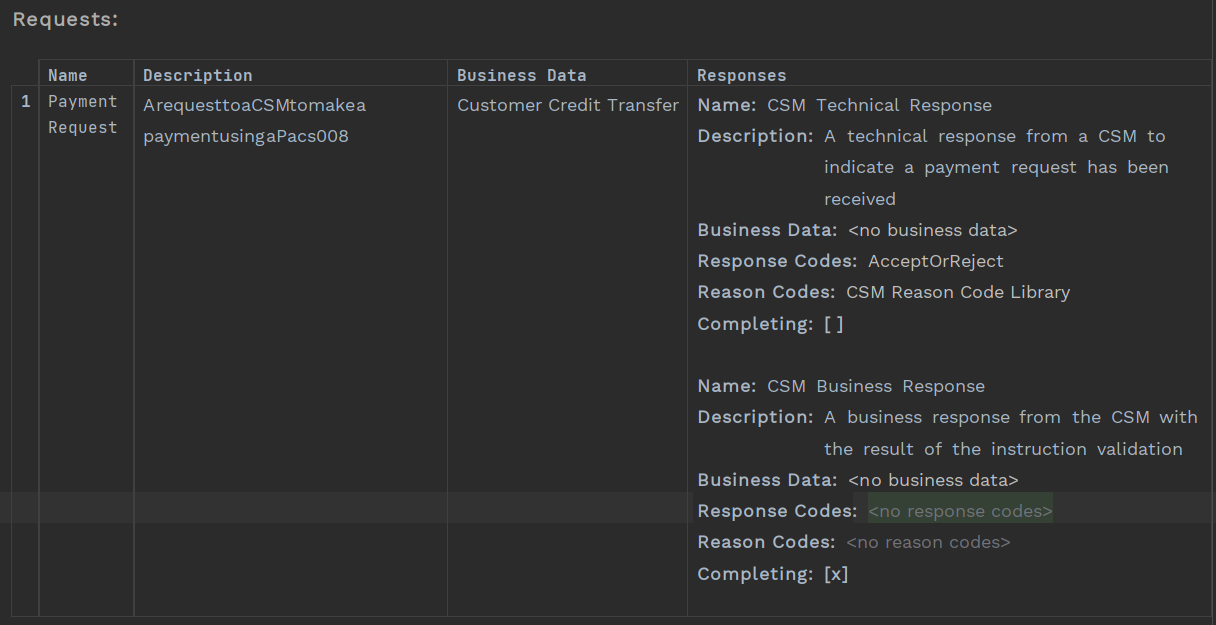
In the previous step you created a reason code library, even when there were only two possible outcomes. This time you will just use the 'AcceptOrReject' response codes. The developers, in the connector between the CSM and the Payment Service, will convert the response codes in the Pacs002 message, in this case ACCP to Accept and RJCT to Reject.
Place the cursor in the 'Response Code' section and press Ctrl+Space and pick 'AcceptOrReject'.
Then place the cursor in the 'Reason Code' section and press Ctrl+Space. You will see that the ISO Reason Codes are a predefined set of reason codes in Flow Designer, so you can just select them.
This time 'Completing' is true, as no further responses are expected from the CSM after this one.
When the CSM provides a business validation response, it’s going to be in the form of a Pacs002 so you should make sure you add 'Payment Status Report' as the business data to those responses.
The request should now look like this:

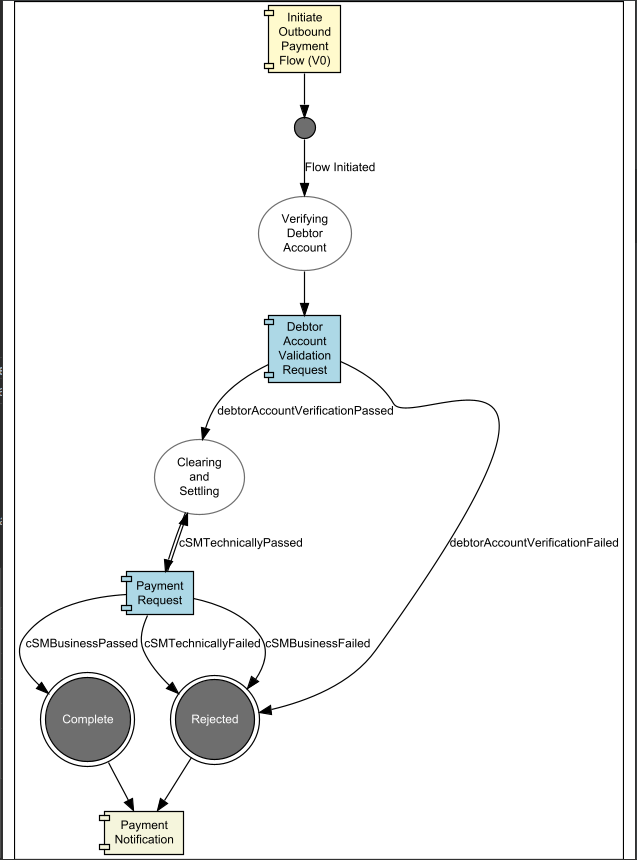
Update the Flow
Now you can update the flow to tie everything together
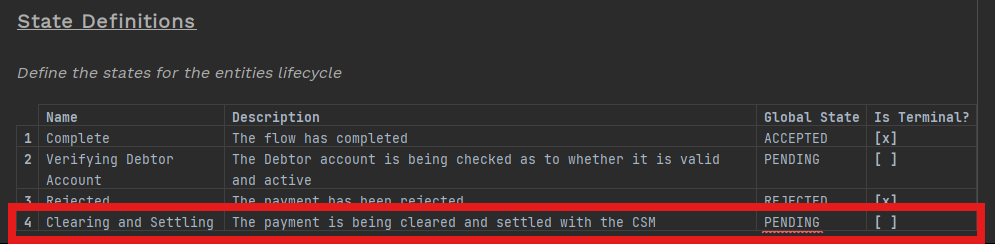
State Definitions
First - lets add the new state of 'Clearing and Settling' while the payment is being processed by the CSM.
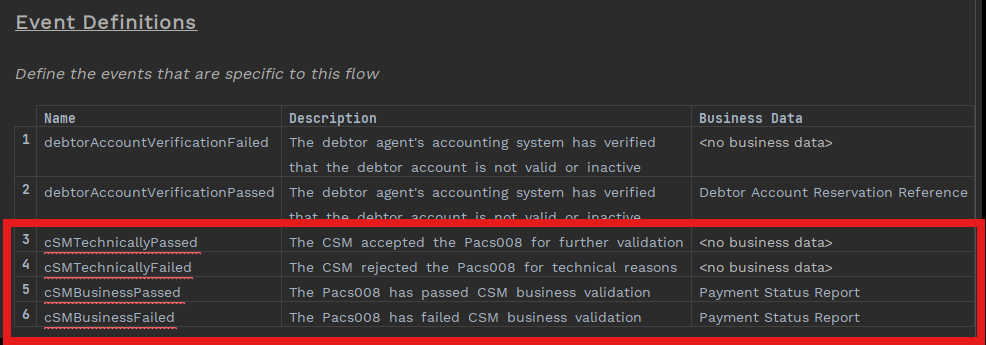
Event Definitions
Now let’s add four new events for the CSM. You have a technical validation (accepted and failed) and a business validation (passed and failed). When the CSM provides a business validation response, it’s going to be in the form of a Pacs002 so you should make sure you add 'Payment Status Report' as the business data for these two events.
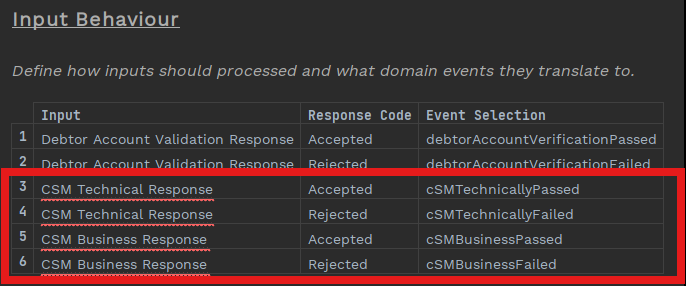
Input Behaviour
Now you have states, events, requests and responses defined; you can update the input behaviour with the four new possible responses to the payment request.
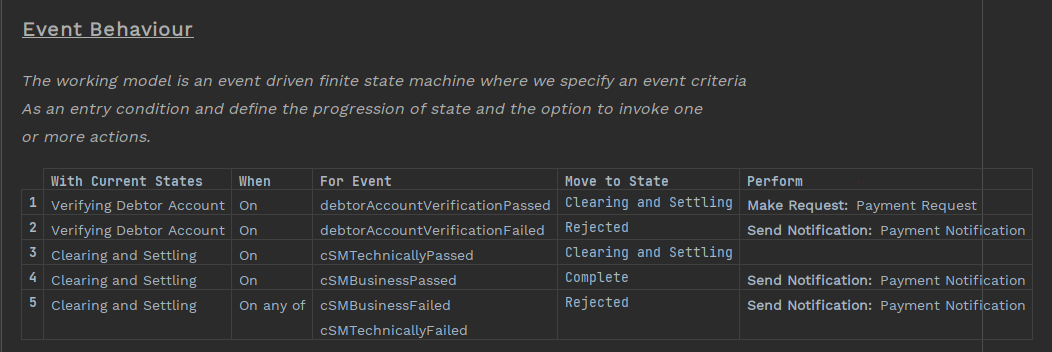
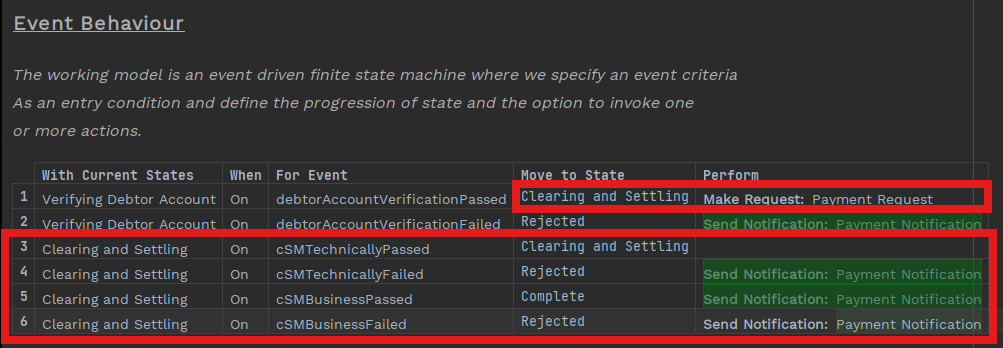
Event Behaviour
And you can now update the event behaviour as follows:
-
Add the new 'Clearing and Settling' state and the four new events to the event behaviour.
-
Change the 'Move to State' for 'Verifying Debtor Account' from 'Complete' to the new state of 'Clearing and Settling' and remove the action to create a notification.
-
Add a new action of 'Payment Request' to when the debtor account verification has passed. This will ensure that the request is sent to the CSM so that you can receive one of the new responses and the flow can continue.
-
Move the 'Send Notification' to the correct place - you send a notification when the payment has been processed, that is now when one of 'CSM Business Passed', 'CSM Technically Rejected' or 'CSM Business Rejected' have occurred.
Let’s use another feature in event behaviour to cater for the fact that the business rejected response could arrive before the technically rejected response.
In this scenario you can use 'On Any' (rather than 'On')
-
Delete row 4
-
In the last row change the 'When' column from 'On' to 'On any of'
-
In the last row add an event - 'CSM Technically Failed'
You have now updated the flow so that, if either the business failed or technically failed response are received, the state is immediately moved to rejected.