CON2 - Writing your own connector (Kafka)
|
Getting Started
The tutorial step uses the "add_payment_init" solution of the project as it’s starting point. If at any time you want to see the solution to this step, this can be found in the "add_kafka" solution! |
In CON1 - Adding payment initiation, we connected our sample application with a payment initiator to allow us to receive payment instructions from a remote service. To do this, we used a pre-packaged connector so that all we had to do was implement the logic for processing upon receipt of the message. This time we’re going to take a step further back and actually write the connector ourselves.
You’ll do this by integrating in with a test sanctions system. This system:
-
Expects to receive a custom "SanctionsRequest" object.
-
Will return a custom "SampleEvent" object.
The system can work over either Kafka or JMS. You’ll use Kafka in this example!
A Few Basics
Let’s start with a few basics about the connector framework.
| Concept | Description |
|---|---|
Uses streams to process messages. Processing messages may involve:
|
|
Tells the connector how to communicate with the underlying protocol |
In this tutorial we’ll consider two types of connectors - "Sending" connectors and "Receiving" connectors. You’ll use these to put a message onto a Kafka topic (send) and then also to process the response (receive).
As the request / response will be asynchronous, we will need some way of determining which response lines up to which request. We do this using "correlation", which is used to related a response to a message. You can read more about correlation here.
It is possible to use the same connector and supply different transports to be able to communicate over different protocols. This keeps our logic of processing messages separated from the underlying protocol.
The connector transport libraries are named with the convention connector-{TRANSPORT_NAME} e.g. connector-http or connector-kafka.
Supporting Classes
The first thing we’ll do is import the domain definition for the sanctions system. To do this we need to add a dependency into our "ipf-tutorial-app" applications pom.xml:
<dependency>
    <artifactId>sanctions-domain</artifactId>
    <groupId>com.iconsolutions.ipf.sample.samplesystems</groupId>
</dependency>
Let’s look at the key classes we receive from this module. The first is the request object we send to the Sanctions system.
@Data
public class SanctionsRequest extends SampleEvent<SanctionsRequestPayload> {
    private Map<String, String> headers;
}
So here we have an object that is taking both a set of headers and a request payload.
For the response side, we can see the SanctionsResponse object. Again checking the hierarchy we’ll see the core of the response is:
@Builder
@NoArgsConstructor
@AllArgsConstructor
@Data
@JsonInclude(JsonInclude.Include.NON_NULL)
public class FilteringResponse {
    private String status;
    private String additionalInf;
}
So the key element here is we will receive back a status.
Next we’ll pull in another dependency,
<dependency>
    <artifactId>sanctions-mapping</artifactId>
    <groupId>com.iconsolutions.ipf.sample.samplesystems</groupId>
</dependency>
This dependency, provides a prepackaged set of mappers (using Icon’s mapping framework) that provides a mapping from a pacs008 to a SanctionsRequest object. The key class to look at here is the SanctionsMapper class which provides this method:
public SanctionsRequest map(FIToFICustomerCreditTransferV08 fiToFICustomerCreditTransfer) {
    var filteringRequest = transformationService.mapThenEnrichWithDefault(fiToFICustomerCreditTransfer, FilteringRequest.class);

    SanctionsRequest sanctionsRequest = new SanctionsRequest();
    sanctionsRequest.setHeader(HeaderUtils.makeHeader("Sanctions", fiToFICustomerCreditTransfer.getCdtTrfTxInf().get(0).getPmtId().getTxId()));
    sanctionsRequest.setPayload(new SanctionsRequestPayload(filteringRequest));

    return sanctionsRequest;
}
Here we can see we are mapping from the pacs.008 (FIToFICustomerCreditTransfer) to return the SanctionsRequest.
Now we’ll use spring to provide to us an instance of the sanctions mapper that we can use. To do this we’ll create a new bean within the IpfTutorialConfig class as:
@Bean
public SanctionsMapper sanctionsMapper(ObjectMapper objectMapper) {
    return new SanctionsMapper(objectMapper);
}
Those are the building blocks we’re going to use, so let’s get on and start writing our connector.
The Send Connector
You’ll start by looking at the send connector, this is the one that will post a SanctionsRequest message onto the appropriate topic for the external system to consume.
We’ll create a new configuration class, called "SanctionsConnectorConfiguration" and we’ll place it into a new "connector" package under the existing "config" package
(Remember to mark your class with the spring @Configuration annotation! You’ll also use lombok’s @Slf4j annotation to provide access to a logging implementation)
Now let’s write our send connector, we’ll need to make a few decisions first:
-
Types - The definition of a send connector is SendConnector<D, T>. In this instance, the D represents the source (domain) object type and the T the target object type. In our connector will take in a FIToFICustomerCreditTransferV08 and send out a SanctionsRequest object.
-
Logging - We can provide a logging implementation to a connector. A message logger is any class that implements this simple functional interface:
public interface MessageLogger {
    void logMessage(MessageLogEntry var1);
}
In our instance, the application comes with a message logger that is part of the data processing. This has everything we need so we’ll just reuse it.
-
Correlation - For correlation we’re going to use another Icon provided utility. You’ll use Icon’s mongo correlation service. So we’ll need to bring in that dependency too:
<dependency>
    <groupId>com.iconsolutions.ipf.core.connector</groupId>
    <artifactId>connector-correlation-starter-mongodb</artifactId>
</dependency>
-
Mapping - As discussed above, for mapping we’ll use the SampleMapper that we’ve pulled in.
Let’s start by thinking at the class level. You’ll provide for class variables to support our connectors:
private final SanctionsMapper sanctionsMapper;
private final ObjectMapper objectMapper;
private final ClassicActorSystemProvider actorSystem;
private final CorrelationService correlationService;
private final MessageLogger messageLogger;
These are as discussed above, together with the actor system itself.
You’ll use spring’s dependency injection to provide these for us by using the @AllArgsConstructor annotation.
Let’s then create a new method to create the send connector:
@Bean(name = "sanctionsSendConnector")
public SendConnector<FIToFICustomerCreditTransferV08, SanctionsRequest> sanctionsSendConnector(ConnectorTransport<SanctionsRequest> sanctionsSendConnectorTransport) {
    return SendConnector.<FIToFICustomerCreditTransferV08, SanctionsRequest>builder("Sanctions", "sanctions.send-connector", actorSystem.classicSystem())
            .withConnectorTransport(sanctionsSendConnectorTransport)
            .withCorrelationIdExtractor(event -> CorrelationId.of(event.getHeader().getTechnical().getEventId()))
            .withCorrelationService(correlationService)
            .withSendTransportMessageConverter(this::convertToTransport)
            .withDomainToTargetTypeConverter(sanctionsMapper::map)
            .withMessageLogger(messageLogger)
            .build();
}
This is important enough to walk through each part in turn.
Firstly we pass into the method a ConnectorTransport<SanctionsRequest> sanctionsSendConnectorTransport. This is an implementation of a connector transport, if you remember our discussion above, the connector transport is used to provide the low level protocol information. For now, we’re not going to worry about that, hence we’ll just pass it into our method.
Now let’s take each line in turn and explain what’s going on.
-
The builder construction - it takes three parameters:
-
The name of the connector - this is particularly useful later when we look at metrics.
-
The config-root for the connector. This allows us to pass the root path for the connector’s properties. All connector properties will start with this variable. This allows us to then build out connector level properties.
-
The actor system itself.
-
-
the transport - obviously here we just use the connector transport we have passed to the method.
-
the correlation extractor function - this is a function that will provide the connector with a unique id that is used for correlation. The id must be unique and be obtainable from the response message too. Here we use the event id on the header.
-
the correlation service - as per above, we’ll use Icon’s mongo backed implementation.
-
the transport message converter - this is a function that takes the sanctions request and converts it into a transport message for passing down the wire. In our case, we’ll make a simple implementation that creates a new TransportMessage with a string representation of our request as the payload.
private TransportMessage convertToTransport(SanctionsRequest request) {
    try {
        return new TransportMessage(new MessageHeaders(CryptoHelper.messageHeaders()), objectMapper.writeValueAsString(request));
    } catch (JsonProcessingException e) {
        throw new IconRuntimeException(e);
    }
}
-
the domain to target type converter - this is the function that will map from our domain type (pacs.008) to our target type (SanctionsRequest). As per above, will use the SanctionsMapper’s map method to do this.
-
the message logger - as discussed we’ll just use existing logger here.
Send Connector Sequence Diagram

The diagram shows how the connector utilises the objects and functions you’ve passed in to prepare a message and sends it to the destination. Note that this is a simplified diagram and does not represent everything that occurs within a connector. A complete explanation of the send connector can be found here.
The Receive Connector
Now that we’ve written the code to set up our connector to send a message out to the sanctions system, we’ll need one to do the reverse and receive the response when it’s ready. So let’s again add a new method to our configuration, this time to construct our receive connector:
@Bean(name = "sanctionsReceiveConnector")
public ReceiveConnector<SampleEvent> sanctionsReceiveConnector(@Qualifier("sanctionsReceiveConnectorTransport") ReceiveConnectorTransport sanctionsReceiveConnectorTransport) {
    return ReceiveConnector.<SampleEvent>builder("SanctionsReceive", "sanctions.receive-connector", actorSystem.classicSystem())
            .withConnectorTransport(sanctionsReceiveConnectorTransport)
            .withCorrelationIdExtractor(event -> CorrelationId.of(event.getHeader().getTechnical().getOriginalEventId()))
            .withCorrelationService(correlationService)
            .withReceiveTransportMessageConverter(message -> sanctionsMapper.convertResponse(message.getPayload().toString()))
            .withReceiveHandler(this::sanctionsReceiveConnector)
            .withMessageLogger(messageLogger)
            .build();
}
As we did last time, let’s walk through the key points of this setup.
-
The builder construction - just as with send connectors we’ll pass in the name of the connector, the root config path and the actor system.
-
the transport - we’ll again need the protocol setup, this time for receiving a message. You’ll pass this into our method to allow us to deal with protocol details elsewhere.
-
the correlation extractor function - just like with the send, we need a function that will provide the same id as we had in the send function, but this time extracted from the response event. This time we’ll take the "original event id" from the header.
-
the correlation service - again we’ll use Icon’s mongo backed one.
-
the receive transport converter - here we need a function that converts from the raw message received into the expected response target type (a sample event). You’ll take that from our sanctions mapper functions.
-
the receive handler - this is the key function. This is a function that takes in the response message together with the context for it (taken from correlation in our case) and requires us to determine what to do with it. In our case, we want to construct a new domain sanctions input and send it into our domain. See if you can write this and when ready compare with our function below:
private CompletionStage<Void> sanctionsReceiveConnector(ReceivingContext receivingContext, SampleEvent sampleEvent) {
        return SanctionsDomain.sanctionsSystem().handle(new SanctionsNoHitInput.Builder(receivingContext.getProcessingContext().getAssociationId().getValue()).build())
               .thenAccept(done -> log.info("Completed {}", done));
    }
-
the message logger - and again we’ll just use the existing logger.
That’s it, that’s our entire receive connector written and ready to go.
The Connector Transports
In the definitions for both our receive and send connectors, we passed in a transport definition. Now we need to set these up. For the moment, we’re just going to use Kafka, so we’ll need those versions. To do this will create a new spring configuration class called "SanctionsTransportConfiguration" which we’ll put in a new "transports" package under our connectors package.
The Sending Connector Transport
Firstly, let’s add the dependency for the connector framework’s Kafka implementation.
<dependency>
    <groupId>com.iconsolutions.ipf.core.connector</groupId>
    <artifactId>connector-kafka</artifactId>
</dependency>
You’ll start with the sending side:
@Bean
    public ConnectorTransport<SanctionsRequest> sanctionSendConnectorTransport(ClassicActorSystemProvider actorSystem) {
        return KafkaConnectorTransport.stringBuilder(
                        "SanctionsSendKAFKA", actorSystem, "sanctions")
                .build();
    }
At this stage we move into specific low level Kafka configuration, the details of which lie outside of this tutorial. The key things to note however are:
-
We give the connector transport a name, again for use in metrics, an actor system and configuration root path to be used
The Receive Connector Transport
This is very similar to the send:
@Bean
public ReceiveConnectorTransport sanctionsReceiveConnectorTransport(ClassicActorSystemProvider actorSystem) {
    return KafkaAckReceiveConnectorTransport.stringBuilder(
            "KafkaSanctionsReceiveConnectorTransport", actorSystem, "sanctions")
            .build();
}
The main differences are this time we use the Kafka configuration for consuming messages from a topic (or potentially multiple topics!). We also have to decide how many partitions we want to apply to our topic. This will help with performance but for now is outside the scope of this tutorial.
That’s our transport defined, all that remains now is setting up the actual configuration to use it.
Using the Connector
Now we need to plug our connections into our flow for usage. The first thing to note here is that the receive connector part (method sanctionsReceiveConnector) is already done for us as the handler is sending on the response back to the domain.
So here we only need to worry about the sending side. For this, we simply need to swap out our sample sanctions adapter (SampleSanctionsSystemActionAdapter) with a real one that calls our new send connector’s send method. The action we supply to the adapter has all the information we’ll need to do that too! See if you can set that up now and when ready the solution is below.
@Bean
public SanctionsDomain sanctionsDomain(ActorSystem actorSystem, SendConnector<FIToFICustomerCreditTransferV08, SanctionsRequest> sanctionsSendConnector) {
    // All adapters should be added to the domain model
    return new SanctionsDomain.Builder(actorSystem)
            .withSanctionsSystemActionAdapter(checkSanctionsAction ->
                    sanctionsSendConnector.send(checkSanctionsAction.getProcessingContext(), checkSanctionsAction.getCustomerCreditTransfer())
                    .thenAccept(done -> log.debug("Result: {}" ,done)))
            .build();
}
So here we can see we are injecting in our new send connector and then simply calling the send and logging the result. That’s all we need to do.
Configuration
You’ll add our configuration into our application configuration file (ipf-tutorial-app/application.conf).
Connector Configuration
For our connector to work, we need to add a number of things:
-
The restart settings
-
The number of partitions to use on send
-
The group and client ids for Kafka to use
We’re going to add these into the common akka configuration that we created in the previous tutorial. We could just as easily add all these into the bespoke sanctions block, but then they wouldn’t be available to reuse for other connectors.
Restart Settings
Firstly, we need restart settings, ie to tell the connector what to do on failover. Here we’ll define the standard set that we’re going to use for all our connectors.
default-restart-settings {
  min-backoff = 1s
  max-backoff = 5s
  random-factor = 0.25
  max-restarts = 5
  max-restarts-within = 10m
}
We are telling our connector that in the event of transport failure, we will attempt to restart up to 5 times with an increasing time between each restart.
To use this, we’re going to add it to the default akka block. You’ll do this by adding a line under both the consumer and producer settings:
producer {
  restart-settings = ${default-restart-settings}
}|
Note the syntax here, how we are able to refer to a complex block from elsewhere in our hocon structure by using the ${…} setup. |
Partitions
Partitions allow us to define how many Kafka partitions we should set up. In our case we’re just going to setup 10 partitions, we do that by adding it to the akka block we need to add a line to the consumer with:
consumer {
  partitions = 10
}
Client and Group Ids
Finally, we’ll add the client and group ids.
-
client.id- sets the name of an individual Kafka producer or consumer client. -
group.id- sets the name of the Kafka consumer group that an individual Kafka consumer client belongs to.
For the client id we need to add an entry to the producer config:
kafka-clients {
    client.id = ipf-tutorial-client
}
And for the group id we need to add an entry to the consumer config:
kafka-clients {
    group.id = ipf-tutorial-group
}
Connector Transport Configuration
For our connector transport to work, the "sanctions" parameter was added to the stringBuilder earlier.
The "sanctions" parameter tells the connector to look for elements under the "sanctions" prefix in the configuration. So all we need to do is add our topics under this root as follows:
sanctions {
  kafka {
    producer {
      topic = SANCTIONS_REQUEST
    }
    consumer {
      topic = SANCTIONS_RESPONSE
    }
  }
}
Summary
That’s everything from our application configuration side complete, just as a recap the full config for the connector should now look like:
sanctions {
  kafka {
    producer {
      topic = SANCTIONS_REQUEST
    }
    consumer {
      topic = SANCTIONS_RESPONSE
    }
  }
}

// default settings for kafka
default-restart-settings {
  min-backoff = 1s
  max-backoff = 5s
  random-factor = 0.25
  max-restarts = 5
  max-restarts-within = 10m
}

common-kafka-client-bootstrap-servers = "localhost:9093"

akka {
  kafka {
    producer {
      restart-settings = ${default-restart-settings}

      kafka-clients {
        bootstrap.servers = ${common-kafka-client-bootstrap-servers}
        client.id = ipf-tutorial-client
      }
    }
    consumer {
      restart-settings = ${default-restart-settings}

      kafka-clients {
        bootstrap.servers = ${common-kafka-client-bootstrap-servers}
        group.id = ipf-tutorial-group
      }
    }
  }
}
// end default kafka settings
Running the Application
To run the application, the first thing we’ll need to do is set up the actual sanctions service that we will be talking to.
Docker Setup
If using docker, here’s the new entry for our application.yml (docker/application.yml)
  sanctions:
    image: registry.ipf.iconsolutions.com/sample-systems-sanctions-simulator-kafka:{app_version}
    container_name: sanctions-sim
    ports:
      - 5010:5005
      - 8088:55555
    environment:
      - SANCTIONS_MODE=normal
      - SANCTIONS_TRANSPORT=kafka
      - SANCTIONS_SIM_ENCRYPTION_ENABLED=FALSE
      - SANCTIONS_SIM_ENCRYPTION_KEYSTORE_PATH=file:///tmp/keys/connector/keystore-pkcs12-aes128.jks
    volumes:
      - ./config/keys:/tmp/keys:ro
      - ./config/sanctions:/sanctions-simulator-kafka/conf
      - ./logs/sanctions:/ipf/logs
    depends_on:
      - kafka
Note that {app_version} is a placeholder that should be replaced with your desired version number (e.g., "2.1.47").
Also note we are not setting any Kafka configuration here, this is because the sample set provided above works with the docker environment.
To make things easier we’ll also add a logback.xml file for sanctions:
<?xml version="1.0" encoding="UTF-8"?>
<configuration>
    <appender name="FILE"
              class="ch.qos.logback.core.rolling.RollingFileAppender">
        <file>/ipf/logs/sanctions-sim.log</file>
        <rollingPolicy class="ch.qos.logback.core.rolling.FixedWindowRollingPolicy">
            <fileNamePattern>/ipf/logs/sanctions-sim.log.%i</fileNamePattern>
            <minIndex>1</minIndex>
            <maxIndex>20</maxIndex>
        </rollingPolicy>
        <triggeringPolicy
                class="ch.qos.logback.core.rolling.SizeBasedTriggeringPolicy">
            <maxFileSize>50MB</maxFileSize>
        </triggeringPolicy>
        <encoder>
            <pattern>%date{yyyy-MM-dd} %d{HH:mm:ss.SSS} %-5level %X{traceId} %logger{36} %X{sourceThread} %X{akkaSource} - %msg%n</pattern>
        </encoder>
    </appender>

    <root level="INFO">
        <appender-ref ref="FILE" />
    </root>
</configuration>
Non Docker Setup
Details for how to run the sanctions simulator can be found here: Using the sanctions simulator
If required, also please ensure the config described above has the correct Kafka setup for your environment.
How the Sanctions Simulator Interacts With the Flow

Before running the application, review this diagram to understand how the connectors interact with the sanctions simulator via the Kafka queues.
Testing It All Works
Now’s the time to check everything works, so let’s rebuild our application:
mvn clean install -rf :ipf-tutorial-appAnd then we could send in a payment:
curl -X POST localhost:8080/submit | jqAnd if we bring up the payment in the Developer GUI ('IPF Transaction Explorer') we can have a look at a couple of interesting things.
Firstly, if we go to the messages tab (search from the main page by unit of work id (uowId), click view on the transaction, click messages tab) we’ll see:

Here we can see that we now are recording the messages going both to (SENT) and from (RECEIVED) the sanctions system. If you "Click to view body" you can view the details of the transformed sanctions messages.
Secondly, just to confirm nothing else has changed we can look at the graph of our tutorial flow (click flows, click IptutorialFlowV2, click view graph) then we see:
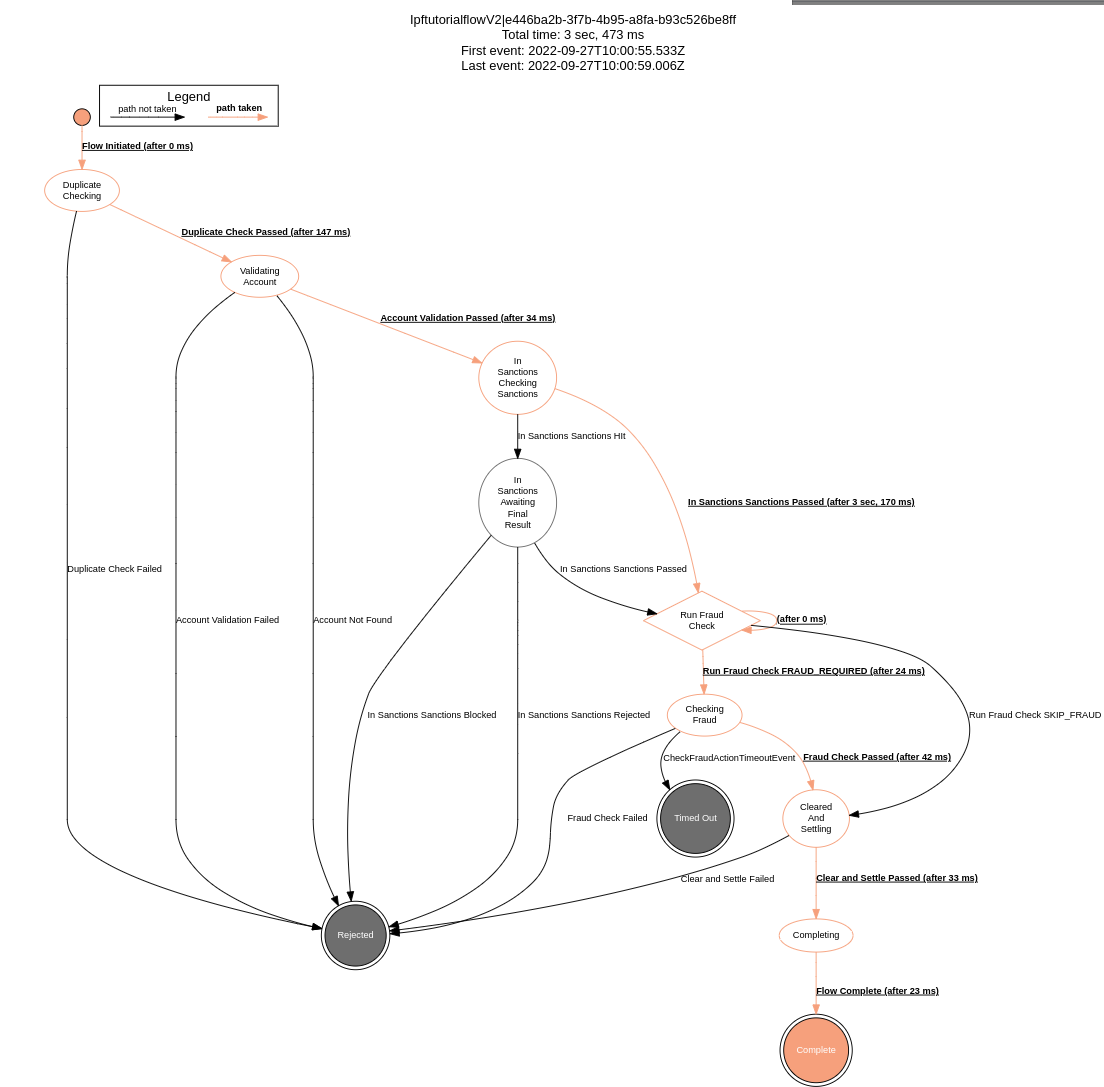
And here we can see that our flow is working correctly!