How to use build scripts
What is a build script?
A build script is a type of MPS solution that is used in order to generate a zip file that can be included in downstream projects. This allows us to link MPS projects together and reuse one in another.
When would I need a build script?
You need to use a build script if you want to export the components of your DSL to be used in other projects. So for example, reusable libraries need build scripts but final flow projects won’t.
How do I get a build script?
The easiest way is simply when using the scaffolder to generate a brand new project then include the 'useBuildScripts' option. This will set it all up for you and there’s nothing extra or special you need to do.
Why don’t all projects have build scripts?
The build scripts need to be kept upto date with the dependencies being used in your project, so if you add dependencies you’ll need to refresh the build script. Whilst this is trivial to do, if you don’t need the zip extracts then it’s simpler just not to have the confusion of a build script. You can always add it later!
What if I need to add a build script to an existing project?
If you need to add a build script (i.e. if you built your initial project without and now want to add one) then simply follow these steps:
Creating the build script
Right click on your project in MPS and select 'New' > 'Build Solution'.
Once built, select the build script in the navigator
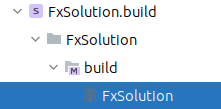
At the top of your build script you’ll see this:

Right click on the 'build.xml' and select inspect node (or press Ctrl+ALT+I). Then in the inspector panel change the ant build location to include the build path as follows:

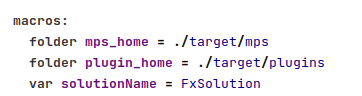
In the macro’s section we need to setup the definitions as below:
In the project structure set the name and folder name to use the new solutionName variable you’ve just created.

In the mps group section, you need to add an entry for the new build solution. This should reference the load from path from the relevant directory in the solutions folder as below:
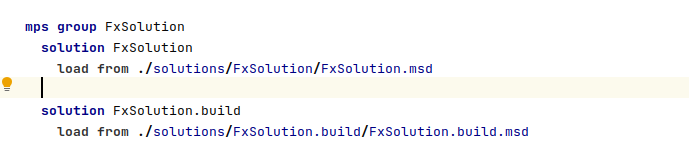
Now, if you go back to the project structure section, you can add the new entry you’ve created:

| You will probably need to reload the two entries in the 'mps group' section. To do this, simply right click on the entry (which will be underlined in red) and select reload from disk. |
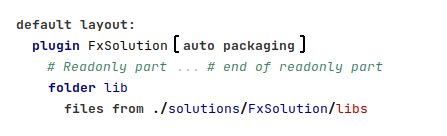
Finally at the bottom of the file, we need to change to create a plugin solution. Delete the entry that is there and then replace it with an entry as shown below:
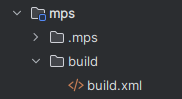
Now you should be able to rebuild the solution in intellij. If you then check you’re files you should see a 'build' directory containing the build.xml under the mps directory.
Using the build script
Now you have the build script, to invoke it we simply need to change the tile definitions in the mps pom.xml
<tiles> <tile>com.iconsolutions.ipf.core.flow:flo-mps-tile:${icon-flo.version}</tile> <tile>com.iconsolutions.ipf.core.flow:flo-mps-archive-tile:${icon-flo.version}</tile> </tiles>
Here we have replace the flo-mps-plugin-tile with two new tiles.