Getting Started
This guide is aimed to get a user from never having used IPF before to having a running application in under 5 minutes! It assumes that you already have access to the appropriate maven repository containing an IPF release.
We’re going to build a simple IPF orchestration application:
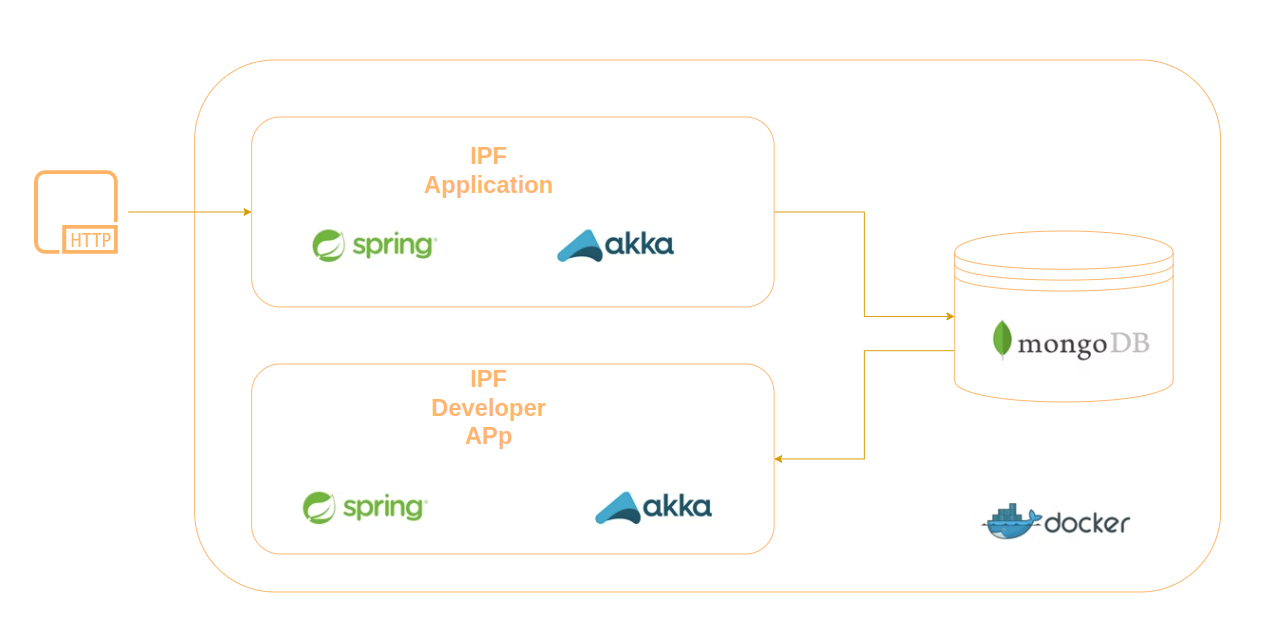
Let’s look a little deeper at what is actually making up the IPF application here:
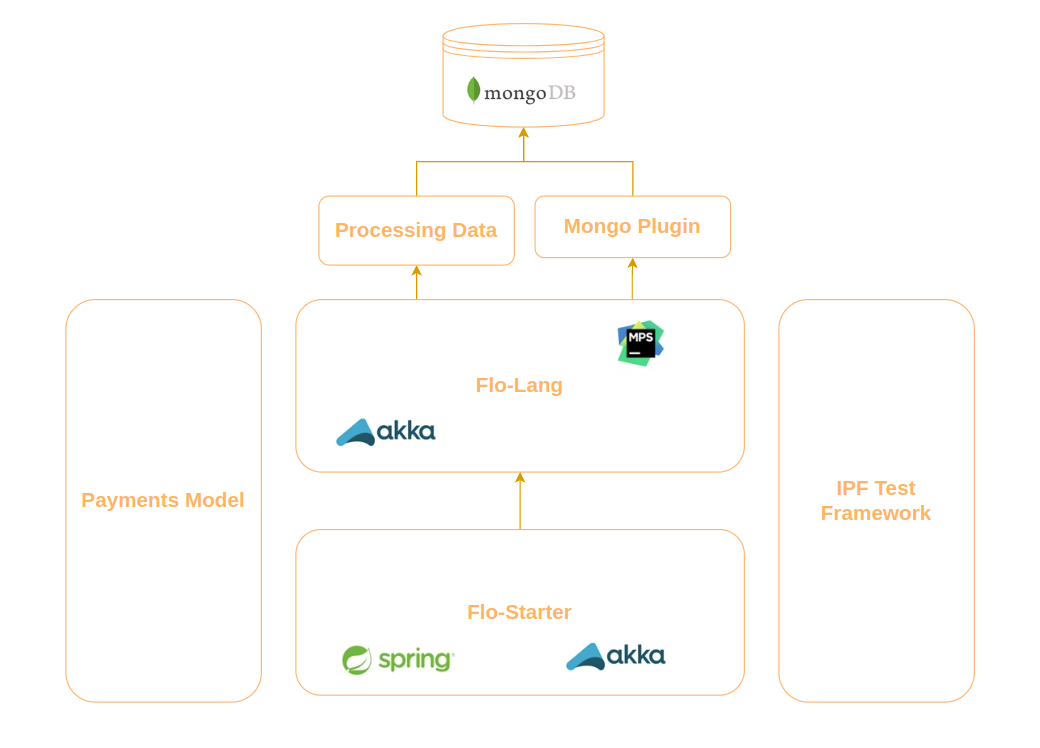
Here you can see that the application is built using a number of IPF components.
We’ll use the IPF Scaffolder to build a skeleton application that contains a single processing flow. We can then use a simple http controller to invoke the flow and see our results on the IPF Developer Application.
Running the Scaffolder
Firstly navigate to the directory that you want your generated project to be installed to. Whilst this directory does not need to be empty it must not contain a folder with the name of the project to generate and must not have a pom.xml file within it.
mvn com.iconsolutions.ipf.build:ipf-project-scaffolder-maven:1.0.3.1:scaffold \
-DipfVersion=2024.2.0 \
-DincludeSampleSystems=n \
-DincludeApplication=y \
-DincludeE2E=n \
-DuseBuildScripts=n \
-DsolutionName=examplesolution \
-DmodelName=examplemodel \
-DgroupId=com.iconsolutions \
-Dversion=0.0.1-SNAPSHOT \
-DartifactId=quick-start \
-DoutputDir=/build/scaffolder|
You must supply the target version of both the scaffolder plugin (1.0.5 in the example above) and the IPF version ( The versions must be compatible. Please check and replace the numbers based on IPF’s release documentation and/or the details for your target environment! |
After a few seconds, the project will be generated in the specified output directory.
Here you can see that our project now resides in /build/scaffolder.
If you want to learn more about the config options provided and their meaning please check here.
Let’s now look at the /build/scaffolder/quick-start directory and you’ll see:
➜  mytest ls -ltr
drwxrwxr-x 8 icon0377 icon0377 4096 Aug 14 14:39 quick-start-domain (1)
drwxrwxr-x 3 icon0377 icon0377 4096 Aug 14 14:39 quick-start-service (3)
drwxrwxr-x 3 icon0377 icon0377 4096 Aug 14 14:39 quick-start-app (4)
-rw-rw-r-- 1 icon0377 icon0377 2400 Aug 14 14:39 Readme.md (2)
-rw-rw-r-- 1 icon0377 icon0377 2218 Aug 14 14:39 pom.xml
The key folders to note here are the:
| 1 | quick-start-domain - this contains all the artefacts relating to the DSL and flow definitions. |
| 2 | Readme.md - this contains information on how to run the generated project. |
| 3 | quick-start-service - this is a module designed to hold all the implementation logic for the different ports that have been generated within your MPS solution. |
| 4 | quick-start-app - this is the home for the application runtime code, the code that will be deployed and use the IPF generated domain to process transactions. |
Having generated the project, you can build it. Move to the base directory of the project and run:
mvn clean installThis will build the project, generating all the artifacts and run both the DSL and application tests. Note that in the application tests, this will be using the embedded mongo db.
Let’s now run the application. To do this we’ll need an environment to run it within - the minimum here is something to consume the messages sent to processing data and a mongo database.
The following is the contents of a sample docker-compose yaml (infra.yml):
version: "3.0"

services:

  # Infrastructure
  ipf-mongo:
    image: registry.ipf.iconsolutions.com/ipf-docker-mongodb:latest
    container_name: ipf-mongo
    volumes:
      - "./data:/data/db"
    ports:
      - "27017:27017"
    healthcheck:
      test: echo 'db.runCommand("ping").ok' | mongo localhost:27017/test --quiet

  ipf-developer-app:
    image: __dockerRegistry__ipf-developer-app:${icon-ods.version}
    container_name: ipf-developer-app
    ports:
      - "8081:8081"
      - "5006:5005"
    volumes:
      - ./logs:/ipf/logs
      - ./config/ipf-developer-app:/ipf-developer-app/conf
    user: "${UID:-1000}:${GID:-1000}"
    environment:
      - IPF_JAVA_ARGS=-Dma.glasnost.orika.writeClassFiles=false -Dma.glasnost.orika.writeSourceFiles=false -Dconfig.override_with_env_vars=true
    depends_on:
      - ipf-mongo
    healthcheck:
test: [ "CMD", "curl", "http://localhost:8081/actuator/health" ]| In the above you’ll need to update the ${icon-ods.version} with the target version you require. |
Then we can start the supporting environment by running: docker-compose -f infra.yml up -d
This will spin up a docker environment containing:
-
An instance of a mongo database.
-
An instance of the
ipf-developer-app, which can be used to quickly view payments.
We can then run our IPF application code just by starting the application like any other spring application by running the Application.java class.
Once everything is up, we can fire a dummy payment through by calling the "submit" endpoint of the provided controller. A simple way to do this using curl is:
curl -X POST localhost:8080/submitIf successful this should return you the payment identification details:
{
  "requestId": "4cece8f7-1a7f-4eb8-a189-a0de5523175e",
  "uowId": "478a35ce-5e34-4e7b-a58b-060368fab758",
  "aggregateId": "QuickStartFlow|39437cdb-4612-42a8-b503-8963a211391a"
}
The key id to consider now is the uowId - this is the unique identifier for our transaction.
Now let’s open the Developer Application. Once open, click search and we should see:

From here you can click the 'View' button to start digging into the details of your transaction!