DSL 10 - Calling Other Flows
|
Getting Started
The tutorial step uses the If at any time you want to see the solution to this step, this can be found on the |
Scenario
So far, we’ve only considered a single flow, which takes in a pacs.008 and performs some actions on it. We could consider this to be an "execution" flow. Let’s now consider how we may do "initiation" and create a second flow that will:
-
Receive a pain.001
-
Convert the pain.001 to a pacs.008
-
Forward the pacs.008 to the execution flow
-
Determine the outcome of the execution flow and terminate appropriately.

The key thing to consider here is how we communicate flow-to-flow. In this step, we’ll only look at flows that are deployed together - namely when two flows are both defined in the same model.
|
While this section discusses how to use the DSL itself to set up flow-to-flow communication, it’s important to realise that, in essence, flow-to-flow is effectively one domain calling another and, as such, it’d be just as valid (and possible) to simply model the flow-to-flow interaction using external domains. |
DSL Setup
Adding the Initiation Flow
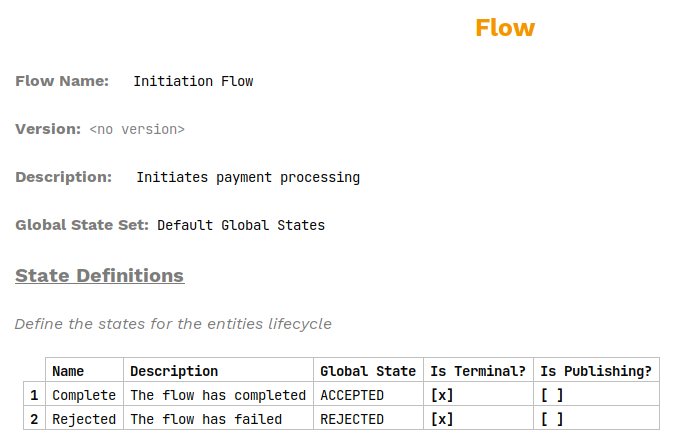
Let’s add a new flow by right-clicking on the model and selecting . Then, in the flow editor we’ll set:
-
A name of "Initiation Flow"
-
A description of "Initiates payment processing"
-
A new state to represent flow rejection called "Rejected". This should have a REJECTED global code.
When done, it should look something like:
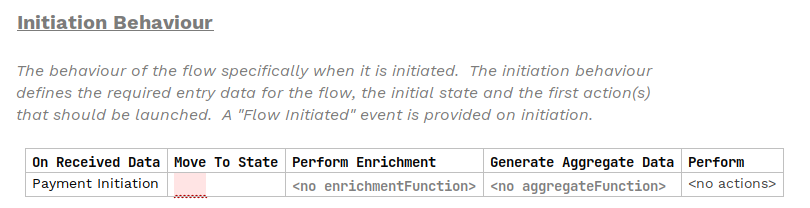
Now let’s move down to the Initiation Behaviour. As per our above-mentioned requirement, we need to receive a pain001. The first thing we’ll do here is use the pre-packaged initiation types by importing them into our solution.
To do this, press Ctrl+R, enter 'ISO Initiation Types' into the search and then select the resulting entry.
|
When importing models into your solution using this method, you may inadvertently import a model that you didn’t intend to, which can result in your application failing to start with errors such as: To remove this, and any other unused models you may have in your solution, click on the |
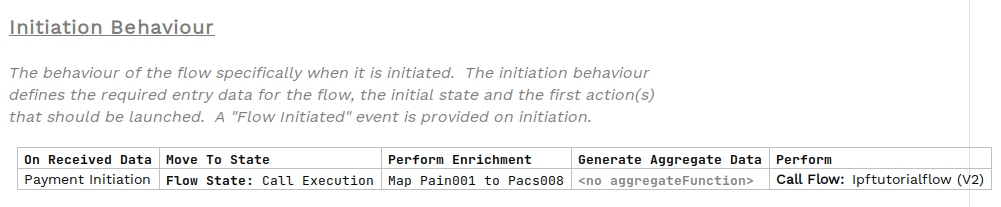
If we go to our Initiation Behaviour on the new flow, we should have the option to select "Payment Initiation" - so let’s do that.
Integrating the Flows
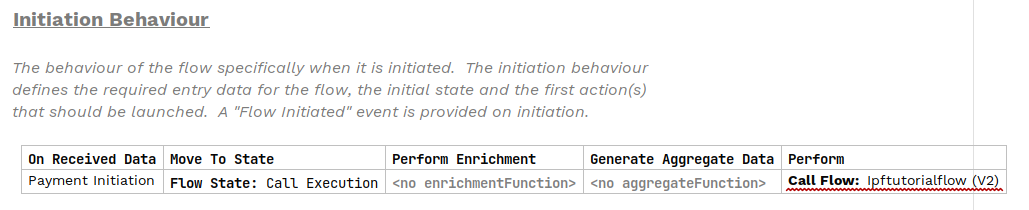
Now let’s integrate the two flows. To do this, we need to use another pseudo-state just like in DSL 5 - Using a Decision. In this case, it’s a "Flow State". So, in the "Move To State" box, select "Create Flow State".
Let’s call our Flow State "Call Execution".
Then in the perform action state, we’ll select "Call Flow" and select our ipftutorial flow. When you’ve done this, it should look something like:
Now we can see that the calling of the flow is underlined as an error. If you validate the flow (ALT+ENTER then Validate Flow) we’ll find:

Let’s work through each of these. Firstly, we see "Called Flow requires missing data: [Customer Credit Transfer]". This is because our execution flow needs to be given a credit transfer object, but at the moment the Initiation Flow doesn’t have one to give. To fix this, we’ll create a new mapping function to map from the pain.001 to the pacs.008. If you need a reminder of mapping functions, review DSL 6 - Mapping Functions. Try and add this new mapping function yourself now. When you’re ready, you can compare to the solution provided below:

We’ll then need to add the mapping function to our Initiation Behaviour. In this case, we’re going to use it as an input enricher:
If we now re-validate our flow, we should no longer see the missing data error.
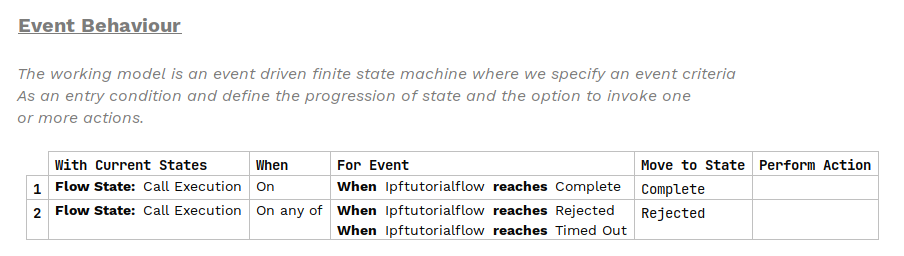
The state issues are due to the fact we’ve not referenced the Complete and Rejected state definitions anywhere in the Initiation Flow yet. To fix this, we’ll begin by adding an Event Behaviour for when we’re in the "Call Execution" state we defined in our Initiation Behaviour. We first add the Complete state in the "Move To State" section of the Event Behaviour and then, in the "For Event" section, we select the special "On Flow State" event type, which provides us with a way to handle the states published by the Execution Flow (similar to how we handled Subflow completion states in DSL 9 - Using Subflows). After implementing this event type, we select Ipftutorialflow (V2) for the "When" part. You’ll notice that when trying to select an option for the "reaches" part, there are no options to choose from!
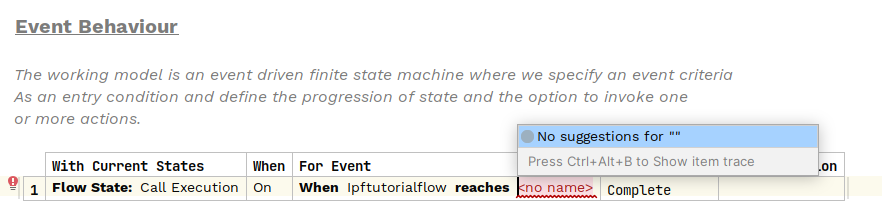
This is because, unlike for subflows, we need to explicitly select which flow states in the called flow (the Execution Flow here) we want to be published and available for any calling flows (the Initiation Flow here).
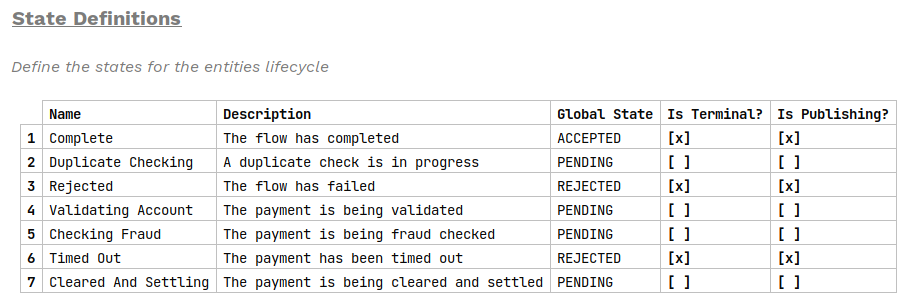
In this instance, we just want to make the terminal states in the Execution Flow available to the Initiation Flow, so we tick the "Is Publishing?" option for the Complete, Rejected and Timed Out states in the Execution Flow:
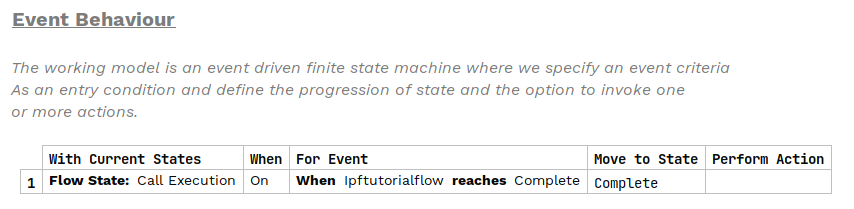
Now we can select the Complete state published by the Execution Flow in the "reaches" part for this Event Behaviour:
We then follow the same process to add Event Behaviour for the Rejected terminal state in the Initiation Flow, which is transitioned to On Any Of the Rejected and Timed Out states being published by the Execution Flow:
Viewing the Flows
That’s all our DSL changes complete. Before moving on though, let’s consider the graph for our new Initiation Flow. As normal, let’s open the Flo Viewer (Tools > Open Flo Viewer):
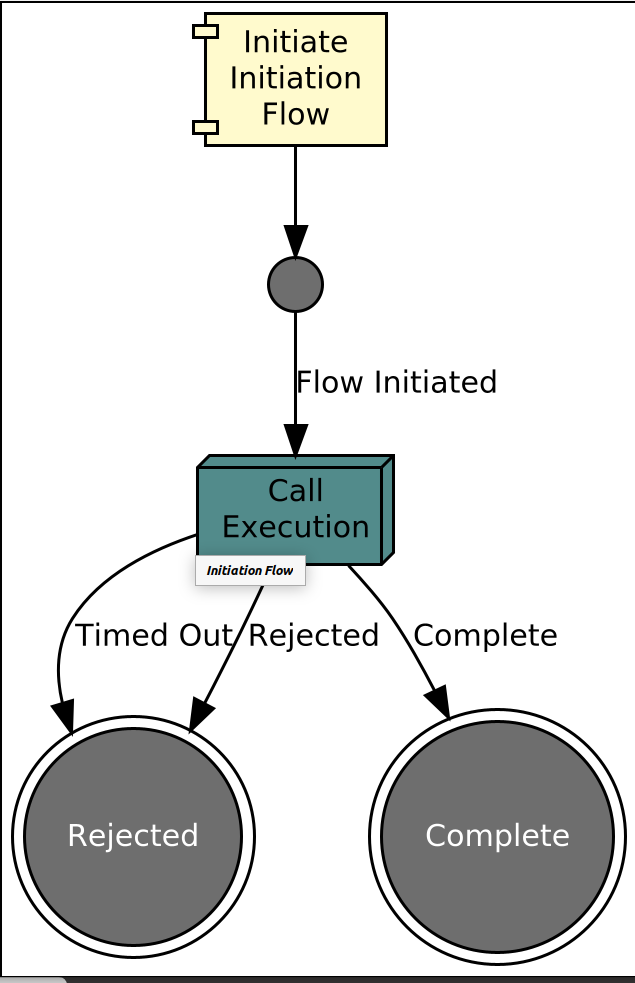
Here we can see that our (called) Execution Flow is represented by the green box in the diagram. Note that, unlike for a subflow, we cannot expand this box, as it is a separate flow and is not considered as an embedded part of the (calling) Initiation Flow.
Java Implementation
Let’s now switch back to Intellij and look at how we plug this into our implementation code. As usual, we’ll start by running a build from a terminal window:
mvn clean installThis will successfully generate all of our DSL related components.
Previously, we were firing our requests directly into the ipf tutorial flow, whereas now we want to call the Initiation Flow. We’ll therefore need to change InitiateIpftutorialflowInput to InitiateInitiationflowInput in the InitiationController (ipftutorialsolution/app/controller/InitiationController.java). The InitiateInitiationflowInput expects a payment initiation object instead of a customer credit transfer, so we need to update our initiation definition accordingly. For now, we can use the Pain001Generator from within the ipftutorial-app to provide this for us.
Try and do this change yourself. When you’re ready, you can compare to the solution provided below:
var samplePain001 = Pain001Generator.generate();
 if (request != null && request.getValue() != null) {
    samplePain001.getPmtInf().get(0).getCdtTrfTxInf().get(0).getAmt().getInstdAmt().setValue(request.getValue());
}

return Mono.fromCompletionStage(IpftutorialmodelDomain.initiation().handle(new InitiateInitiationFlowInput.Builder(entityId)
        .withProcessingContext(ProcessingContext.builder()
                .unitOfWorkId(unitOfWorkId)
                .clientRequestId(clientRequestId)
                .build())
        .withPaymentInitiation(samplePain001)
        .build()).thenApply(done -> InitiationResponse.builder().requestId(clientRequestId).uowId(unitOfWorkId).aggregateId(done.getAggregateId()).build()));
Make sure you remember to clean up the imports in InitiationController after making this change (CTRL+SHIFT+O or CTRL+ALT+O on Windows)!
Next, we have to add the mapping function for the Initiation Flow. Let’s remind ourselves what we were trying to achieve with this function: a way of mapping the received pain.001 to a pacs.008 that we can then send to the Execution Flow.
You could use any approach you want to perform the mapping, but in this case, we’re going to use a pre-built library that provides us with a method to map the pain.001 to a pacs.008. So let’s add that now.
First, we need to add the dependency to the pom.xml within the ipf-tutorial-app module (ipf-tutorial-app/pom.xml).:
<dependency>
    <groupId>com.iconsolutions.ipf.core.mapper</groupId>
    <artifactId>mapping-library-spring</artifactId>
</dependency>
This will load in a Spring based implementation of various ISO to ISO mapping methods. Have a look at the IsoMappingService class that has been brought in, and you can see it has a method to apply a mapping from pain.001 to pacs.008:
public FIToFICustomerCreditTransferV08 mapPain001toPacs008(CustomerCreditTransferInitiationV09 initiation) {
    return (FIToFICustomerCreditTransfer)this.transformationService.mapThenEnrichWithDefault(initiation, FIToFICustomerCreditTransfer.class);
}
Here we can see that it is calling a transformation service to apply the mapping. This is using Icon’s "Mapping Framework" to perform the mapping. The mapping framework can be used to build your own custom mappings, but this is out of the scope of this tutorial section. Note that this implementation assumes as 1:1 ratio between input (pain.001) and output (pacs.008).
As we have chosen to use a spring based implementation, an instance of the IsoMappingService will be automatically injected into the spring context for us. Therefore, we simply need to add it to our ipf tutorial model Domain definition and use it to provide the implementation of our Initiation Flow mapping function port.
Try and do this yourself now, just as we did for the ipf tutorial flow mapping function port previously in DSL 6 - Mapping Functions. When you’re ready, you can compare to the solution provided below:
@Bean
public IpftutorialmodelDomain ipftutorialmodelDomain(ActorSystem actorSystem, IsoMappingService mappingService, SchedulerPort schedulerAdapter) {
    // All adapters should be added to the domain model
    return new IpftutorialmodelDomain.Builder(actorSystem)
            .withTutorialDomainFunctionLibraryAdapter(input -> CompletableFuture.completedStage(new DuplicateCheckResponseInput.Builder(input.getId(), AcceptOrRejectCodes.Accepted).build()))
            .withAccountingSystemActionAdapter(new SampleAccountingSystemActionAdapter())
            .withFraudSystemActionAdapter(new FraudSystemActionAdapter())
            .withDecisionLibraryAdapter(input ->
                    input.getCustomerCreditTransfer().getCdtTrfTxInf().get(0).getIntrBkSttlmAmt().getValue().compareTo(BigDecimal.TEN) > 0 ?
                            RunFraudCheckDecisionOutcomes.FRAUDREQUIRED : RunFraudCheckDecisionOutcomes.SKIPFRAUD)
            .withIpftutorialflowV1MappingAdapter(input -> new ExtractCreditorAccountForFlowIpftutorialflowV1MappingOutput(input.getCustomerCreditTransfer().getCdtTrfTxInf().get(0).getCdtrAcct()))
            .withIpftutorialflowV2MappingAdapter(input -> new ExtractCreditorAccountForFlowIpftutorialflowV2MappingOutput(input.getCustomerCreditTransfer().getCdtTrfTxInf().get(0).getCdtrAcct()))
            .withInitiationFlowMappingAdapter(parameters -> new MapPain001ToPacs008ForFlowInitiationFlowMappingOutput(mappingService.mapPain001toPacs008(parameters.getPaymentInitiation())))
            .withSchedulerAdapter(schedulerAdapter)
            .withCSMServiceActionAdapter(new SampleCSMServiceActionAdapter())
            .withSanctionsSystemActionAdapter(new SampleSanctionsSystemActionAdapter())
            .build();
}
That’s it! Now when our Initiation Flow calls the mapping function, it will take the input pain.001 and return a mapped pacs.008.
Checking Our Solution
As always, let’s start up our application (instructions are available in Reviewing the initial tutorial application if you need a refresher!) and check that our solution works.
Using our trusty curl command:
curl -X POST localhost:8080/submit | jqwe notice that our aggregate id in the response looks a bit different than before:
{
  "requestId": "1a53c51c-c96e-4786-9f3f-d0d91f80b973",
  "uowId": "ba0b5c6c-855b-41ef-98a7-9b0ee121e6da",
  "aggregateId": "InitiationFlow|176a4e23-6299-49be-89bf-891ca12740de"
}
and signifies that it is now the Initiation Flow that’s being hit via the request.
If we now bring up the payment in the Developer GUI and select the flow view (search by unit of work id, click view), we should see:

This is a really important moment to understand. We’ve brought back all the flows associated to our unit of work id here, and in doing so, we’re now seeing two flows rather than one.
Firstly we have the Initiation Flow. Let’s look at its full graph:
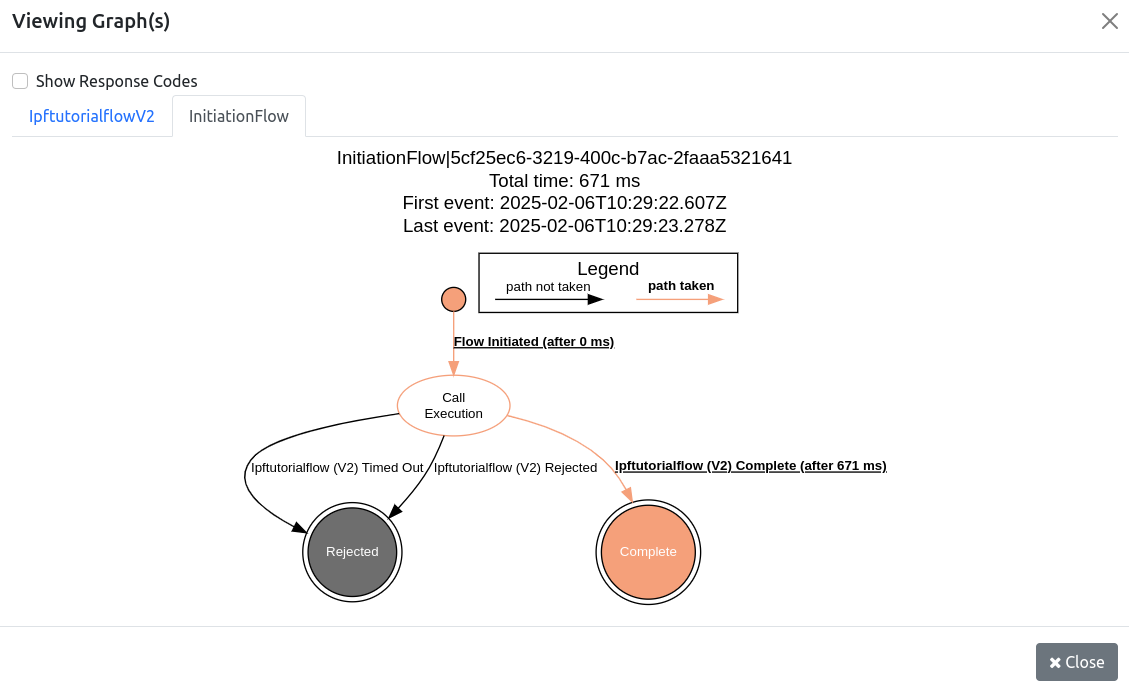
We can see here that it’s calling the Execution Flow AND receiving the completion response back from it. This indicates that our main Execution Flow must have completed correctly. We can validate that by clicking on the graph for the ipftutorialv2 flow and seeing what it looks like:
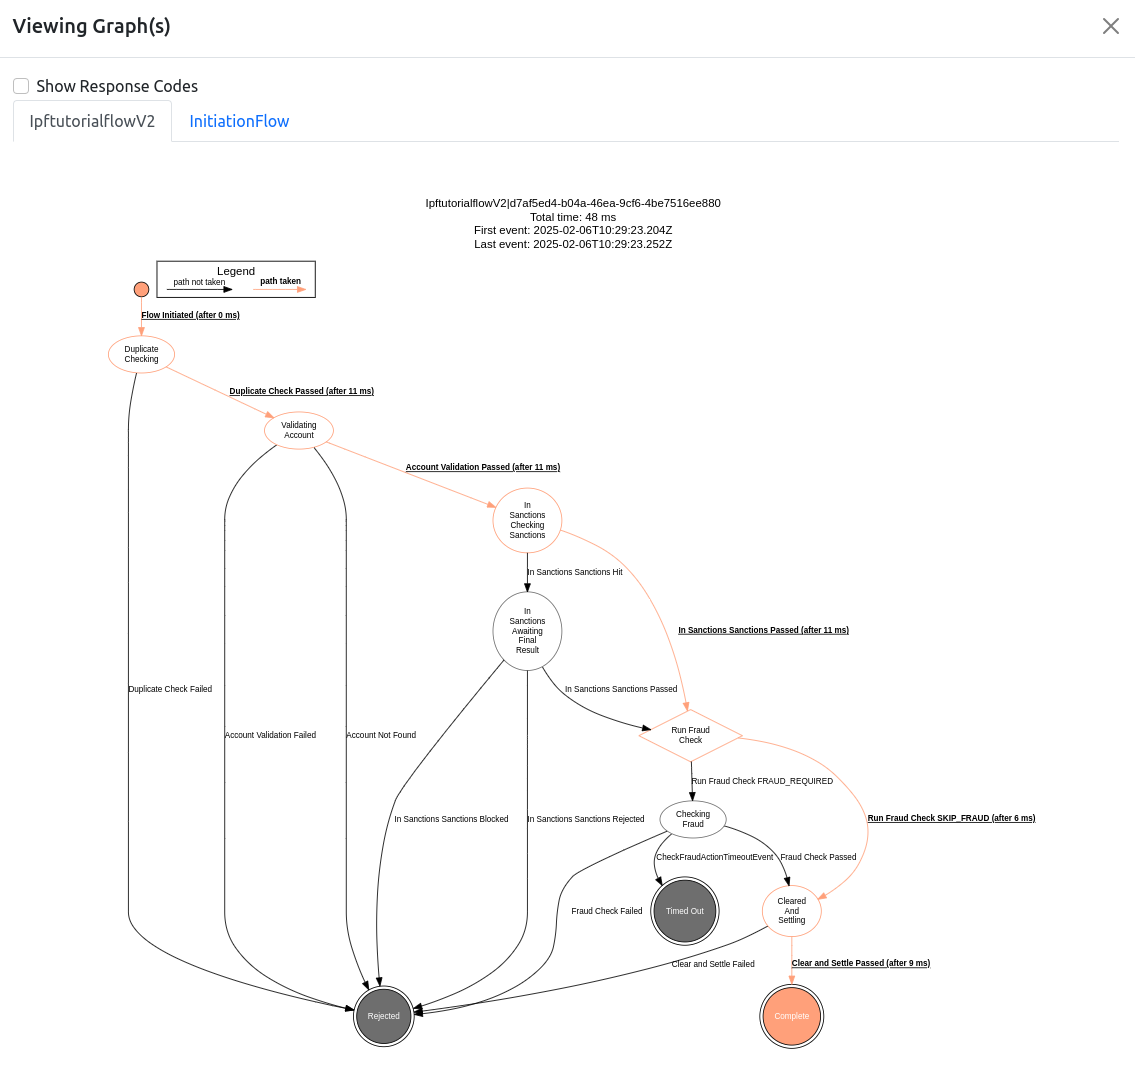
As expected, it has completed successfully too.
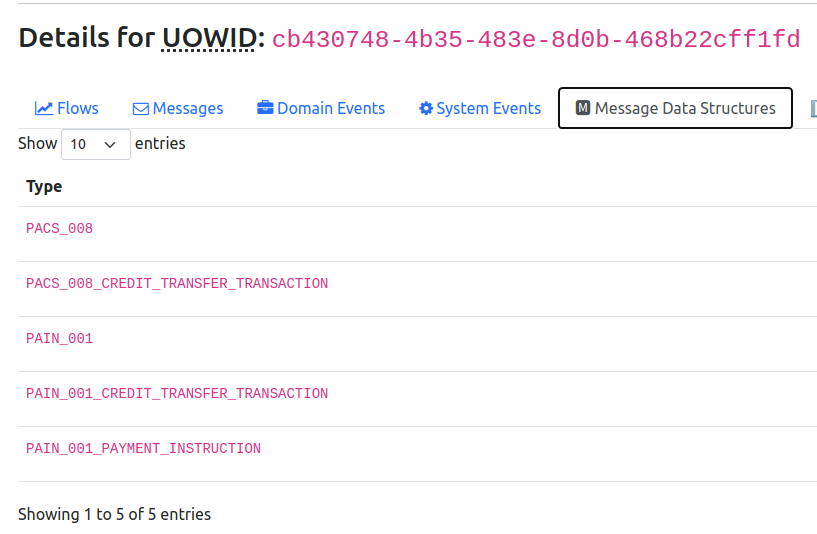
Looking in the Message Data Structures tab, we can verify that the pain.001 file was passed to the flow:
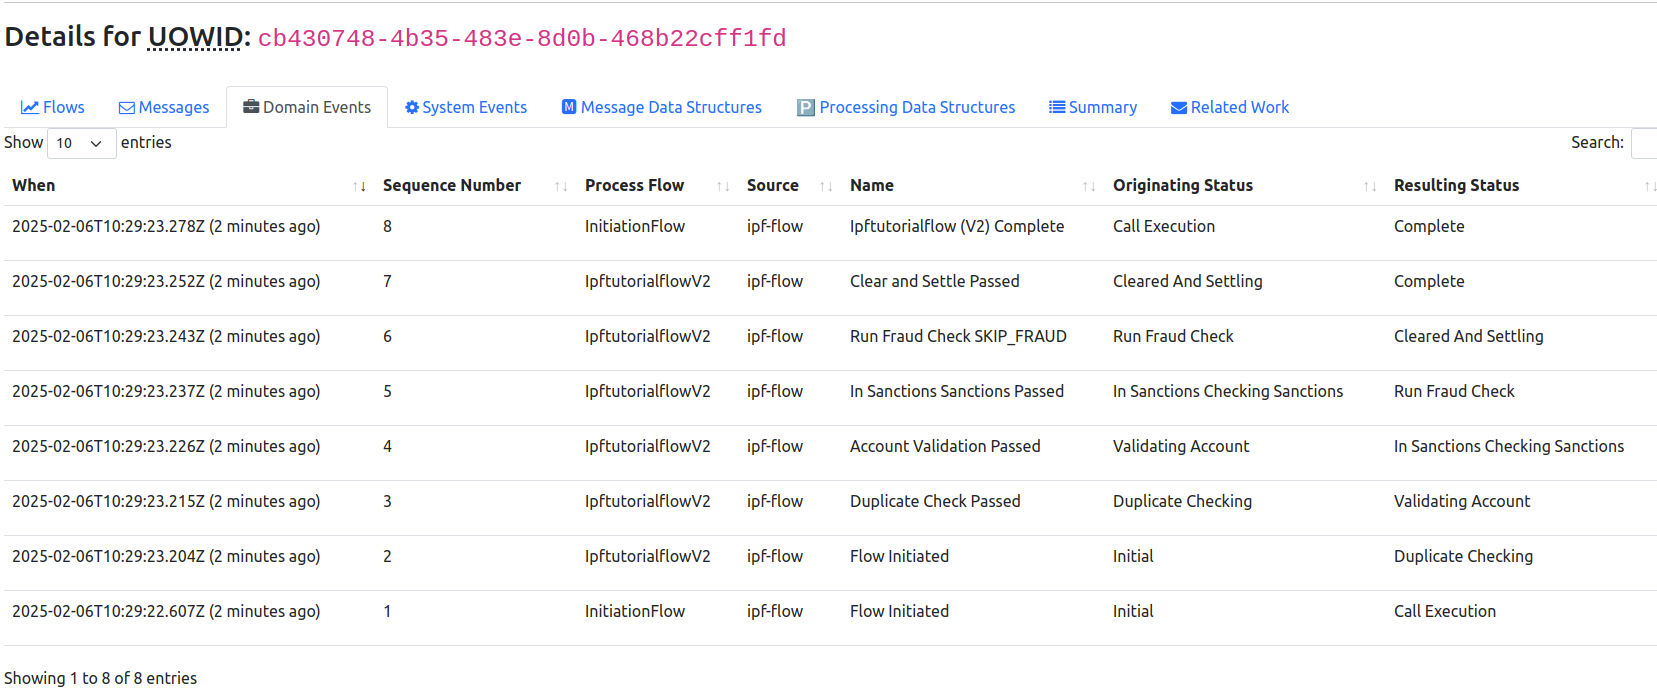
It’s also worth checking the "Domain Events" tab, where you can observe the Events and the Process Flow from which those events originated: