DSL 3 - Using a Domain Function
|
Getting Started
The tutorial step uses the "initial" solution of the project as it’s starting point. If at any time you want to see the solution to this step, this can be found in "add_domain_function" under solutions! |
What is a Domain Function?
A "Domain Function" is any process that you need to undertake within the boundaries of your domain. These could be a number of things like simple calculations, mapping or invoking business rules.
Objective
We want our flow to perform a duplicate check using a domain function. We will send our pacs.008 to the duplicate check, and we expect it to return either a success (not duplicate) or a failure (is duplicate).
DSL Set Up
Adding the Domain Function
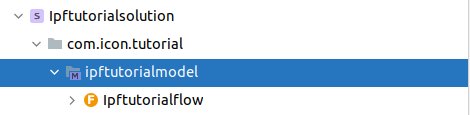
First of all lets create a new domain function library to hold our function within. From the navigator on the left right-click on the model:
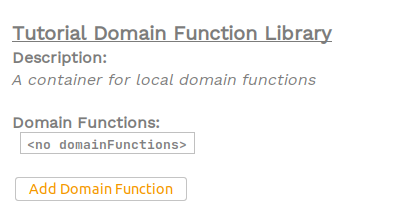
And then, right click, select New > v2Flo > Domain Function Library. When prompted enter a name and description for the library like this:
Now lets click the "Add Domain Function" button, this will populate the table with a new row.
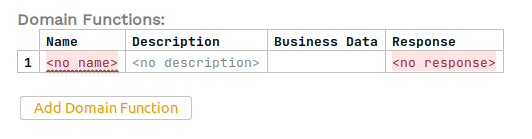
To start with lets add the name and description of our domain function - these are simple free text entry boxes:
-
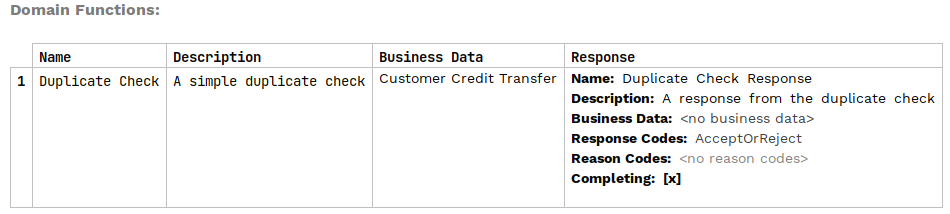
Name - Duplicate Check
-
Description - A simple duplicate check
Next we have to choose the business data we will send to our domain function. In this case we’re going to send the customer credit transfer (pacs.008) itself. To do this we will use the MPS selection capability by pressing "CTRL + SPACE", this will present a list of possible data elements we have available. Select the "Customer Credit Transfer".
|
After using "CTRL+SPACE" to bring up the options, you can start typing and this will narrow down the options to only those that match what you have entered. |
Now we need to define the response to our domain function. to do this we simply press "RETURN" in the response box to generate a new response, and then for the properties of our response:
-
For the name we’ll use "Duplicate Check Response"
-
For the description we’ll use "A response from the duplicate check"
-
For our duplicate check, we are not expecting it to return any business data so we can leave it blank, but here you could add business data simply by clicking "CTRL + SPACE" in the box again and selecting from the business data options.
-
For response codes, as we simply need a positive and negative response we can use the inbuilt "AcceptOrReject" codes. So again here we use "CTRL + SPACE" to bring up the options and choose the "AcceptOrReject" option.
-
For our duplicate check, we don’t need to worry about reason codes so we’ll ignore these for now.
-
For completing flag, we will leave the default selected.
You’ll come back to completion flags in a later tutorial.
If you’ve entered everything correctly your domain function definition should look like:
That’s our domain function defined, so how do we use it within our flow?
Calling the Domain Function
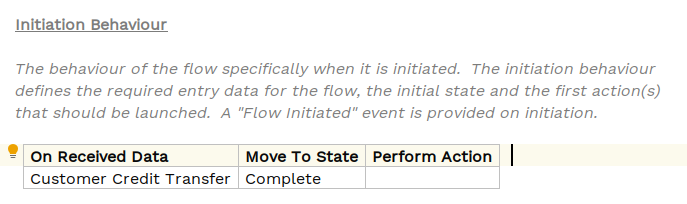
Currently, in our flow, on initiation we simply move directly to the complete state:
Now we’ll change this so that we call our domain function, and if successful we’ll move to the complete state but on failure we’ll move to a new rejected state.
So first of all we’ll need to create two new states:
-
Duplicate Checking - this will be the state the flow is in whilst the duplicate check is being performed.
-
Rejected - this will be our failure state for when the duplicate check has failed.
Let’s add these to the flow by clicking the "Add State" button within the state section of the flow and then setting them up as follows:
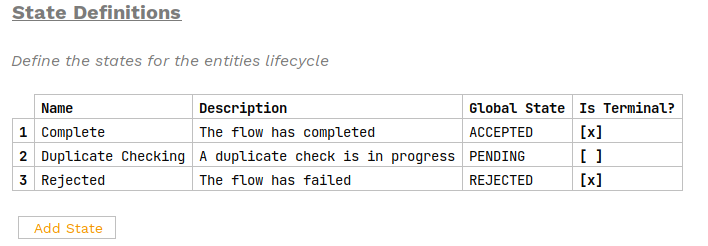
Let’s briefly talk about the other values we’ve set up here:
In our case:
-
The duplicate checking state is in the middle of the flow while the process is still in flight and more work is expected - hence we select the
PENDINGglobal state and mark the state as not terminal. -
The rejected state happens when the flow has finished unsuccessfully, so we use the
REJECTEDglobal state and as no more work is expected we mark it as a terminal state.
The other thing you might notice in the screenshot above (and your implementation) is that the two new states are underlined in red. This is a common theme within MPS that errors are marked as red underlined, if we hover over the underline we can see that both errors are because the states are not yet used in the flow. You’ll fix this going forward.
|
Sometimes it can be hard to hover over the error, in these cases there are two other options: On the right hand side of the flow will be little red lines indicating where in the flow the errors are, hover over these to see the error. If you press "ALT+ENTER" anywhere in the flow we’ll get the intentions popup box, one of the options here will be "Validate Flow". If you select this the flow validation box will come up clearly displaying the errors like: 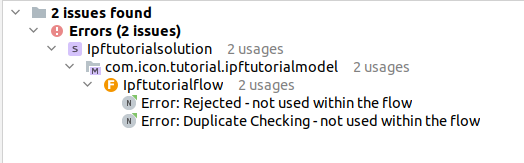
Here you can simply double-click on an error to be taken straight to the point of failure. |
Now lets return to our "Initiation Behaviour" and change it to invoke our domain function. To do this we change the "Move To State" from "Complete" to our new "Duplicate Checking" which should now be available in the options. We then select the "Duplicate Check" function within the "Perform Actions" block, select 'Perform Action' and then choose our new domain function from the list.
Once done it should look like:

So now when our flow receives the customer credit transfer, we will move to the duplicate checking state and call our duplicate check function. The next step is to process the response we receive from it.
Using the Domain Function Response
The first thing we need to define here is the events that will occur when we receive our duplicate check response. In our case we want two events:
-
To signify that the duplicate check has passed and that this is a unique transaction.
-
To signify that the duplicate check has failed and that this is a duplicate of an existing transaction.
Let’s create these two events by clicking the "Add Event" button, in the "Event Definitions" section of our flow.

Note that for these events, we’re not receiving any data so the business data column is blank. We can see again there are errors on our two events, have a look to see why.
Now that we have our events setup, we need to handle the receipt of the actual duplicate check response. The response is a type of input, so to process it we need to go to "Input Behaviour". Let’s click the "Add Input Behaviour" button on our flow, and we should see this:
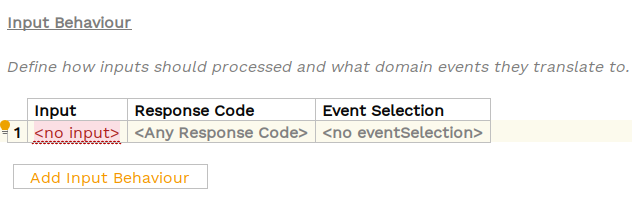
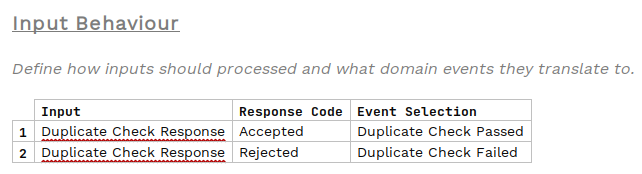
So here for the input we need to enter two input behaviours, one that is based on a successful duplicate check response that forwards to the duplicate check passed event, and the other on the failure case going to the duplicate check failed event. If we set these two up we should see:
Select our "Domain Function Response" (again using "CTRL + SPACE"). For our response code, we’ll start on the "Accepted" case so select that. Then we need to consider the event we wish to raise "Event Selection" (again using "CTRL + SPACE").
Again, check the errors ("ALT+ENTER" → "Validate Flow"), and we’ll see that it’s now prompting us that we need to use these inputs in our flow.

The final step is to add the "Event Behaviours". This tells the flow how to act when it receives a particular event whilst in a given state (or states). So lets click "Add Event Behaviour" and we should see:

So in our case:
-
"With Current State" - this processing the of the success state should only occur when we’re in the "Duplicate Checking State" so we select that.
-
"When" - we’ll leave this as "On" - this means that every time this event is received we will fire the behaviour.
-
"For Event" - that’s our event we’re interested in, so for the success case - "Duplicate Check Passed"
-
"Move to State" - for success, we’re just going to move to "Complete" so select that.
-
"Perform Action" - for now this is the end of our flow, so we’ll leave this blank.
When complete, our new line should look like:

Now we need to add the equivalent block for the failure case, see if you can enter this yourself and when ready compare to the solution below.

Once complete, we should be able to validate our flow again ("ALT+ENTER" → "Validate Flow") and see that all the errors have now been corrected.
That’s it, we’ve now added our new step to our flow.
To see it in diagram form we can open the Flow Viewer (Tools > Open Flow Viewer`): and we’ll see:
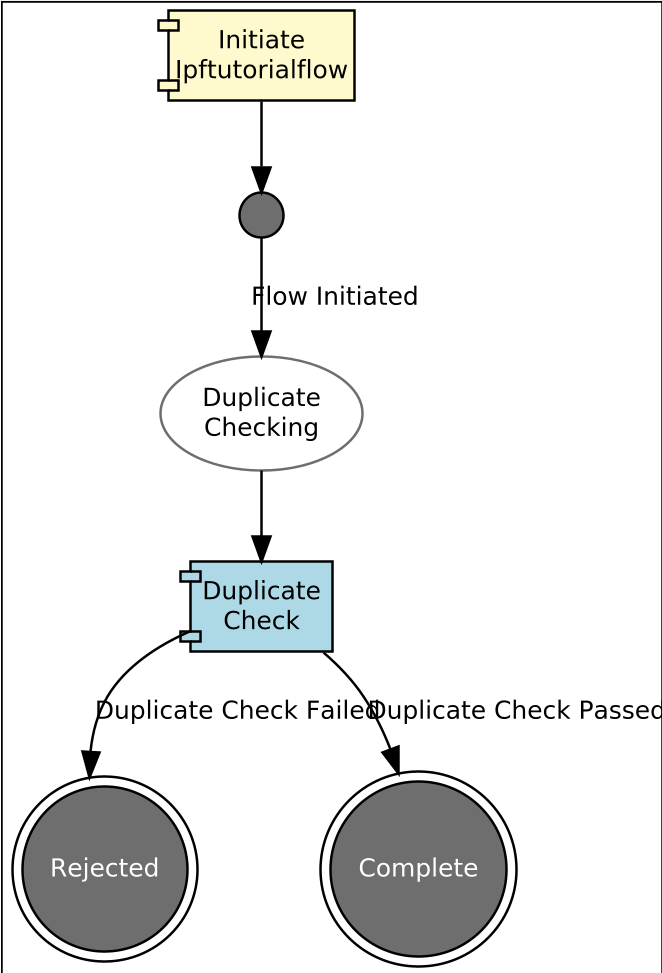
So here we can see that on initiation, our flow will move to the "Duplicate Checking" state, will call the duplicate check function and then depending on the result move to either the "Complete" or "Rejected" state.
Now that we’ve defined our domain function and told our flow how to use it within it’s processing, it’s time to look at how we provide an implementation for the domain function.
Java Implementation
Defining the Adapter
Let’s switch to IntelliJ to work with the Java side.
First we need to regenerate the application code to pick up the changes we’ve made in our DSL editing. You’ll do this by running the following from the root of our initial module (solutions/initial):
mvn clean installThis should take a minute or so as all the code and dependencies are generated. Once it’s complete, navigate to the target directory of the domain-root/domain project, and we should see a few key classes:
   package com.iconsolutions.ipf.tutorial.adapters;

   import com.iconsolutions.ipf.tutorial.actions.DuplicateCheckAction;
   import com.iconsolutions.ipf.tutorial.inputs.DuplicateCheckResponseInput;
   import java.util.concurrent.CompletionStage;

   public interface TutorialDomainFunctionLibraryPort {
      CompletionStage<DuplicateCheckResponseInput> execute(DuplicateCheckAction var1);
   }
This method is the definition of our interface to the domain function. So when the application receives the initiation request, it will make a call to this interface to invoke the domain function and based on the response will raise the appropriate events.
Have a look at the "DuplicateCheckAction" and "DuplicateCheckResponseInput" classes. You’ll see that in our cases, the "DuplicateCheckAction" is a standard POJO containing some flow based metadata together with the pacs.008 input we defined. Similarly, the key element on the "DuplicateCheckResponseInput" is the "AcceptOrReject" response code enum which allows us to define the outcome of our duplicate check.
To use this we need to supply an implementation of the interface.
This implementation could be as complex as required but for simplicity of this tutorial we’re simply going to return a success response.
The implementation needs to be added to the definition of the domain, so let’s start by opening the "IpfTutorialConfig" java class (in the ipf-tutorial-app). The interesting part of this is the configuration of the domain which is currently:
@Bean
public IpftutorialmodelDomain init(ActorSystem actorSystem) {
   // All adapters should be added to the domain model
   return new IpftutorialmodelDomain.Builder(actorSystem).build();
}
With hexagonal architecture, our implementation of the "Port" is called an "Adapter". So let’s add an adapter to this configuration inline by providing a function that simply returns a new CompletableFuture holding a successful duplicate check response input. This is just a simple solution for this tutorial step, we’ll look at providing more enriched functions later in the tutorial series.
Our new code should look like:
@Bean
public IpftutorialmodelDomain init(ActorSystem actorSystem) {
// All adapters should be added to the domain model
return new IpftutorialmodelDomain.Builder(actorSystem)
.withTutorialDomainFunctionLibraryAdapter(input -> CompletableFuture.completedStage(new DuplicateCheckResponseInput.Builder(input.getId(), AcceptOrRejectCodes.Accepted).build()))
.build();
}
That’s all we need to do to add the domain function into our flow execution.
Checking our Solution
As normal let’s now check that the solution works. Start up the application as previously (instructions are available in Reviewing the initial application if you need a refresher!)
Then we can send in a payment:
curl -X POST localhost:8080/submitAnd finally if we bring up the payment in the Developer GUI, using the uowId returned on the above curl POST (e.g. "uowId":"53518cec-5a24-4b9a-8477-8bb5526af959") and bring up the domain events tab (search by unit of work id, click view, click domain events)
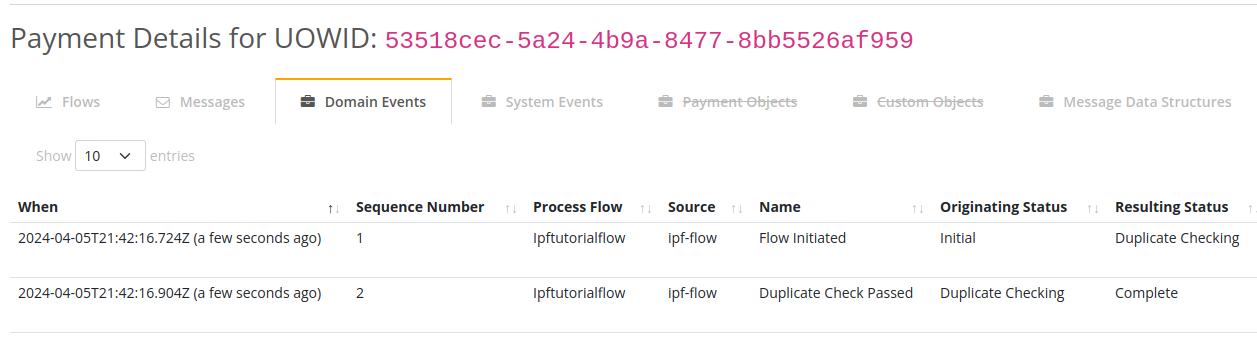
Here we can see that whereas before we only got the "Flow Initiated" Event, we now get both it AND the "Duplicate Check Passed" event! Hence, we know everything is working and our duplicate check is being successfully invoked.