Step 8 - Add a decision
Introduction to Step 8
In this step you will introduce a decision into the flow. Normally, events are generated in response to a request - however there are occasions when the application needs to make a decision. Some examples include checking a payment limit, BIC reachability or, in this scenario, determining whether a payment is an 'on us' payment.
If you assume that, built into the implementation, there is a check on whether the creditor and debtor bank are the same. If they are, then the payment will be processed as a book to book transfer and will not be sent to the CSM.
You will also add a business rule that states that a debtor account reservation reference is required when booking a payment on the debtor account.
To be able to achieve this you will need to do a number of things:
-
Add creditor agent and debtor agent as business data
-
Update the mapping functions to separate creditor agent and debtor agent from the Customer Credit Transfer
-
Extend the flow to include a booking step and add a booking state
-
Add a decision point to decide whether to send a payment to a CSM or straight to booking
-
Ensure the right business data is on the booking request
Add a Booking request and response to the Debtors Accounting System external domain
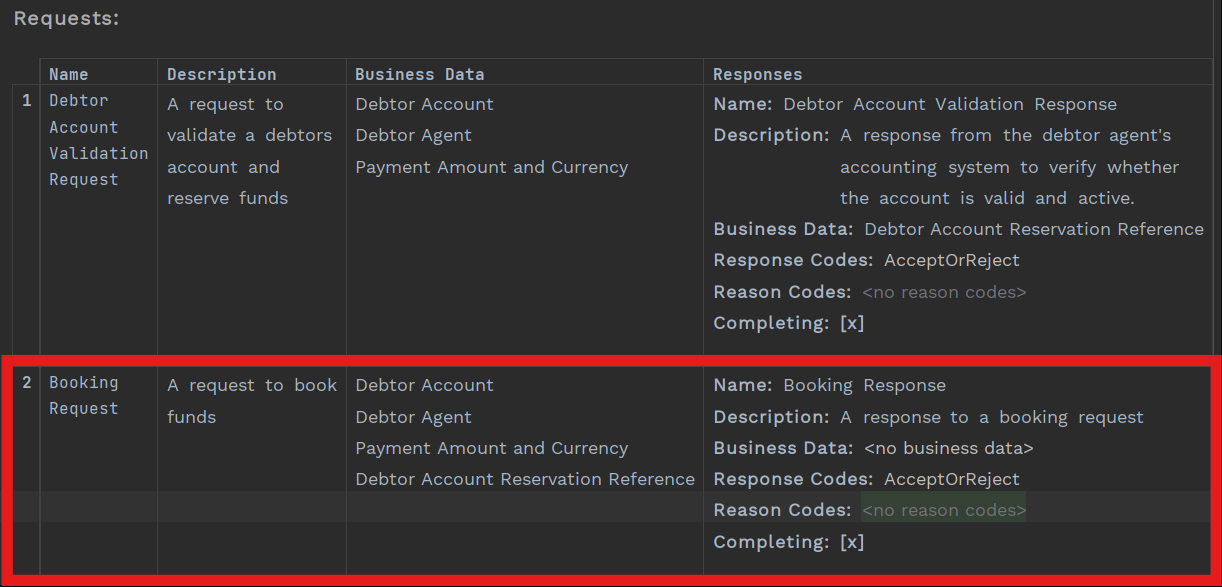
In this scenario, the debtor agent’s accounting system does the booking as well as a debtor account verification, so you need to add a new request for the booking to the external domain.
On this occasion you are assuming that the booking request needs quite a lot of information:
-
The account and BIC to be debited
-
The amount and currency to be debited
-
A specific booking reference provided when account is verified
So you need to go the 'Debtor Agent’s Accounting System' external domain, add a new request and make sure you add the correct business data needed in the request.
Once you have finished the external domain should look like this:
Add a new Booking state
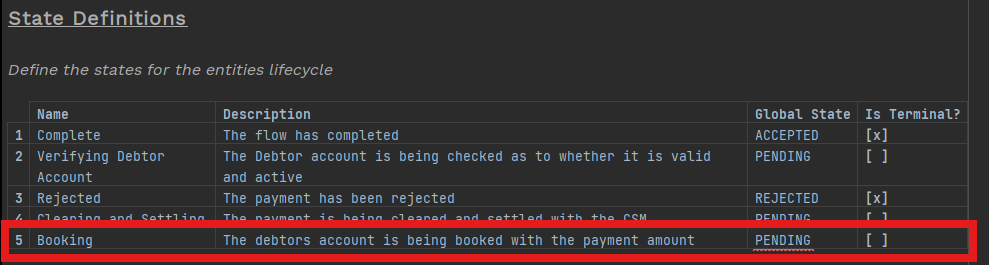
You now need to add a new state to represent when the account is being booked.
Open up the flow, then add a new 'Booking' status. This will not be terminal state so 'Is Terminal' should be false.
Add two new Booked events
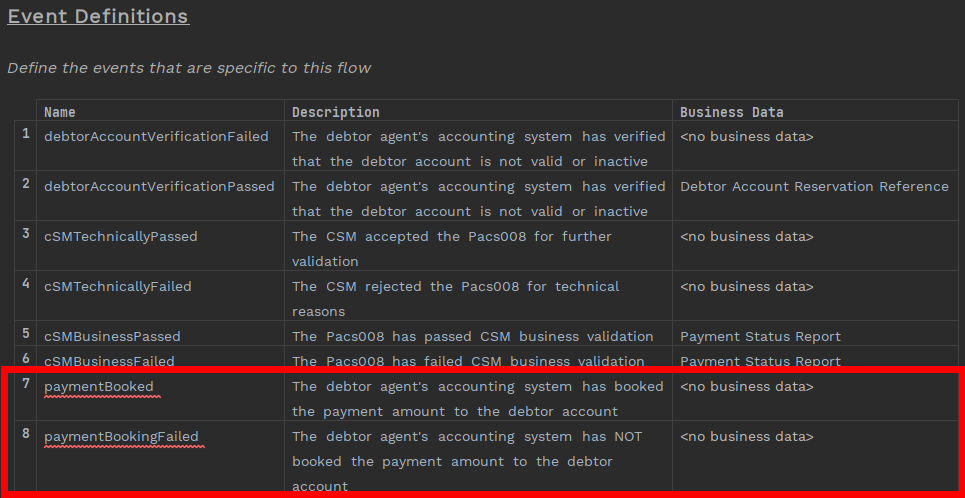
Earlier you added the new booking request. This request has two responses (accepted or rejected), and now you need to add the new events that are triggered by the response.
-
Payment Booked
-
Payment Booking Failed
Once you have added the new events, the event definition section of the flow should look like this:
Update Input Behaviour with the two responses to a Booking request
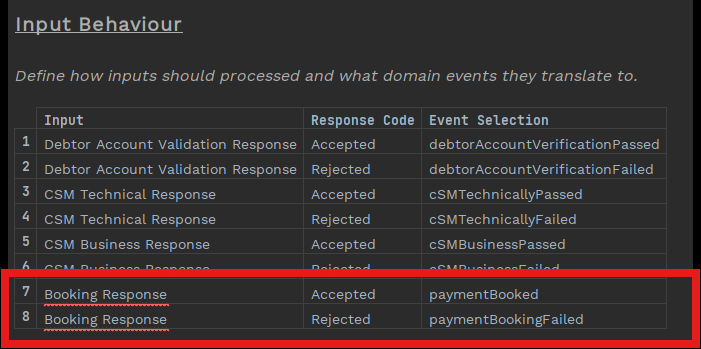
Now you have defined the events, you can now update the input behaviour section of the flow to associate the booking response (i.e. the input) to the events you have just created.
Once you have finished, the input behaviour should look like this:
Before you finish updating the flow, you need to create and populate a decision library and update the business data library and mapping function to supply the decision with the data that it needs. The decision library holds the internal decisions made by the solution you are building.
A DECISION can have one or more OUTCOMES. These outcomes are then fed into the state machine (i.e. the flow) when defining event behaviour.
Update Business Data Library
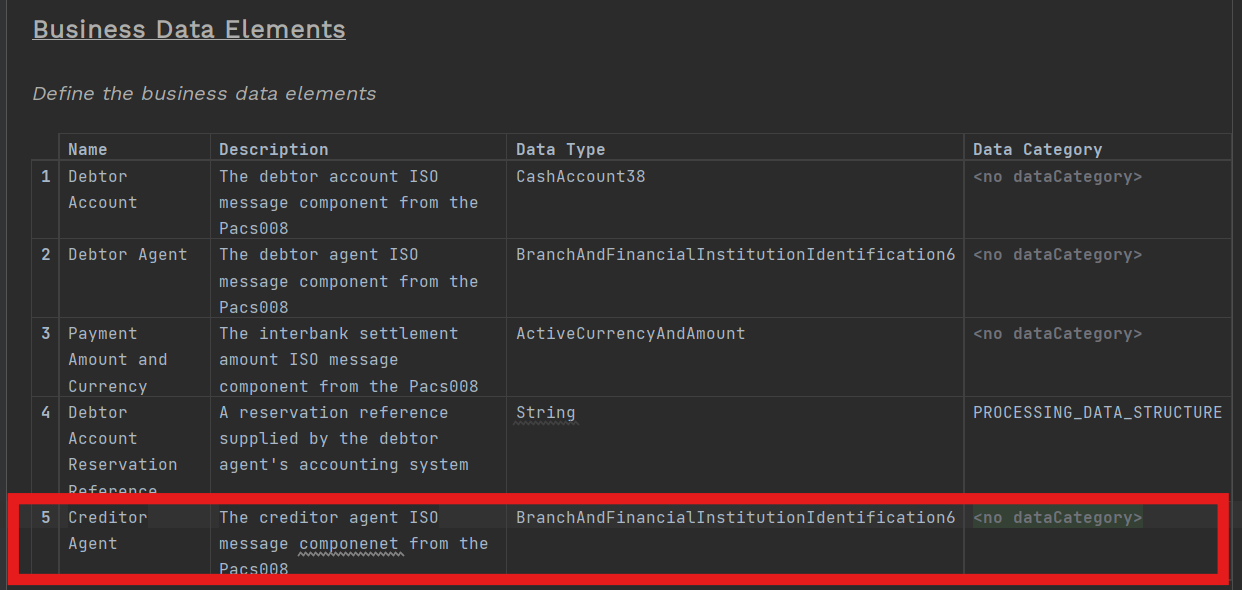
In our scenario there is a check on whether the creditor and debtor bank are the same. The debtor agent is already in the business data library, so let’s add the creditor agent too so that both creditor and debtor bank details are available to use by the decision.
Open up the 'Outbound Payment Flow Business Data Library' and add the creditor agent.
Update Mapping Function
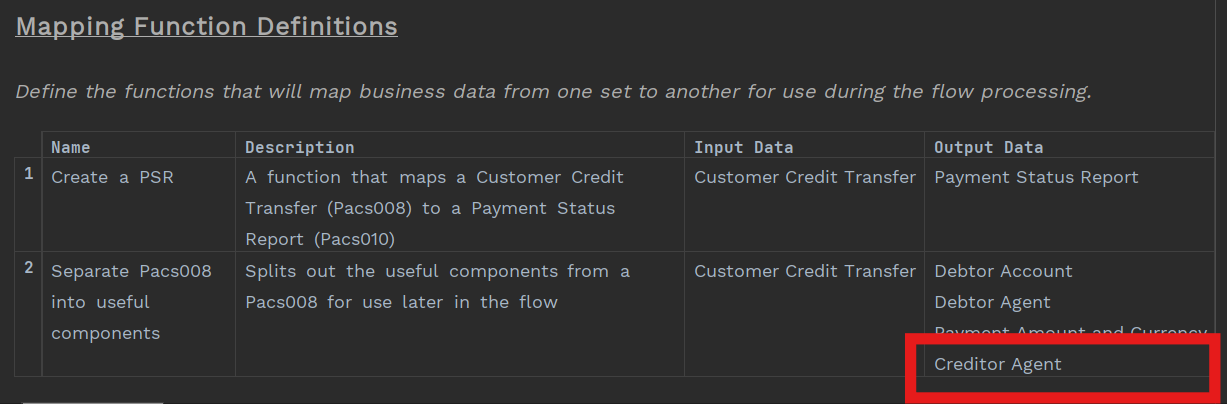
Now you have the extra business data that you need, let’s update the mapping function that separates the Pacs008 so it is available to the flow.
Open up the 'Outbound Payment Flow', navigate to the mapping function, and then add 'Creditor Agent' to the output Data for the 'Separate Pacs008 into useful components' function.
Create Decision Library
Right-click on the model, and then select New>v2Flo>Decision Library.
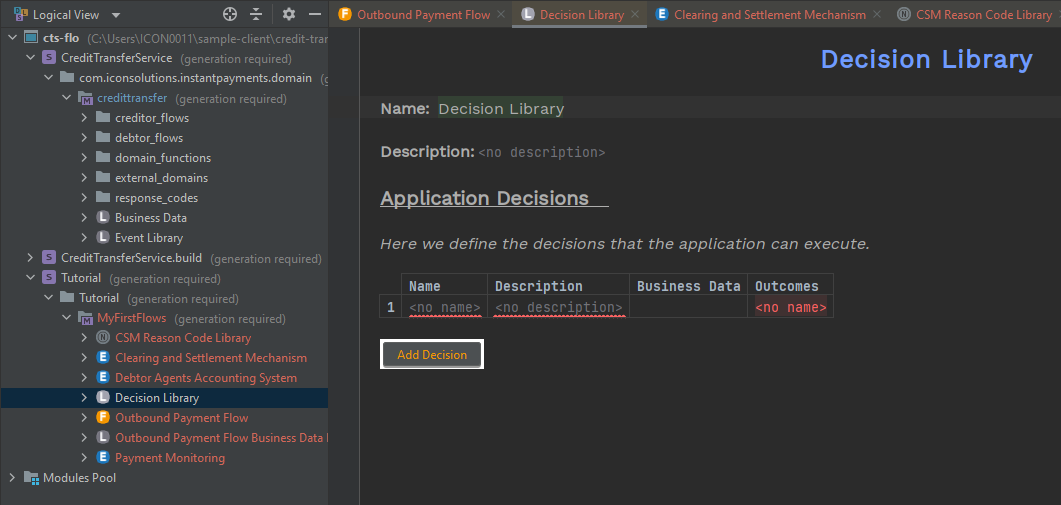
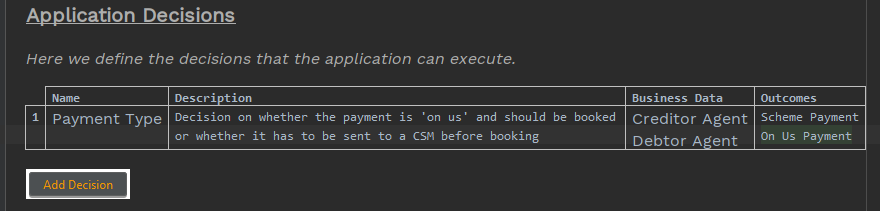
Now click on the 'Add Decision' button to create a decision.
The decision will determine the payment type to use, and will compare the creditor agent and debtor agent to determine if they are the same organisation so you will need to ensure that the agent business data is available for the application by specifying it as business data.
Luckily you have already added creditor agent and debtor agent as business data in an earlier step, so you can just select them using Ctrl+Space while the cursor is in 'Business Data'.
Finally, specify what the possible outcomes (i.e. results of the decision) will be. For your scenario, the payment type will be identified as either a payment that will be sent to the CSM (a 'Scheme Payment') or one that will be a book to book transfer (an 'On Us Payment')
Add the two possible outcomes to the application decision you just created by placing the cursor in the 'Outcomes' cell, press Ctrl+Enter and select the 'Decision Outcome' option. From there you can add the outcomes to the cell using free text.
That’s the decision library created. Now you can add this to the flow as part of event behaviour.
| The logic itself needs to be implemented in Java or potentially using the rules framework. |
Update Event Behaviour to finish the flow
So you can now tie in the decision to the flow.
Create a Decision State
Decisions are considered as pseudo states.
In your use case, once the 'Debtor Account Verification' has passed, then the application is going to work out what type of payment it is before pushing it down one of two routes, so you need to use the 'Debtor Account Verification Passed' event to move to a decision state.
Press Ctrl+Space in the 'Move to State' cell for the first event behaviour and select 'Create Decision State'.
Your event behaviour should look something like this:
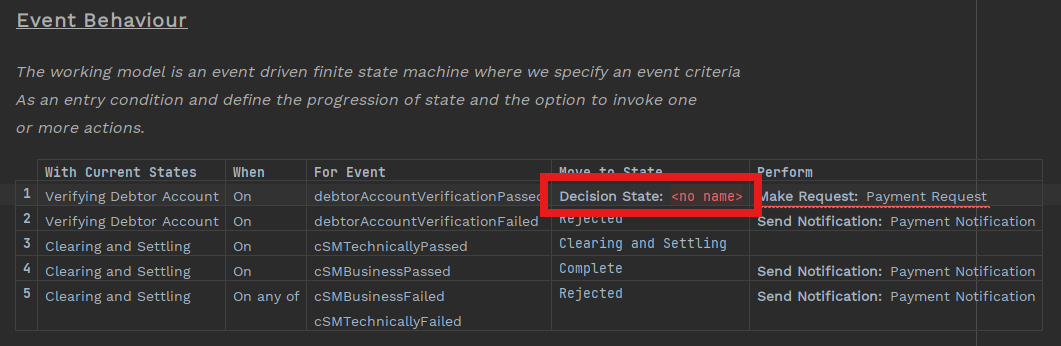
At this point you are presented with the option to name your decision. This is important, because a single decision can be used in multiple places in a single flow, or even in different flows and subflows.
In order for the flow graph to be understandable (and for the flow to build correctly) - each decision usage requires a unique identifier, which you will be specifying as the decision name here.
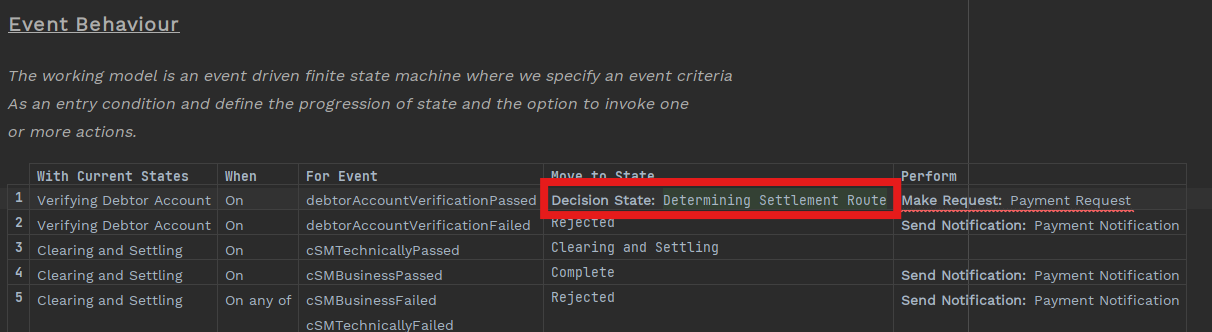
In your use case you will not be reusing the decision, so you can simply name it 'Determining Settlement Route'.
Add Decision Action
Now you have created the decision state, you need an action that will generate the code to enable the decision to be called.
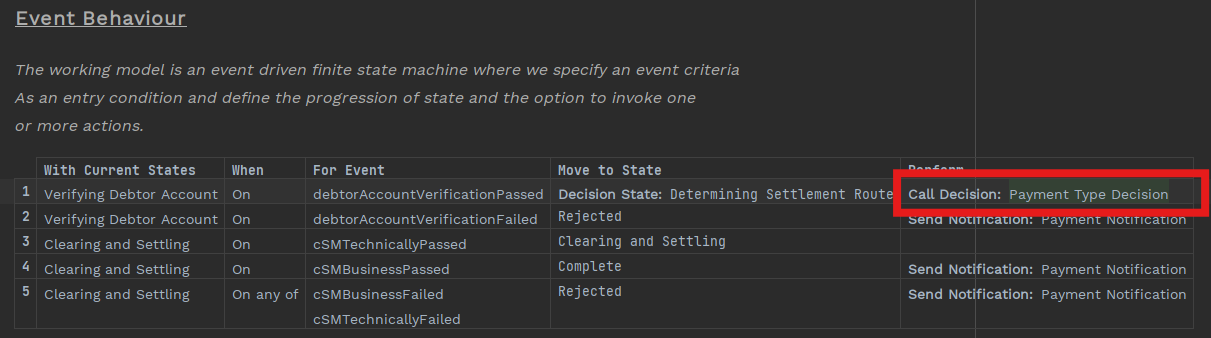
Delete the 'Make Request' from the 'Perform Action' cell, and then press Ctrl+Space - you will be presented with the only available option, which is a 'Routing Decision'.
Select this option and you will be presented with decisions in the decision library (in your case, that is just one decision).
Select the 'Payment Type' decision.
Event behaviour should now look like this:
You now need to add the two possible outcomes:
-
If the outcome is an 'On Us payment', then you need to generate the booking request, bypassing the CSM.
-
If the outcome is a 'Scheme payment', then you need to generate the payment request.
Add New Event Behaviour for the Decision Outcome
Now you have moved to the Decision State after Debtor Account Verification has passed, you need to add the outcomes of the decision to the Event Behaviour.
Add two new Event Behaviours:
-
Set the 'With Current State' to Determining Settlement Route in both.
-
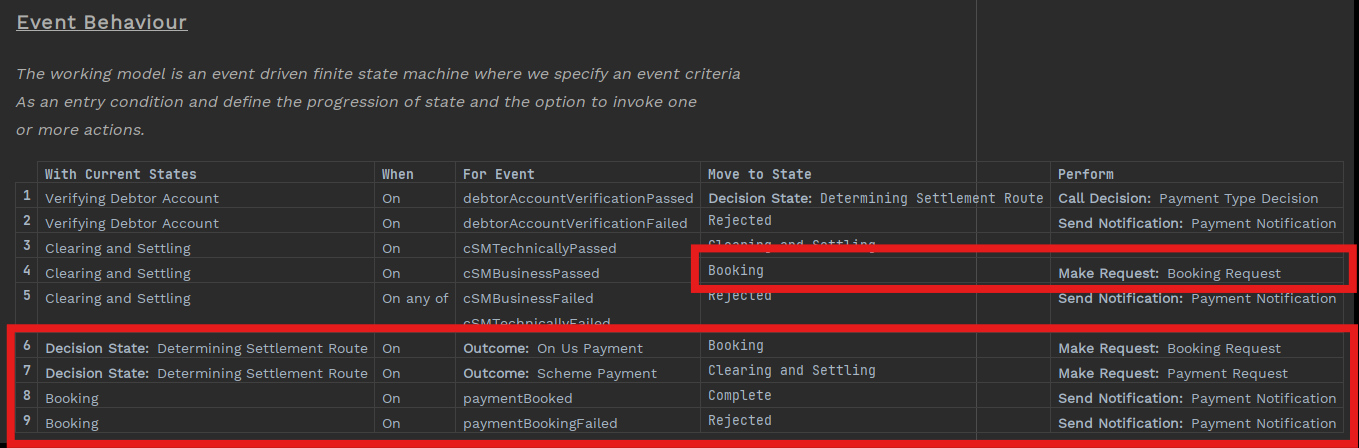
For the first new behaviour set the 'For Event' to 'Outcome:On Us Payment'.
-
Since it is an 'on us' payment then you are going straight to booking - so set the 'Move to State' to 'Booking' and add 'Make Request: Booking Request' in the 'Perform Action' cell.
-
-
For the second new behaviour set the 'For Event' to 'Outcome:Scheme Payment'.
-
Since it a 'scheme' payment you are going to send the payment to the CSM - so set the 'Move to State' to 'Clearing and Settling' and 'Make Request: Payment Request' in the 'Perform Action' cell.
-
Your event behaviour should now look like this:

Add New Event Behaviour for the new Booking state
Add two new event behaviours:
-
Set the 'With Current State' to 'Booking' in both.
-
Add the state transitions to either 'Complete' or 'Rejected' depending upon whether the event is 'paymentBooked' or 'paymentBookingFailed'.