Reviewing the initial tutorial application
|
Getting Started
The tutorial step uses the "initial" solution of the project as it’s starting point. You can open it by selecting <install-root>/solutions/initial/pom.xml in Intellij. |
Business Orientation
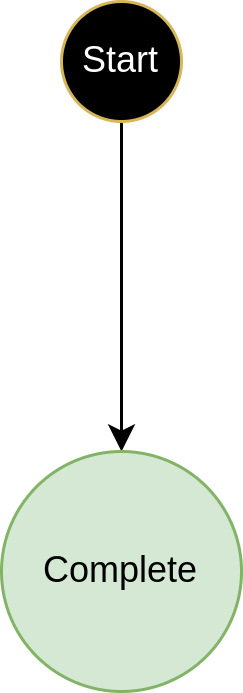
This tutorial uses a common application which we will build upon in a step by step manner to investigate different features and capabilities of the IPF Platform. The initial application is a very simple flow that simply does:
You’ll move on from here to add calls to other services whilst looking at advanced concepts like reusability and versioning.
Understanding the application structure
You’ll now have a brief dive into the actual application and the way it’s structured.
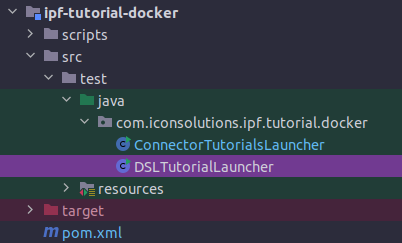
Let’s start by looking at the application we have downloaded. If we open the project in Intellij we can see that it has 3 major folders inside it:
-
domain-root - this contains all the artefacts relating to the DSL and flow definitions.
-
ipf-tutorial-app - this contains all the application runtime code, this is the code that will be deployed and use the IPF generated domain to process transactions.
-
docker - this contains all the script and configuration needed to run the application in a docker environment.
When the application receives a request it will perform a number of simple steps:
-
It will generate a unique ID for the process.
-
It will initiate a new flow.
-
It will generate a new FlowInitiated event.
-
It will move the flow to the "Complete" state (note that this is simply because of how our flow is currently configured, this is investigated in more detail in )
The application is also using the processing data module within IPF. You’ll look at this in greater depth in a later tutorial, but for now what we need to know is that the data being generated by IPF is being packaged and sent out over HTTP. In our case, we’ve added a small "ipf-developer-app" container that has a published endpoint for that data to be pushed to. This we’re using as a way to make it easier to see and understand how our IPF Application is working.
Let’s now set the application up to actually process a payment.
Application Configuration
The application uses hocon to define properties. You can see the application configuration within the src/main/resources directory of the main ipf-tutorial-app project. In there let’s have a look at a few settings within the application.conf file:
akka { (1)
  cluster {
    seed-nodes = ["akka://"${actor-system-name}"@0.0.0.0:"${akka.remote.artery.canonical.port}]
    sharding.remember-entities = on
  }
  remote.artery {
    canonical.port = 55001
    canonical.hostname = 0.0.0.0
    bind.hostname = 0.0.0.0
    bind.port = 55001
  }
}

ipf { (2)

  mongodb.url = "mongodb://localhost:27017/ipf" (3)

  processing-data.egress { (4)
    enabled = true
    transport = http
    http {
      client {
        host = "localhost"
        port = 8081
        endpoint-url = "/ipf-processing-data"
      }
    }
  }

  system-events.exporter { (5)
    type = ipf-processing-data-egress
  }

  behaviour.retries { (6)
    initial-timeout=5s
  }

}

management.endpoints.web.exposure.include = "*"
Let’s take each section of this and work through what it is telling us.
| 1 | Firstly we have the akka specific properties. In our case the key here is that we define that we want to run with just a single node. In a production environment, we’d want to consider our options for clustering but for now we just use this simple approach. The config section here could be used as a base for your own projects and indeed is the same as that produced by the IPF Scaffolder. |
| 2 | All the "IPF" specific properties go within the ipf section here. There are a few different properties so let’s consider each in turn: |
| 3 | The first property we come across is ipf.mongodb.url, in the tutorial case we’re using mongo as our database provider so this is simply the connection url. We’re assuming in the above that there will be a mongo service running on localhost:27017, |
| 4 | Next we come to the "processing-data.egress". The processing data egress module is used to export data from IPF onto a desired location, for example a Kafka topic or an HTTP endpoint. Here we are defining:
|
| 5 | The next section is for "system-events.exporter". System events are IPF’s way of emitting information about things that are happening within IPF itself. You’ll come onto these in greater depth later. For now the key is simply that we are setting ipf.system-events.exporter.type to be "ipf-processing-data-egress", telling our application to send the system events to the processing data setup we have deployed. |
| 6 | The next configuration is the "behaviour.retries.initial-timeout". Behaviour retries are a mechanism to resubmit commands into IPF if for any reason a reply has not been received back. The default configuration is set to wait 100ms before a reply, however here we’re increasing this to 250ms simply under the assumption that this tutorial is being run on a lower grade machine and hence to give it a little more time to complete any requests. |
| We will use the "ipf-developer-app" to consume the data generated from the processing data services. This is a lightweight simple example application that provides a view across the data generated by IPF. It’s not a production utility, but is used to assist development. Details to use the developer app are listed here: Running the developer app. |
Supporting Environments
In order to run the tutorial a number of supporting components are required.
-
For DSL tutorial steps, a mongo database together with a running instance of the IPF developer app.
-
For Connector tutorial steps, in addition to the base mongo and developer app we also need the different instances of the supporting simulators we will need:
-
Payment Initiation
-
Sanctions
-
Fraud
-
To use these there are a couple of options provided, firstly to run using a supporting docker environment and secondly to run using a set of runnable jars.
Running the supporting docker environment
As discussed in the tutorial summary, the base tutorial project has an "ipf-tutorial-docker" project. This can be simply built by running a maven build from that folder:
mvn clean installAfter this has run there are two methods of starting our docker environment. Firstly there are two java runners provided:
The 'DSLTutorialsRunner' can be run and this will build a docker environment containing mongo and the ipf-developer-app ready for you to use. This will be needed when running the "DSL" tutorials.
The 'ConnectorTutorialsRunner' can be run and this will build a fuller docker environment containing mongo, the ipf-developer-app and all the simulators ready for you to use. This will be needed when running the "CONN" tutorials.
Alternatively if you look in the target directory then under the docker folder you can see the two basic docker-compose files for both of these options.
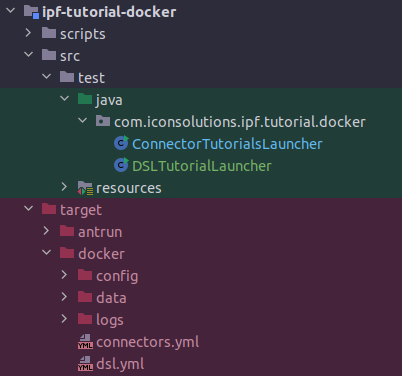
| Also in the target directory you’ll find the docker/logs directory where all the logs for the various components will be written should they be needed. |
| There is also a script provided in the scripts directory of the main ipf-tutorial-docker, 'clean-all.sh'. This can be run to completely reset your docker environment and remove all the data to date. |
Running the supporting runnable jars
If you do not want to use a docker environment, we can bring it up as a traditional spring boot application and use some existing infrastructure, for example a shared mongo environment.
For the DSL tutorials, you’ll just need mongo and the runnable ipf-developer-app.
Running the ipf-developer-app
Firstly, you’ll need to download the appropriate version of the developer app from ipf-releases Nexus repository, for example version 2.1.2 can be found here:
|
You must choose and download a version of the ipf-developer-app that is compatible with the IPF Release you are using. Please check and replace the version numbers based on the IPF release documentation and/or the details for your target environment! |
To run this, we simply need to fire the following command, replacing {version} with the version that you are using (e.g. 2.1.2):
java -cp "ipf-developer-app-{version}-runnable.jar:config" -D"ma.glasnost.orika.writeClassFiles"=false -D"ma.glasnost.orika.writeSourceFiles"=false -D"config.override_with_env_vars"=true -D"loader.main"="com.iconsolutions.ipf.developer.app.IpfDeveloperApplication" "org.springframework.boot.loader.launch.PropertiesLauncher"|
If using windows, we need to replace the first |
This will run with default configuration, namely:
-
ipf.mongo.url = "mongodb://ipf-mongo:27017/ipf" -
server.port = "8081"
|
It is possible to override these values by adding an |
After spinning up a mongo environment and the ipf-developer-app, we are now ready to run all the 'DSL' tutorials.
Running the runnable simulators
To run the other connector based tutorials we will also need the simulators. Just like the ipf-developer-app these are also available in nexus.
The configuration for each of these can be found alongside that of the developer app.
| Each of the runnable application comes along with a 'Readme' file that explains how to start them. |
Building the tutorial application
To build the application we use Maven, we’ll need to run this from the root of our initial module:
mvn clean installThe build will use the defined flows to generate application code. The generated code can be seen in a number of key places:
-
The generated domain code will be in "domain-root/domain/target" - this will include all the Akka event sourced behaviour implementations together with all the ports that the domain will communicate with.
-
The generated test code will be in "domain-root/test/target" - this contains the generated test framework code to provide a testing capability against our domain.
-
The generated sample adapters will be in "domain-root/sampleapp/target - this contains a set of simple sample implementations for all the generated ports. These can be used to quickly bootstrap a complex flow into being executable. At this stage as our flow is so simple, all we have in here is an example configuration file.
Running the tutorial application
Once we have the appropriate supporting environment up and running we need to start the application. The simplest way to do this is just run the application as a simple spring boot application. In intellij we can do this by simply right-clicking on the main 'Application.java' file and choosing 'Run Application'.

Assuming that our properties our correct, then the application will start and we’re ready to go.
| By default, the tutorials have been configured to use the supporting docker environment. If you are running against your own environment, then you may need to change the configuration. In particular for example you may need to switch the mongo URL you are using. See the config explanation above for details. |
Building the tutorial as a docker image
If we want to, we can also build the tutorial solution itself as a docker image. To do this we go to the root of the solution and run the following command:
mvn clean install -rf :ipf-tutorial-app -PcontainerThe key things to note here is the -Pcontainer flag, this tells Maven to activate the profile that contains the docker image generation plugin. Go and have a look at the pom file of the ipf-tutorial-app to see how this is done!
|
Note in the above the use of -rf :ipf-tutorial-app → this tells maven to only rebuild the ipf-tutorial-app project. You could rebuild everything and skip this, but since we just generated all our code a moment ago there’s no need to rebuild those projects here. |
The docker image that is generated can then be used as part of a docker environment by adding this to your docker-compose file:
ipf-tutorial-app:
  image: ipf-tutorial-app:latest
  container_name: ipf-tutorial-app
  ports:
    - 8080:8080
    - 8559:8558
    - 5006:5005
    - 55002:55001
    - 9002:9001
  volumes:
    - ./config/ipf-tutorial-app:/ipf-tutorial-app/conf
    - ./logs:/ipf/logs
  environment:
    - IPF_JAVA_ARGS=-Dma.glasnost.orika.writeClassFiles=false -Dma.glasnost.orika.writeSourceFiles=false -Dconfig.override_with_env_vars=true
  depends_on:
    - ipf-mongo
    - ipf-developer-app
  healthcheck:
    test: [ "CMD", "curl", "http://localhost:8080/actuator/health" ]
A few things to note around this setup:
-
We expose the port "5006" - this is the "debug" port, it will allow us to attach a remote debugger.
-
We map the "logs" directory on our local machine to the "/ipf/logs" directory on the running docker container. This means that we can see all the application logs at _docker/logs/
-
The configuration will live at _docker/config/ In here we will need to provide config overrides that are specific for the docker environment we need to run. To do so create an application.conf file and add the properties you need.
For example, if you run the tutorial app as a docker container alongside the docker supporting docker environment above, then you’ll need to change the hosts to use the docker host names. So your application.conf file would look like:
ipf {
  mongodb.url = "mongodb://ipf-mongo:27017/ipf"
  processing-data.egress {
    http {
      client {
        host = "ipf-developer-app"
      }
    }
  }
}
Running a payment
Now that we’ve started our application and supporting environment, it’s time to run some payments through it. Let’s start by taking a quick look at the InitiationController.
This class has been built simply as a quick way to interact with the IPF application system and depending on your solution requirements may well not be needed. It uses a simple rest endpoint to provide healthcheck and submission capabilities. In a "real" application, initiation may come from many different channels and over any number of protocols.
If we look at the main initiation method on the controller:
@RequestMapping(value = "/submit", method = RequestMethod.POST)
public Mono<InitiationResponse> submit(@RequestBody(required = false) InitiationRequest request) {
    final String unitOfWorkId = UUID.randomUUID().toString(); // this is the common id used to link all flow elements and uniquely identify a request.
    String clientRequestId = request != null && request.getRequestId() != null ? request.getRequestId() : UUID.randomUUID().toString();  // this is a client id (if required)
    String entityId = UUID.randomUUID().toString(); // this is the entity id to uniquely identify the current flow.
    var dummyPacs008 = PayloadGenerator.generatePacs008();
    if (request != null && request.getValue() != null) {
        dummyPacs008.getCdtTrfTxInf().get(0).getIntrBkSttlmAmt().setValue(request.getValue());
    }
    return Mono.fromCompletionStage(IpftutorialmodelDomain.initiation().handle(new InitiateIpftutorialflowInput.Builder(entityId)
            .withProcessingContext(ProcessingContext.builder()
                    .unitOfWorkId(unitOfWorkId)
                    .clientRequestId(clientRequestId)
                    .build())
            .withCustomerCreditTransfer(dummyPacs008)
            .build()).thenApply(done -> InitiationResponse.builder().requestId(clientRequestId).uowId(unitOfWorkId).aggregateId(done.getAggregateId()).build()));
}
We can see here that our controller takes an optional "InitiationRequest", let’s look at that too:
@Data
public class InitiationRequest {
    private String requestId;
    private BigDecimal value;
    private String version;
}
We can see here we’ve provided 3 properties on our initiation request - a requestId, a value and a version. This will be used in later tutorial sessions in order to test various things.
This tutorial series assumes you have a little utility called jq installed on your machine, this simply will format the returned json from our commands in a pretty fashion. In all of these therefore you can simply remove the | jq to return pure json!
Let’s create a payment in our new environment. To do so we simply need to hit the example InitiationController’s submit endpoint, which we can do by running the following command:
curl -X POST localhost:8080/submit | jqThis will return the details of the payment that has been created, such as:
{ "requestId": "220b4868-a96c-4d9a-8b17-b1aa714f05e8", "uowId": "8995c642-a887-4676-a690-2bf261fba172", "aggregateId": "Ipftutorialflow|44d0f1df-eb66-4826-8b1f-63eac604b730" }Here we can see a number of key things:
-
The "requestId" - this identifies the request being made. Normally this would be supplied by the calling system, but in our case it is auto-generated by the test "Initiation Controller".
-
The "uowId" - this is the "unit of work id", it is the single ID that can be used throughout the application to track the payment. This becomes particularly useful for example when considering a payment that spans multiple flows.
-
The "aggregateId" - this is the ID of the individual payment flow that has been kicked off.
If we wanted to, we could supply the additional parameter’s into our command for example:
curl -X POST localhost:8080/submit -H 'Content-Type: application/json' -d '{"value": "150", "requestId":"abc"}' | jqThis would submit a request with a value of "150" and a requestId of "abc". If you try this now, we’ll see the "requestId" in your response having the value "abc". Later we can look to see that the value of our payment has also been set to 150 USD.
Querying the payment
The tutorial application also provides a simple query controller that allows us to make basic calls to IPF to retrieve data. So for example, you can retrieve the status of the payment by calling:
curl -X GET localhost:8080/query/Ipftutorialflow%7C44d0f1df-eb66-4826-8b1f-63eac604b730/status | jqThis should return the value "COMPLETE" - note we’ll need to swap the aggregateId given in the command to that which was returned when you created your payment! You’ll also need to replace the | character with the encoded '%7C'. Alternatively you could just paste the path into your favourite browser.
The table below shows the list of available endpoints that can be queried. To use them simply swap "aggregate/status" in the command above to the endpoint path given in the table.
| Endpoint Path | Provides…. |
|---|---|
query/{aggregateId} |
A full copy of the aggregate for your payment |
query/{aggregateId}/status |
The current status of your payment |
query/{aggregateId}/eventNames |
A list of events that have happened to your payment |
query/{aggregateId}/processingContext |
The processing context of your payment |
Try a few of these now to get a feel for using the controller and what sort of data it provides!
Note that the query service at this point in the tutorial is a very simple controller based implementation. In later sessions of this tutorial series we’ll work on providing much greater depth and possibilities through data projection and introduce IPF’s standalone ODS Service.
The payment journal
As IPF performs it’s processing, it writes all it’s events to the journal. This is a collection which is stored in mongo, under the IPF database. If you use your favourite mongo viewer (For example, our engineers often use Robo3t)
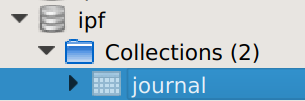
Then you can see the events that have been persisted down to the journal. You should be able to find a record like:
{ "_id" : ObjectId("62bb257a29d64365337f88be"), "eventPayloads" : [ { "deleted" : false, "manifest" : "", "payload" : { "type" : "om.iconsolutions.ipf.tutorial.ipftutorialflow.events.FlowInitiated", "value" : "{"createdAt":1656431994.593398000,"originalCommandId":"HandleInitiateIpftutorialflow|07adee15-80ea-44d0-ab3b-efe3be1ba20e|be7cf0a8-29af-4d96-9018-8efecb8b3bc6","status":{"originatingStatus":"Initial","resultingStatus":"Complete","globalStatus":"ACCEPTED"},"eventId":"Ipftutorialflow|44d0f1df-eb66-4826-8b1f-63eac604b730|1","processingContext":{"associationId":"Ipftutorialflow|44d0f1df-eb66-4826-8b1f-63eac604b730","unitOfWorkId":"8995c642-a887-4676-a690-2bf261fba172","clientRequestId":"220b4868-a96c-4d9a-8b17-b1aa714f05e8","processingEntity":"UNKNOWN"},"initiatingId":"44d0f1df-eb66-4826-8b1f-63eac604b730","causedByEventId":null,"responseCode":null,"originalResponseCode":null,"reasonCode":null,"originalReasonCode":null,"reasonText":null,"originalReasonText":null,"failureResponse":false,"customerCreditTransfer":\{"grpHdr":\{"msgId":"42708ab4-a5ee-4c07-9331-3c34a1438bfa","creDtTm":1656431994.184934000,"btchBookg":null,"nbOfTxs":"1","ctrlSum":null,"ttlIntrBkSttlmAmt":\{"value":10.45,"ccy":"USD"},"intrBkSttlmDt":[2022,6,28],"sttlmInf":\{"sttlmMtd":"CLRG","sttlmAcct":null,"clrSys":null,"instgRmbrsmntAgt":null,"instgRmbrsmntAgtAcct":null,"instdRmbrsmntAgt":null,"instdRmbrsmntAgtAcct":null,"thrdRmbrsmntAgt":null,"thrdRmbrsmntAgtAcct":null},"pmtTpInf":null,"instgAgt":\{"finInstnId":\{"bicfi":"IPSTFRP0","clrSysMmbId":null,"lei":null,"nm":null,"pstlAdr":null,"othr":null},"brnchId":null},"instdAgt":\{"finInstnId":\{"bicfi":"ICSLGBL1","clrSysMmbId":null,"lei":null,"nm":null,"pstlAdr":null,"othr":null},"brnchId":null}},"cdtTrfTxInf":[\{"pmtId":\{"instrId":null,"endToEndId":"866afe26-c173-4921-9587-468f2f974b73","txId":"cecbe387-3906-4351-9fab-dd8b1ad48333","uetr":"1e97e521-d7d6-4913-b941-63e437f884f9","clrSysRef":"2c3b0220-1df4-4a3e-8372-0d7a5a15b3c3"},"pmtTpInf":null,"intrBkSttlmAmt":\{"value":10.45,"ccy":"USD"},"intrBkSttlmDt":null,"sttlmPrty":null,"sttlmTmIndctn":null,"sttlmTmReq":null,"accptncDtTm":1656431994.191809000,"poolgAdjstmntDt":null,"instdAmt":null,"xchgRate":null,"chrgBr":null,"chrgsInf":[],"prvsInstgAgt1":null,"prvsInstgAgt1Acct":null,"prvsInstgAgt2":null,"prvsInstgAgt2Acct":null,"prvsInstgAgt3":null,"prvsInstgAgt3Acct":null,"instgAgt":null,"instdAgt":null,"intrmyAgt1":null,"intrmyAgt1Acct":null,"intrmyAgt2":null,"intrmyAgt2Acct":null,"intrmyAgt3":null,"intrmyAgt3Acct":null,"ultmtDbtr":null,"initgPty":null,"dbtr":\{"nm":"7f0d8165-9c67-4989-865e-15fce48689c1","pstlAdr":null,"id":null,"ctryOfRes":null,"ctctDtls":null},"dbtrAcct":\{"id":\{"iban":"GB26MIDL40051512345674","othr":null},"tp":null,"ccy":"EUR","nm":null,"prxy":null},"dbtrAgt":\{"finInstnId":\{"bicfi":"ICSLGBL1","clrSysMmbId":null,"lei":null,"nm":null,"pstlAdr":null,"othr":null},"brnchId":null},"dbtrAgtAcct":null,"cdtrAgt":\{"finInstnId":\{"bicfi":"ICSLGBL2","clrSysMmbId":null,"lei":null,"nm":null,"pstlAdr":null,"othr":null},"brnchId":null},"cdtrAgtAcct":null,"cdtr":\{"nm":"bc67af37-93f1-452b-918e-c4fb65f2d6f2","pstlAdr":null,"id":null,"ctryOfRes":null,"ctctDtls":null},"cdtrAcct":\{"id":\{"iban":"GB26MIDL40051512345675","othr":null},"tp":null,"ccy":"EUR","nm":null,"prxy":null},"ultmtCdtr":null,"instrForCdtrAgt":[],"instrForNxtAgt":[],"purp":null,"rgltryRptg":[],"tax":null,"rltdRmtInf":[],"rmtInf":null,"splmtryData":[]}],"splmtryData":[]},"paymentJourneyType":null,"paymentType":null}" }, "persistenceId" : "Ipftutorialflow|44d0f1df-eb66-4826-8b1f-63eac604b730", "sequenceNumber" : NumberLong(1), "tags" : [ "tag-1" ], "timestamp" : NumberLong(0), "writerUuid" : "06cf3f62-65fe-43db-80f2-7a98a483fea4" } ], "hiSeq" : NumberLong(1), "loSeq" : NumberLong(1), "persistenceId" : "Ipftutorialflow|44d0f1df-eb66-4826-8b1f-63eac604b730" }
Let’s break the payload down a little so we can see the constituent parts:
-
"type" : "com.iconsolutions.ipf.tutorial.ipftutorialflow.events.FlowInitiated" - here can see the name of our event.
-
"status":\{"originatingStatus":"Initial","resultingStatus":"Complete","globalStatus":"ACCEPTED"} - here we can see that this event was received in the "Initial" state and caused the payment to move to the "Complete" state. It’s transformed the payment to the global "ACCEPTED" state.
-
"associationId":"Ipftutorialflow|44d0f1df-eb66-4826-8b1f-63eac604b730" - this is the aggregateId.
-
"unitOfWorkId":"8995c642-a887-4676-a690-2bf261fba172" - this is the overall payment unit of work id.
-
"clientRequestId":"220b4868-a96c-4d9a-8b17-b1aa714f05e8" - this is the originating request id.
Note how for the data shown above, these ids correspond to the Ids received as the response to the initial submit request.
The Developer GUI
The IPF Tutorial app has been configured to publish its data so that it can be read by the IPF Developer GUI. This is a lightweight GUI used for testing and to demonstrate the ability to create different views of the data being published by IPF. We can access it by going to localhost:8081/explorer.html. Let’s explore a little what it tells us about our simple application.
Search
You’ll start by searching for our transaction by using the unit of work ID that was returned to us from our initiation request:

Flows
We should see one record returned, with the basic details of that payment. Let’s now press the "view" button to see some more details:

Here we see the "flows" that make up our payment. A payment can have many legs through different flows in its lifecycle. For the moment we have the simplest setup available and it’s just a single flow hence why we only see one record. In for example we’ll start adding multiple flows.
In the meantime, we can see many things about our flow so let’s try a few of those out.
Graphs
Firstly we can see the graph - click the graph button and we should see the graph we had from our MPS setup before:
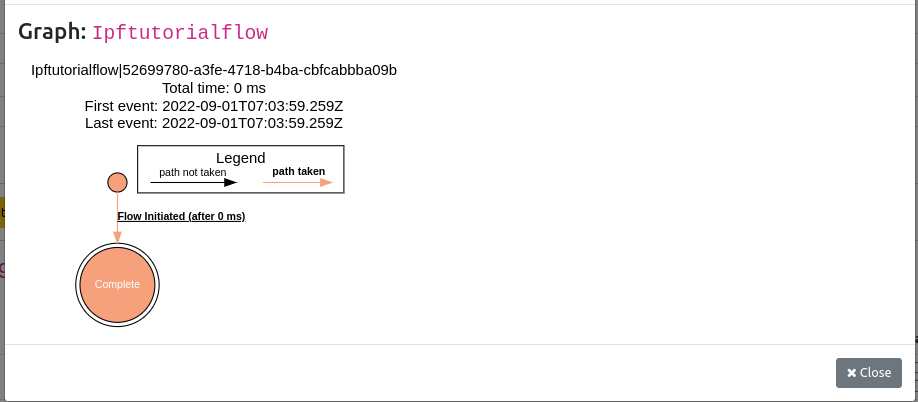
Note how this time we are colouring in the flow - the path taken through is highlighted in orange. This will become more obvious later as we build the complexity of our flow and can see our payment taking decisions about which route to run.
Aggregate Data
Let’s close the graph and then click to view the aggregate data.
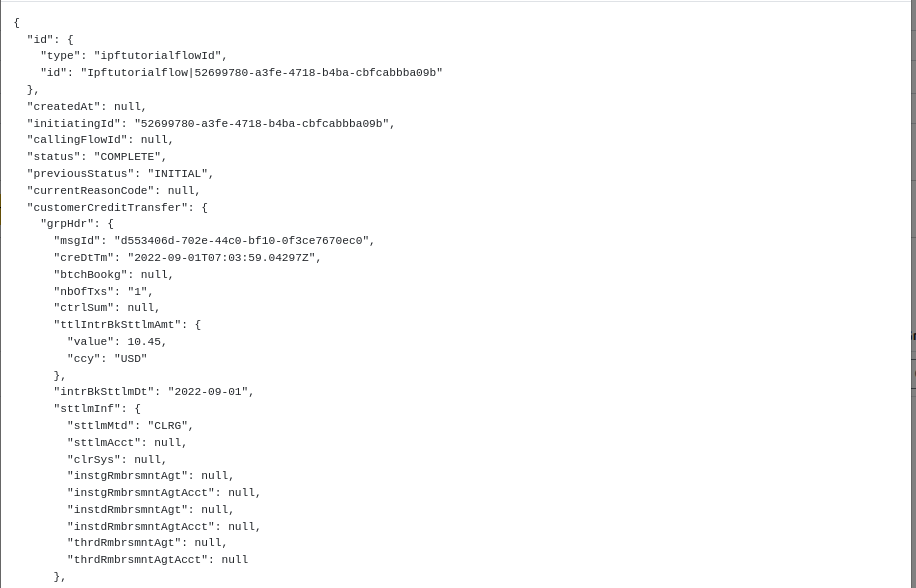
Here we can see all the "live" data of the flow. It tells us everything IPF has in memory about that flow, including all the data available to the flow. This can be either data supplied to the flow via events or calculated by IPF itself (we’ll cover this in DSL 6 - Using an aggregate function)
Domain Events
The next interesting view is the domain events one, let’s click the orange "Domain Events" button:

This shows us all the domain events that have been recorded during the payment journey. There are a couple of interesting points to note here:
-
Sequence Number - this is an ordering of the events as they arrive. In our case it’s trivial, but in more complicated multi flow cases this will be the ordering across all flows not just one.
-
Process Flow - this becomes useful when multi-flow are in place.
-
Content - this provided a full view of the entire domain event.
System Events
Now let’s look at the system events view:

Here we can see that our flow has generated 7 system events. System events are a way of tracking what has happened within an IPF application. You’ll discuss these in greater depth at a later tutorial, but for now let’s just quickly think about what these are telling us. They are effectively providing a story of the "events" that have occurred to our "system" that are associated to this particular payment. It tells us a story:
_The flow started > A command was received (the initiation instruction) > A domain Event was persisted (the Flow Initiated event) > There was a state transition (from Initial to Complete) > The Flow Finished. _
Have a look at the different events generated here, and view the details they are providing.
Message Data Structure
Next lets look at the Message Data Structures tab:
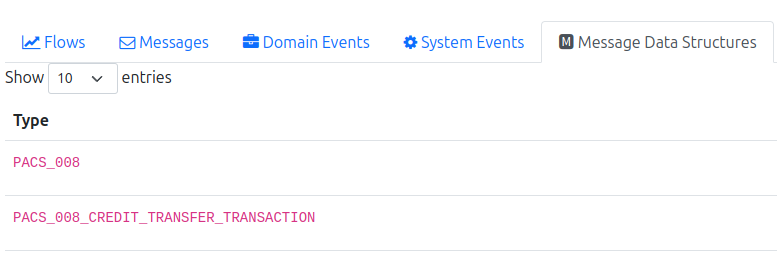
This is showing us the different pre-configured message data structures that are available to the flow. We’ll discuss this much more in later tutorials but for now we can see that we have the full pacs.008 available together with the individual credit transaction that is for our payment (noting for now we are only dealing with 1-1 relationships between pacs008 and credit transfers but later this may become 1-n).
The other tabs - messaging and custom objects are blank for now. These aren’t being used by our simple flow as yet.