CON1 - Adding Payment Initiation
|
Getting Started
The tutorial step uses the If at any time you want to see the solution to this step, this can be found on the |
In the DSL tutorial, we built an application that uses the Icon Payment DSL to build up a flow. To initiate this flow, our sample application had a simple REST controller that allowed us to initiate the flow. We were able to send in certain key values - such as the amount - to help us test various different conditions within our flow. However, in the real world, these payment instructions would be coming from an external source over some kind of message broker.
In this section, we’re going to use an existing test module - the "Sample Payment Initiator" as the external source. This is a simple application we can use to test our application. It has a few key properties:
-
It provides a simple simulator that allows us to generate pain001’s, providing an interface to set some of the key values.
-
The application can be used with different kinds of message broker (Kafka, JMS)
-
The application comes with a set of pre-packaged Connectors. These are the client components - built using Icon’s Connector framework - that allow quick and easy integration between the main IPF app and the payment initiation simulator.
In this tutorial, we’re going to use the Kafka version of the payment simulator.
Let’s get going and set everything up so that we can start sending messages to our IPF application from the Payment Initiation Simulator.
A Quick Recap
Let’s do a quick recap on the existing flow, the key one here is the initiation flow and its initiation behaviour:
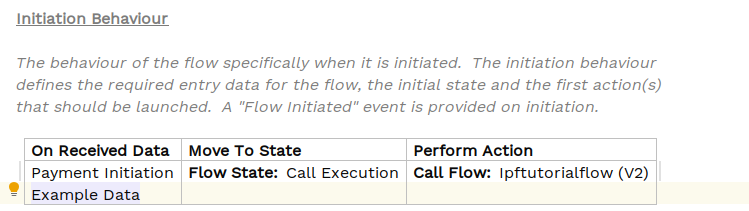
The key thing to note here is that we’re sending in a payment initiation (pain001) into start the flow. We won’t worry about the example data object here as it was just used as a way to illustrate custom types.
You might remember that - when generated - this will create a new method on the domain’s initiation controller that
allows us to make flow initiation requests. In the current flow, we do this within the controller of the main
ipf-tutorial-app application. Let’s remind ourselves of that code (taken from InitiationController):
Mono.fromCompletionStage(IpftutorialmodelDomain.initiation().handle(new InitiateInitiationFlowInput.Builder(entityId)
        .withProcessingContext(ProcessingContext.builder()
                .unitOfWorkId(unitOfWorkId)
                .clientRequestId(clientRequestId)
                .build())
        .withPaymentInitiation(samplePain001)
        .withExampleData(IpfTutorialBean.builder().intField(7).stringField("Test").build())
        .build()).thenApply(done -> InitiationResponse.builder().requestId(clientRequestId).uowId(unitOfWorkId).aggregateId(done.getAggregateId()).build()));
The key point is that we are using the sample pain001 we generated as our payment initiation data when we construct the initiation input. You’ll do something very similar when setting up to use the payment initiation simulator.
Adding the Connector
First we need to add the dependency to talk to the sample initiation simulator we will use for receiving payment
initiation messages. Add this to the ipf-tutorial-app 's pom.xml:
<dependency>
  <groupId>com.iconsolutions.ipf.sample.samplesystems</groupId>
  <artifactId>payment-initiation-connector-kafka</artifactId>
</dependency>
We don’t need to specify a version here because it is inherited from the release core BOM.
Note also that we’ve chosen the Kafka implementation here as our protocol.
|
If running via the scaffolder, we will either need to declare the latest version (2.4.0) or add the sample-systems-bom to our parent to inherit it. |
The Client Adapter
When the payment initiation simulator runs, it will send messages to the relevant Kafka topic. We’re going to use the
pre-packaged Icon Connector in our application, which will consume initiation messages from that topic and process
messages. To be notified of payment initiation messages that arrive, the connector provides an interface
- the PaymentInitiationClientAdapter - which we will need to implement in ipf-tutorial-app . Our implementation will
need to provide the same core logic that the current initiation REST controller does, i.e. take the pain001 and start
a flow with it.
Let’s start by looking at the definition of this interface:
public interface PaymentInitiationClientAdapter {

    ProcessingContext determineContextFor(PaymentInitiationRequest request);

    CompletionStage<Void> handle(ReceivingContext context, PaymentInitiationRequest request);
}
There are two methods it provides:
-
determineContextFor- This is the chance to provide an upfrontProcessingContext, for example theunitOfWorkIdwhich represents an IPF reference used to track all activity against. -
handle- This is where we handle inbound messages, and for us we need to pass the message onto the flow.
Let’s consider what we want to do in our specific implementation.
-
determineContextFor- in our case we’re not too worried about id’s. But if there was a specific client request id or unit of work id that you required your messages to use this would be where to set it. However, we’ll use a generated unit of work id. -
handle- this is where we need to take the pain001 out of the request object and pass it into the domain’s initiation methods.
See if you can figure out how to implement these two methods yourself. Alternatively, the solution
(to add to the ipf-tutorial-app) is below:
@Slf4j
@Service
public class SamplePaymentInitiationAdapter implements PaymentInitiationClientAdapter  {

    @Override
    public ProcessingContext determineContextFor(PaymentInitiationRequest paymentInitiationRequest) {
        return ProcessingContext.builder().unitOfWorkId(UUID.randomUUID().toString()).build();
    }

    @Override
    public CompletionStage<Void> handle(ReceivingContext receivingContext, PaymentInitiationRequest paymentInitiationRequest) {
        return IpftutorialmodelDomain.initiation().handle(
                new InitiateInitiationFlowInput.Builder(UUID.randomUUID().toString())
                    .withProcessingContext(receivingContext.getProcessingContext())
                    .withPaymentInitiation(paymentInitiationRequest.getPayload().getContent())
                .build())
                .thenAccept(done -> log.debug("Completed request"));
    }
}
Note here that we use Spring’s @Service annotation to wire in the dependency.
That’s all our code done, so let’s build the application.
Note that we have only changed implementation code and not our flow so there is no need to rebuild the MPS components at
this time. So we can use Maven’s --resume-from flag (or -rf for short) to only build ipf-tutorial-app:
this time. So we can use Maven’s --resume-from flag (or -rf for short) to only build ipf-tutorial-app:
mvn clean install -rf :ipf-tutorial-appConfiguring the Application
Now it’s time to set up the configuration. We’ll need the configuration for our payment initiation connector to talk to kafka.
Configuration
The standard config - like the topic from which we will consume payment initiation messages - is provided out of the box. It’s going to read messages from the PAYMENT_INITIATION_REQUEST topic. So all we need to tell it how to connect to Kafka.
We do however need to provide the details for where kafka will be located. All IPF connectors will default to using a config root of akka . This means that if we have multiple services all using the same kafka we can define the configuration once and let all our services use that. We’re going to assume for this tutorial that is the case so we’ll set up our service like that. You’ll make a few tweaks now to give us extra functionality.
// default settings for kafka
common-kafka-client-settings {  (1)
  bootstrap.servers = "localhost:9093" (2)
}

akka.kafka {
  producer {
    kafka-clients = ${common-kafka-client-settings} (3)
  }
  consumer {
    kafka-clients = ${common-kafka-client-settings} (4)
  }
}
// end default kafka settings
Let’s review a few bits of this:
| 1 | We extract our the raw kafka settings (group id, bootstrap servers) into a separate section. This means we can reuse this across different property sets. You can see that in points 3 and 4. |
| 2 | This is the kafka bootstrap url and may be different for your environment, this is what is needed if running the 'connectors.dsl' provided. |
| 3 | Here we reuse our common kafka settings for the producer. |
| 4 | Here we reuse our common kafka settings for the consumer. |
Note that you can provide any standard Kafka consumer configs or producer configs alongside bootstrap.servers. This
section of the configuration will simply treat any configuration keys you specify as Kafka properties.
Running the Application
You are finally ready to run the application. How you do this depends on the environment in which you are following the tutorial. We assume here that you will use the environment provided by the tutorial’s docker setup in which case we need to start the connectors.yml file.
Once we’ve done that we’re good to go, just like we were with the previous tutorials.
Non-Docker
Kafka
When not running in Docker, you will need to use your own Kafka broker. This must have two topics available:
-
PAYMENT_INITIATION_RESPONSE -
PAYMENT_INITIATION_REQUEST
Next, we need to tell the IPF tutorial application how to connect to Kafka. You’ll then need to update the
bootstrap.servers config we set up in the previous section to reach your specific kafka environment.
Payment Initiation Simulator
Details for how to run the payment initiation simulator can be found here: Using the payment initiation simulator.
Testing the Application
As normal, let’s now check our solution works. Start up the application as previously (instructions are available in Reviewing the initial application if you need a refresher!)
Now the Payment Initiation Simulator will be available (along with the Zookeeper and Kafka setup).
You can access the simulator at localhost:8083/index.html
When loaded, it should look like this:
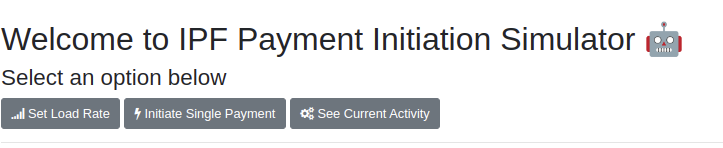
There’s a couple of key functions to note here. You can:
-
Set load rate - this allows us to send a consistent rate of transactions, e.g. 10TPS, through to our application.
-
Initiate single payment - this allows us to send a single payment with provided values.
You won’t use "See Current Activity" for now, but it allows the simulator to track responses to payments, their latency, error rates, etc.
You’ll start by calling an individual payment. Click the initiate single payment button and then you’ll leave everything as default and click initiate payment. This will fire in a generated payment. A pop up box will appear that will continue to spin, this is because the simulator by default expects that there will be a response to it’s message. For now we don’t have this so the spinning is the expected behaviour.
Let’s bring up the IPF Developer app at localhost:8081/explorer.html and run a search. You should see a new record having been created a few seconds ago:

Let’s view this record and then go to the "messages tab":

Here you can see that IPF has "received" a PaymentInitiationRequest. You can view the body of the message if you want.
Feel free at this stage to try sending some different messages through with different values, or to send a fixed load through.
Conclusions
In this section you’ve learnt how to connect to an external system that has a pre-prepared Connector.
|
Next up you’ll look in a little more detail at connectors in: CON2 - Writing your own connector |