Step 10 - Add a Subflow
Introduction to Step 10
In this step you will introduce a sub-flow. Using a sub-flow is a way of logically grouping together a set of events and states (in this case sanctions). Sub-flows can be reused within the same flow and in different flows in the same model.
For this use case, you will be calling the sanctions sub-flow once you have completed the debtor account validation and the validation has passed.
You will introduce the following sanctions flow:
-
A request is sent to a new sanctions external domain
-
The response will either be no hit (continue processing the payment) or hit (further investigation by a sanctions team is required)
-
If a payment is held in sanctions then a second response will be expected that will be either pass, fail or block
-
If the final response is fail then the transaction is rejected
-
If the final response is block then the transaction will be dealt with manually and the payment is terminated
Creating a new Sub flow
You can create a new sub flow by right clicking on your model from the left hand panel and selecting New>v2Fo>SubFlow.
Give the sub flow a name and you have created an initial sub flow which should look like something like this:

Filling in the Sub Flow
You will see that a sub flow is set out exactly the same way as a flow, where you define your states and events and add them to the your initiation, input and event behaviours.
Now that you have been creating and updating flows for a while have a go yourself at building a valid sanctions flow. You will need to:
-
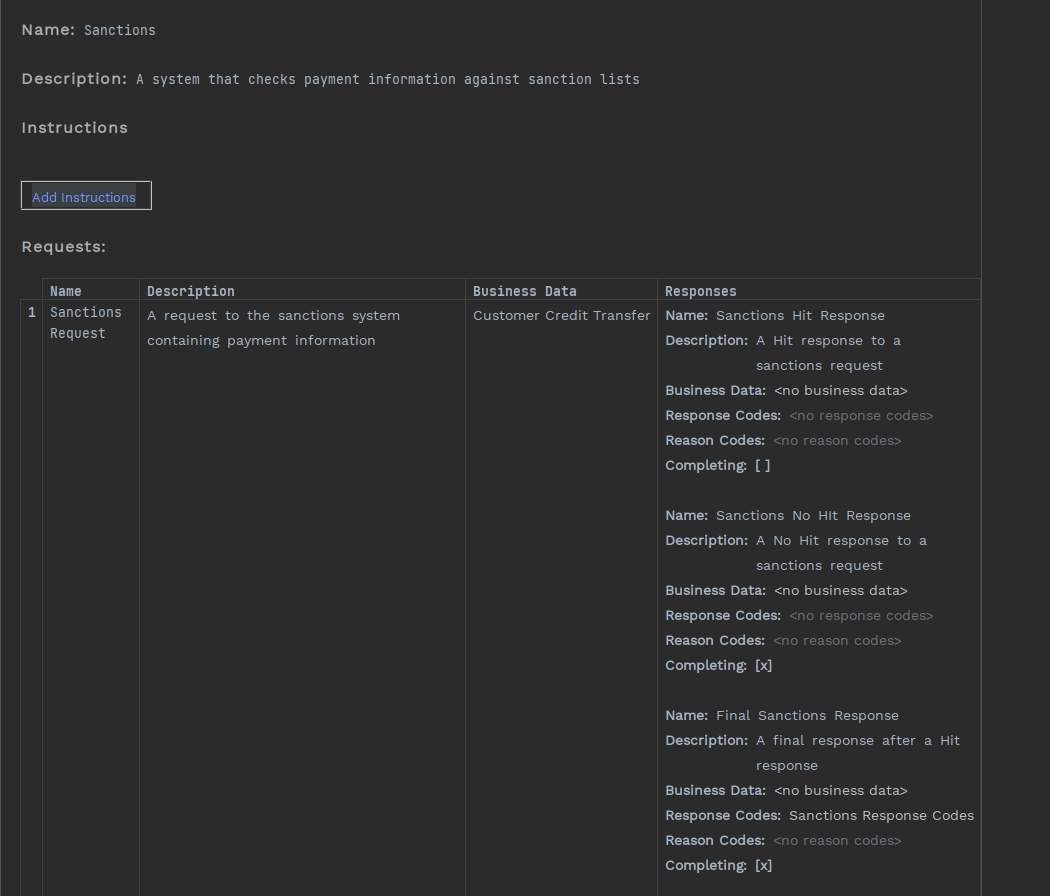
Create an external domain to represent the sanctions system
-
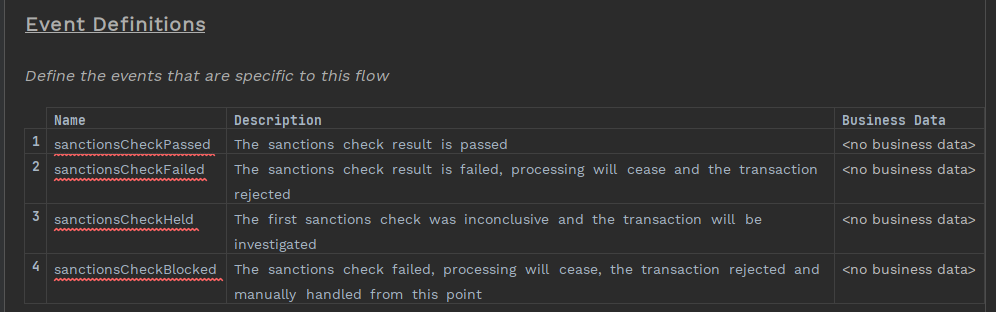
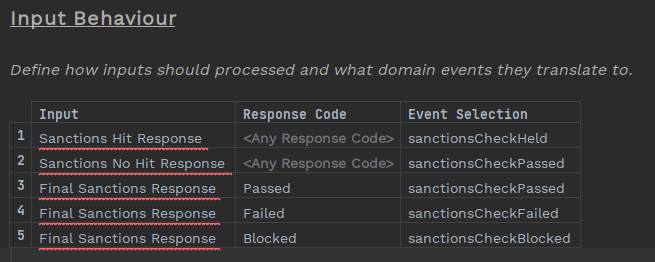
Create a single sanctions request with multiple responses for a 'Hit',' 'No Hit' and the 'Final Response'
-
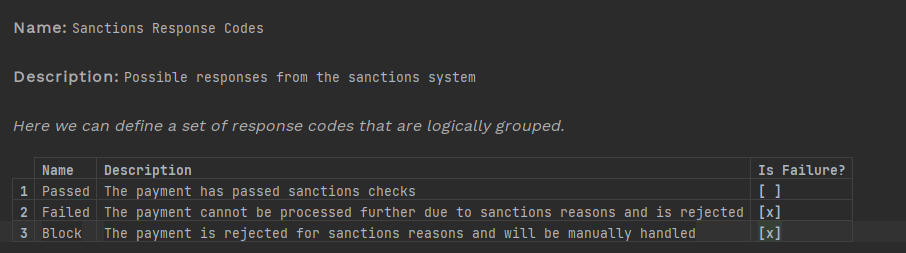
Create a new response code library for the possible 'Final Response' codes from sanctions ('Pass', 'Fail' or 'Block')
-
Define your states and events in the sub flow
-
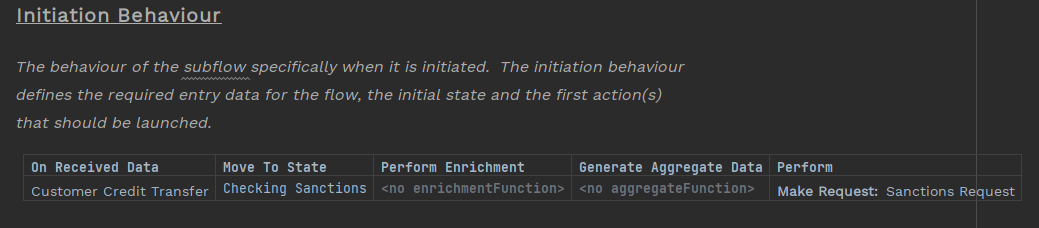
Create an initiation behaviour in the sub flow
-
Build those responses into input behaviour in the sub flow
-
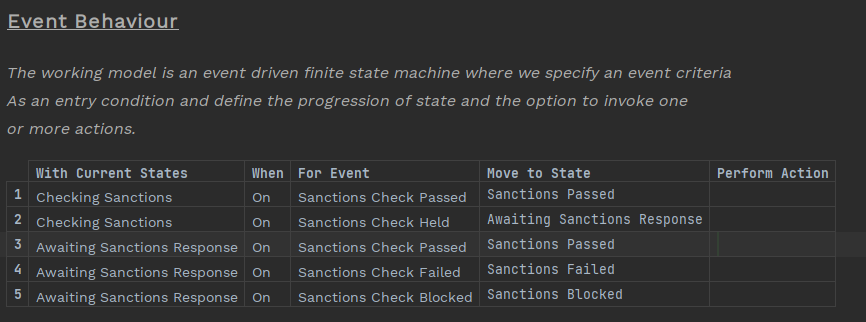
Complete the sub flow by creating event behaviour
Sub Flow
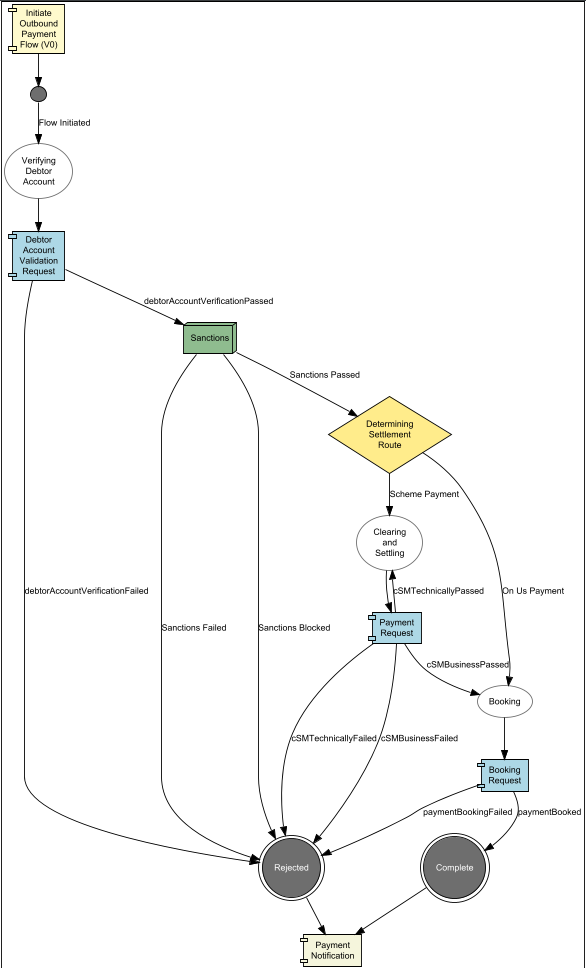
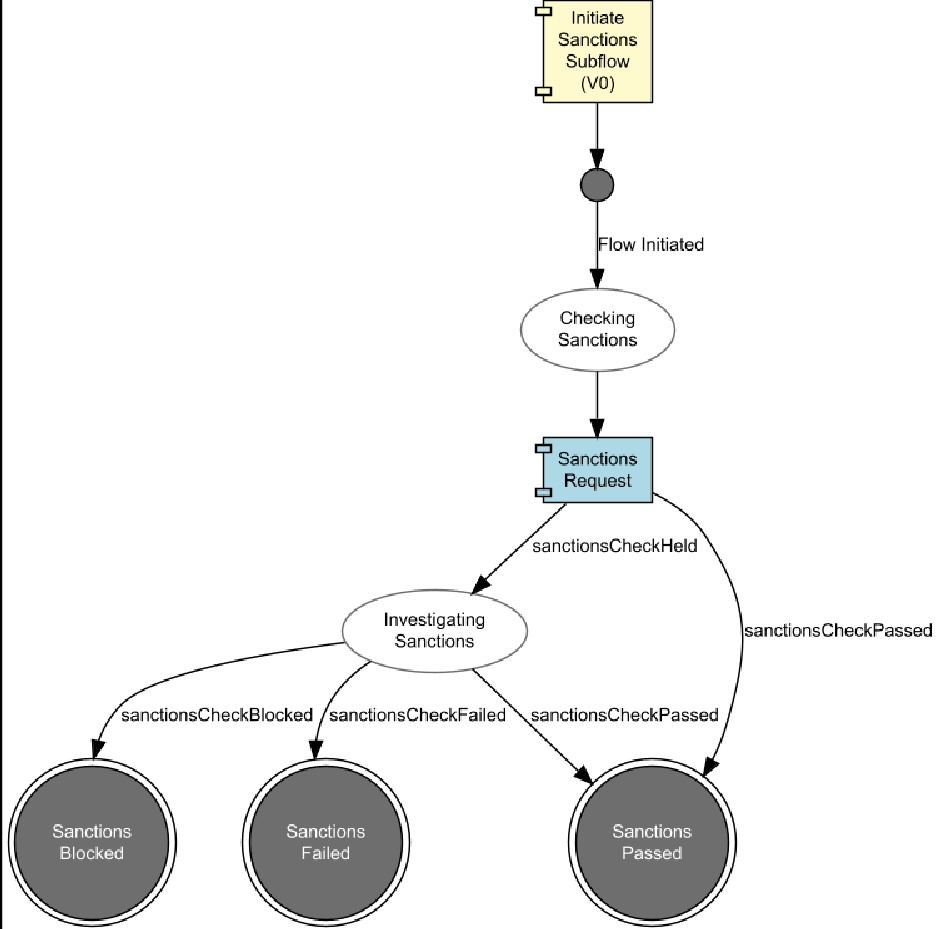
And your sub flow should look like this

| The global state for everything in the sub-flow is 'PENDING' because we want all the sub-states to be viewable in the IPF Dashboard under that global state. You could create a new library of global states just for the sanctions sub-flow and use those instead if you wished. |
Add the Sub-Flow to Event Behaviour
Now you have created a reusable sanctions sub flow, you can now plug it into your flow.
Add a Sub Flow Sub State
First of all you have to put it in the right place - once the account validation is passed you will be checking sanctions prior to deciding whether its an 'On Us Payment' or 'Scheme Payment'.
So in the first event behaviour, delete the decision from the 'Move to State' and press Ctrl+Space. You will have the option to create a sub flow state, so pick that option and your event behaviour should look like this:
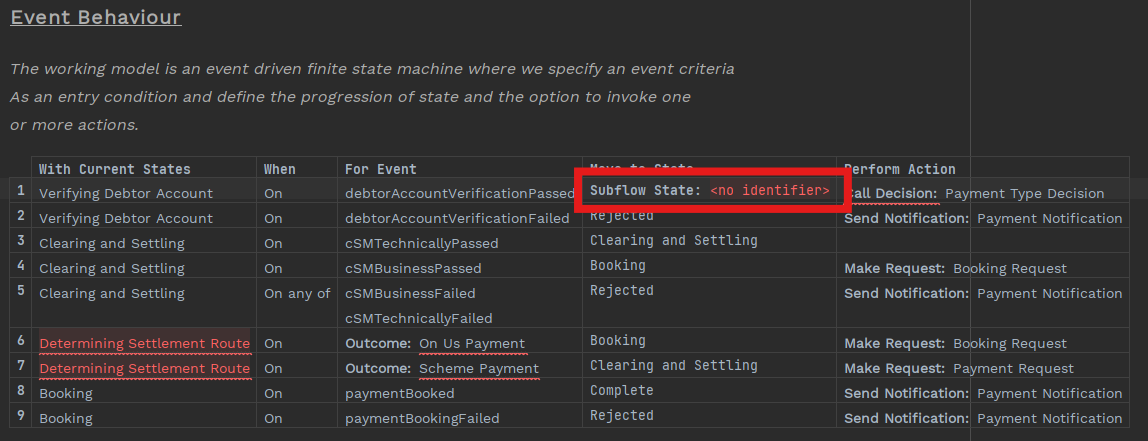
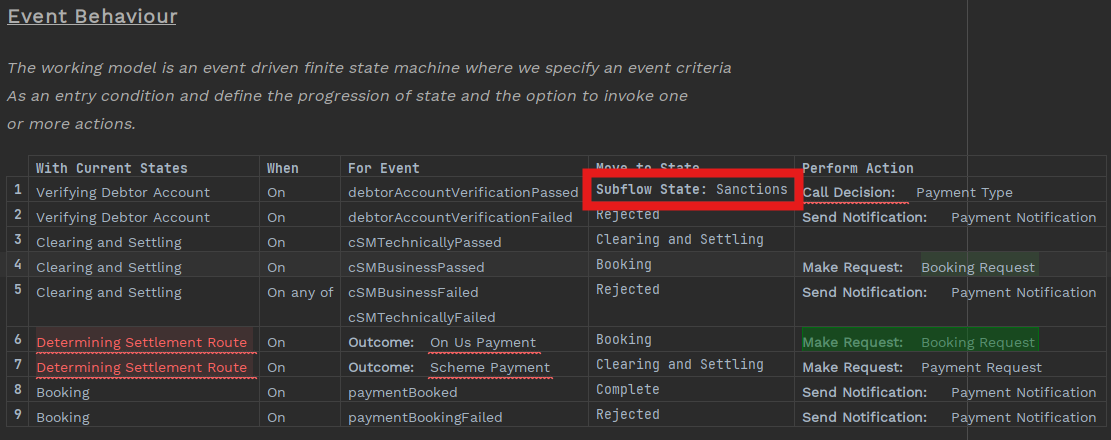
Name the Sub Flow
Like decisions, which you used in a previous step, sub flows can be used multiple times so you need a unique name each time a sub flow is called.
In your use case you are going to call the sanctions sub flow once before being sent to clearing so let us call the sub state 'Sanctions'.
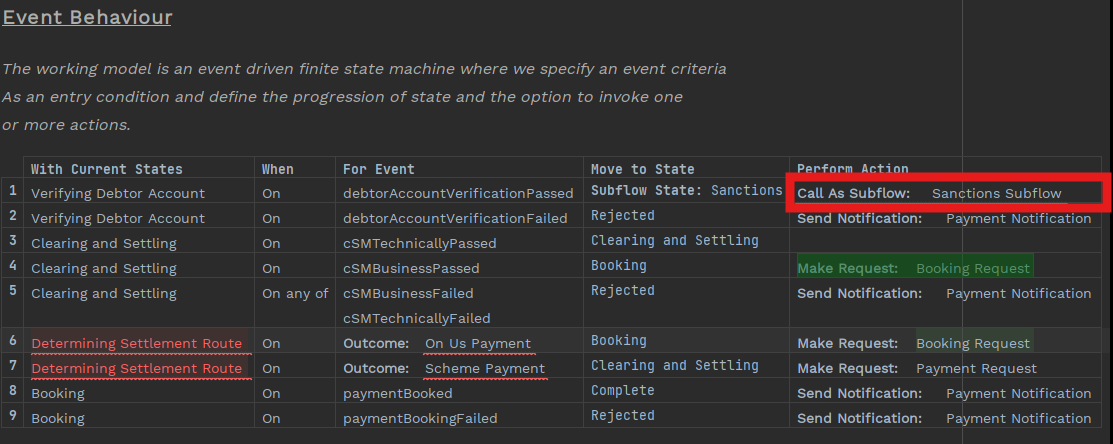
Add Call Sub Flow Action
Once you have moved the payment to the sub flow sub state, you also have to instruct the flow to actually send the payment to the sub flow.
Replace the 'Perform Action' (which is currently the decision) with a call to a sub flow by deleting the current entry and pressing Ctrl+Space and then selecting the sub flow you have just created.
If you had created multiple sub flows, all of those sub flows would be available to select.
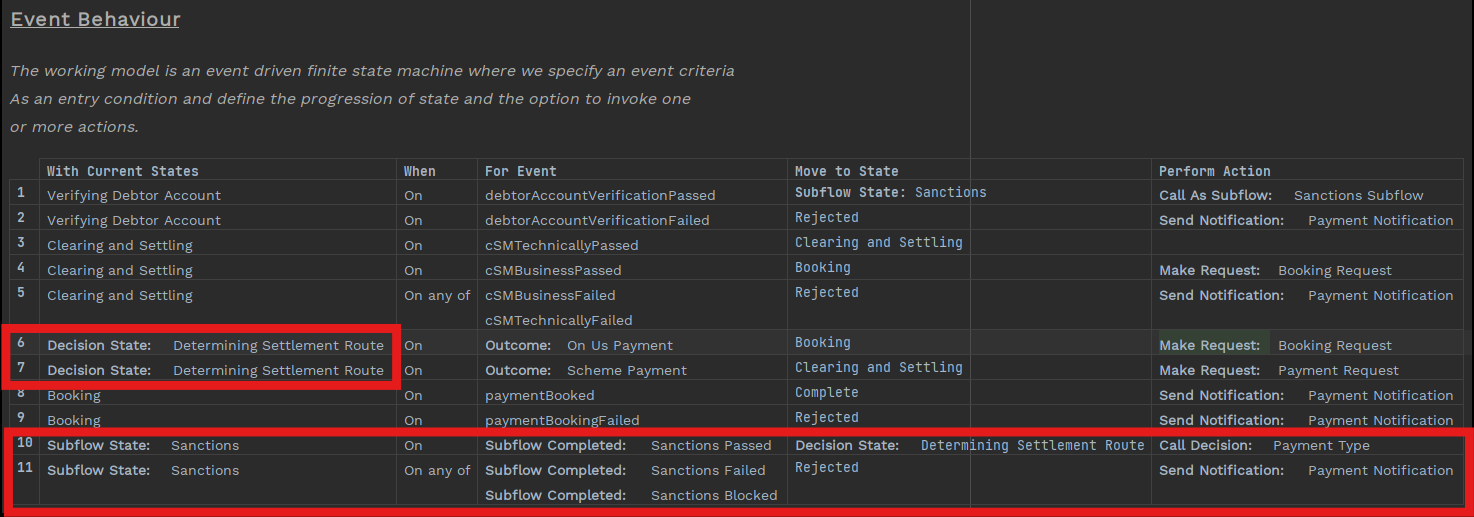
Finish off Event Behaviour
Now you have created a new 'Sanctions' sub state, you can now specify what should happen when the payment is in that state.
For sub flows, a terminal state is the equivalent of an event (i.e. a terminal event in a sub flow is used to move the payment from one state to another in the calling flow).
If you remember you created three terminal states in the sub flow: 'Sanctions Passed', 'Sanctions Blocked' and 'Sanctions Failed' - you need to add these into the event behaviour of the calling flow.
Add two new event behaviours as shown below.
| You have to build the decision that you removed from event behaviour 1 into the new event behaviour (in this case 11). |