DSL 9 - Using Subflows
|
Getting Started
The tutorial step uses the "add_version" solution of the project as it’s starting point. If at anytime you want to see the solution to this step, this can be found on the "add_subflow" solution! |
What is a Subflow?
A "Subflow" is a reusable section of a flow. It effectively has all the same features as a flow but is not expected to be standalone but instead is included inside of another flow.
A subflow can therefore be :
-
Used within many different flows.
-
Used multiple times within the same flow.
An often seen example of a subflow is a sanctions check. It may be that many different flows all use a sanctions check or indeed that a sanctions check may be needed at different parts of the flow (for example following a resumption on delay).
For this section, we’ll use the sanctions example to integrate a subflow into our flow.
Our sanctions subflow, will need to perform the following actions:
When the subflow begins we make a request to a sanctions system.
Then the sanctions system can either return:
-
Passed - all is good, flow can proceed.
-
Wait
Then on the wait condition, we should wait until the sanction systems sends us one of three further messages:
-
Passed
-
Blocked
-
Failed
DSL Set Up
Adding the Sanctions Domain
Before we start looking at the subflow itself, we first need to add an external domain that is capable of supporting our flow. So let’s go ahead and do that.
Firstly, we’ll create a new external domain for our sanctions sytem. This is just like we did in () except that the response needs to use an extra capability we’ve not fully discussed before. So let’s start by adding the basics:
-
A name of "Sanctions Domain"
-
A description of "A sample sanctions system"
-
Add a request with details:
-
A name of "Check Sanctions"
-
A description of "Sample sanctions call"
-
Add the customer credit transfer to business data
-
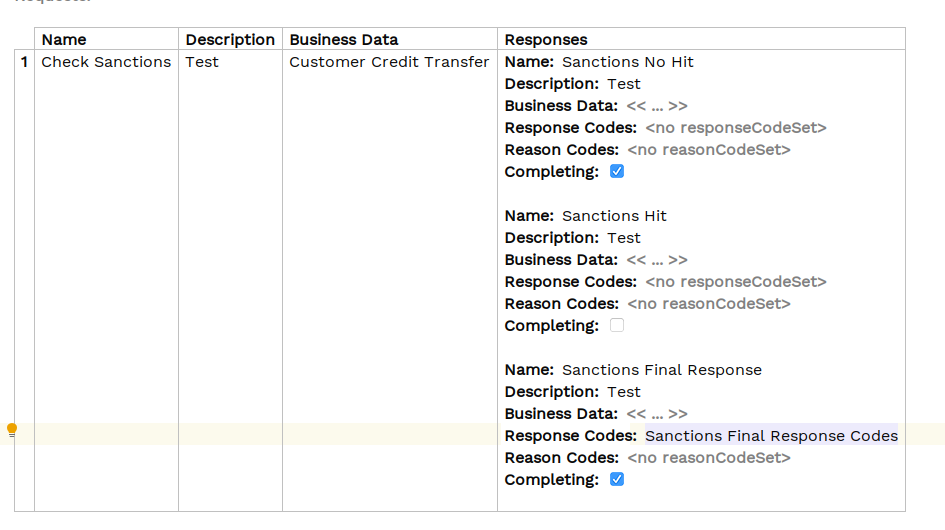
Now we consider the responses. There are a number of different ways we could model the required responses using combinations of response codes and reason codes like we did in the fraud system. Here however, we will do it by modelling multiple responses to our single sanctions request.
The first response is the "passed" scenario, we’ll call this a "no hit" scenario. For this we just add a simple response like we have before:
-
A name of "Sanctions No Hit"
-
A description of "The sanctions check has passed"
-
All other fields we’ll leave as the default.
The second response is the one when the initial check does not immediately pass and we are asked to wait. You’ll call this a "hit" scenario.
The key difference between the "hit" and "no hit" scenarios are that:
-
in the no-hit scenario it completes the request - i.e. we’re not expecting any further information from the sanctions system.
-
in the hit scenario it does not complete the request, we’re still expecting a final result of our sanctions call.
So this time, for our hit scenario we need to set our "Completing" flag to false to tell the system that we will expect subsequent messages from the sanctions system in response to the initial request.
Let’s set this response up:
-
A name of "Sanctions Hit"
-
A description of "The sanctions system is checking the outcome"
-
The completing flag unchecked
-
All other fields we’ll leave as the default.
Finally we also need the result response when the sanctions system eventually sends us a response. You’ll call this the "Final Sanctions Response". So let’s add this:
-
A name of "Sanctions Final Response"
-
A description of "The final result from the sanctions system"
-
For the response codes we’ll need to create a new response code library for our "Sanctions Final Response Codes". This is just as in DSL 4 Using an External Domain. In our case we’ll have three response codes: False Hit, Block, Reject.
-
All other fields we’ll leave as the default.
Once we’ve put all this together our sanctions system definition should look like:
And for reference our new "Sanctions Final Response Codes" will look like:
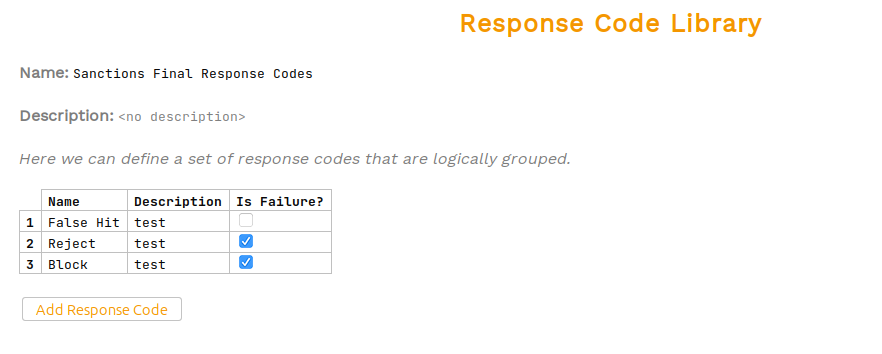
Note that we can simply add our response codes to the existing library that we used for our account validation codes.
That’s our sanctions system all set up and ready to use.
Adding the Subflow
Now that we have our sanctions domain set up, let’s go and create our subflow. We do this by right clicking on our model and selecting .
This should create a new subflow page:
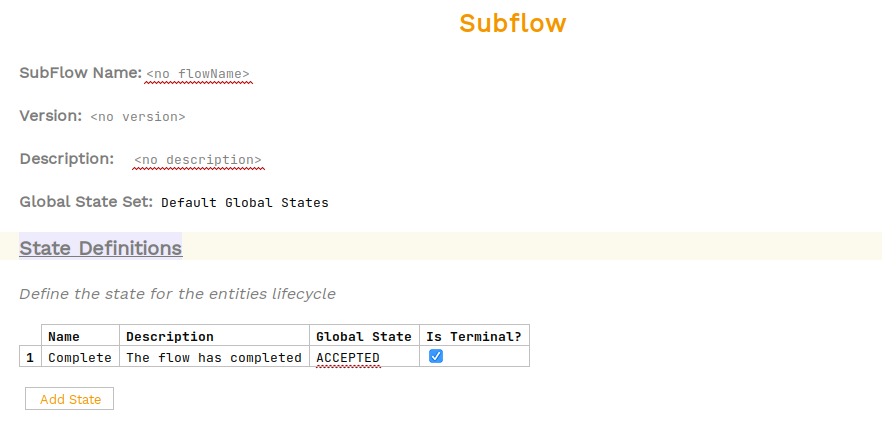
The first thing to note is how similar this is to the flow page. That’s because it is effectively a specialised type of flow! So using this page should feel very familiar.
Let’s setup our new subflow, we’ll start by giving our sanctions flow a name of "Sanctions Subflow" and a description of "An example subflow for sanctions".
The next thing to consider is our states we are going to need. From the requirements we can see that there are three states we will need:
-
A "Checking Sanctions" state for when we make the initial request to sanctions and are awaiting a response.
-
An "Awaiting Final Result" state for when we have received a wait notification from sanctions and are awaiting the final response.
-
A "Complete" state for when we have successfully completely a sanctions check.
-
A "Rejected" state for when the sanctions check has failed.
-
A "Blocked" state for when the sanctions check has resulted in a blocked notification.
Go ahead and set these up now. Consider what values you will need for the terminal flag and global state on each of these states and when complete the solution is below:
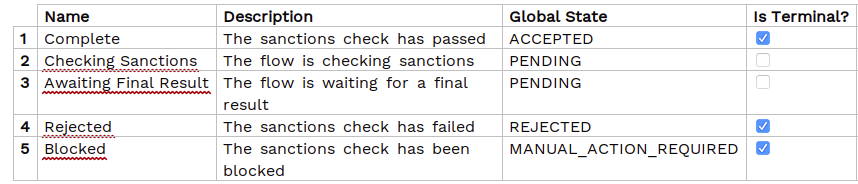
It’s really important within a subflow to get the terminal states correct. That’s because those are the states that the subflow will be able to report back to the parent flow. So here we have "Complete", "Rejected" and "Blocked" as terminal states. That’s because the "Checking Sanctions" and "Awaiting Final Result" states are intermediary states during the subflow processing. We can further emphasize that by the setting of the "PENDING" global state.
Now let’s carry on down our subflow and the next thing to consider is the events. Again going back to requirements we can see that we will need 4 events:
-
"Sanctions Passed" for a successful sanctions check
-
"Sanctions Rejected" for a failed sanctions check
-
"Sanctions Blocked" for a blocked sanctions check
-
"Sanctions Hit" for an wait notification.
Note here there are many different event names we could use. We’ve chosen to use the same event "Sanctions Passed" for both the direct and indirect (via wait) passing of the sanctions check. We could just have easily created two events to uniquely identify each.
Let’s add these Event Definitions now and we should see:

Continuing on down our subflow our next section to consider is the Input Behaviour. Here we have to consider each of our three different responses from the sanctions system and how we want to handle them. Try to do this yourself and the solution is below:
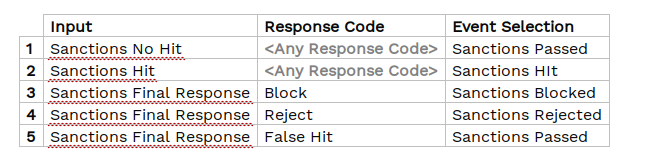
Next up, on initiation we need to call the sanctions system. So we’ll need a new state "Checking Sanctions" and an initiation behaviour that moves us to the "Checking Sanctions" state and calls our sanctions system. Try that now and the solution is below:

Finally we need to handle our event behaviour. See if you can work it out, and then the solution is below:

The one interesting point to note here is how we’ve handled line 4 in the event behaviour. It would have been just as correct to have two lines here, one for the "Checking Sanctions" current state and one for the "Awaiting Final Result" current state. But we’ve chosen here to use the ability of having multiple states defined in the current state. This is simply a shorthand way to avoid repeating the same logic multiple times if the outcome is no different.
We’ve now completed all our sections of the flow, but if we look there is still an error showing on the "Perform Action" of the initiation behaviour. Let’s investigate this by validating the flow (ALT + ENTER then validate flow). It tells us:

It’s telling us that the subflow doesn’t have access to a customer credit transfer and hence it can’t make the call out to the sanctions system. In our case, our customer credit transfer belongs to the parent flow. So to provide it down to the subflow we need to add it to the initiation data, let’s do that and we should now see:

And our error has been resolved. As normal before completing let’s have a look at our graph (Tools > Open Flow Viewer) to find:
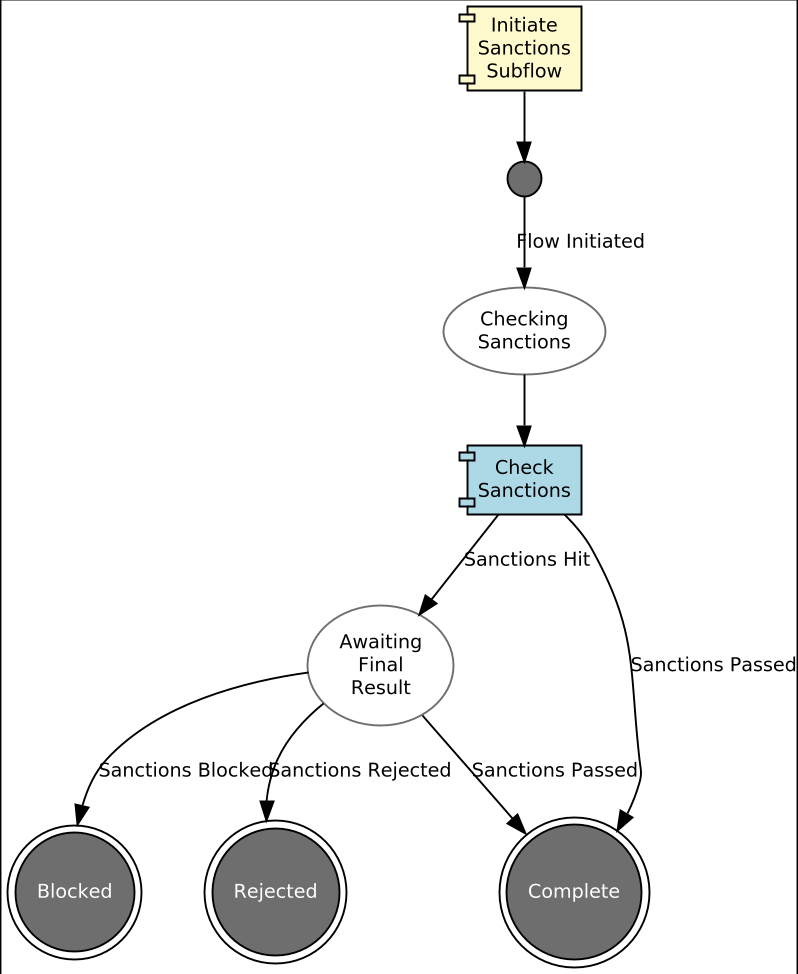
That’s our subflow all setup and ready to use, so the next question is how do we apply this to our parent flow. Let’s go back to it, we’ll update only in our latest V2 version:
We’re going to add our subflow in as a new step after our account validation. Currently we have:

To slide in the extra step, we want the validating account to call our subflow (not run the fraud check decision) and then run the fraud check on successfully passing sanctions instead.
If you remember back to DSL 5 - Using a decision, we introduced the concept of a pseudo state and in that case the specific type of a "Decision State". Here we want to use a different type of state - a "Subflow State". Let’s start by adding it after we received the "Account Validation Passed" result.
So instead of moving to the "Run Fraud Check" decision, lets create our "Subflow State".
-
To do this we first need to delete the existing decision state and then select "Create Subflow State".
-
You’ll enter the name as "In Sanctions".
-
Then in the "Perform Action" box we’ll delete the existing call to Fraud and then select "Call Subflow" and then choose the "Sanctions Subflow". Once done we should look like:

If you inspect the error now we’ll see:

So here we can see that the flow needs us to define how to handle the fact that the subflow has reached those Complete, Rejected or Blocked states. Why only those 3? Because those are the ones we specified as terminal with the sanctions subflow.
Let’s setup our handling of the subflow terminating as "Event Behaviour" in the main V2 flow. To do this we start by adding a new Event Behaviour with current state of "In Sanctions". Then in the "For Event" we select "Subflow Completion" and then we’ll start by selecting "Complete".
In our case on receipt of complete from the sanctions flow we’ll need to create our "Run Fraud Check" decision and fire the fraud check decision as we had previously (note - until this is done "Run Fraud Check" shows as an 'Unresolved Reference'):

Now let’s do the same to handle the outcome from Rejected and Blocked, for now we’ll just send both to rejected.

Again, note here how we’ve used the "Any Of" capability to minimise the entry.
Finally, let’s look at how this has impacted our flow diagram (Tools > Open FlowViewer):
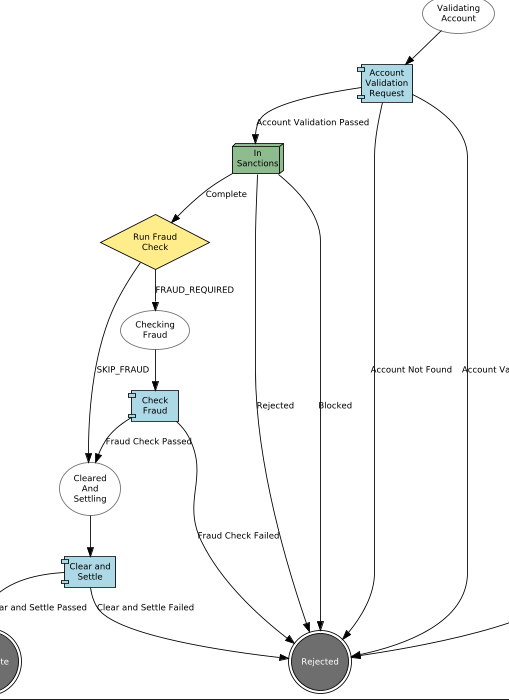
Here we can see that our subflow call has been represented by box. The box contain all of the subflow logic to minimise the complexity of the graph. However, if you look at the top of the graph there’s a new option "Expand Subflow". Let’s click this and apply to see:
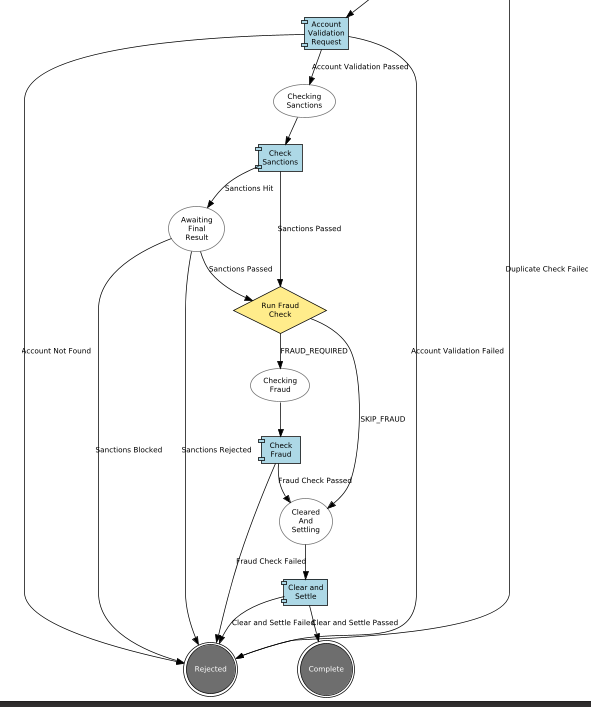
And in this view we can see the subflow being expanded out so we can see the inner workings of the flow.
That’s all our DSL setup done. Now let’s move onto the implementation side.
Java Implementation
Defining the Adapter
Let’s switch to Intellij to work with the java side.
Firstly, let’s rebuild our project so that we can generate our new flow. To do this open a new terminal and run:
mvn clean installThere is nothing special about the subflow itself from a generation viewpoint, the changes we have to consider are simply that we have defined a new External Domain (Sanctions Domain) that we now have to implement. You’ll again here choose to just use the sample app’s implementation as we did in DSL 4 - Using an external domain, so try and add that now and solution is below when ready:
@Bean
public IpftutorialmodelDomain init(ActorSystem actorSystem, SchedulerPort schedulerAdapter) {
    // All adapters should be added to the domain model
    return new IpftutorialmodelDomain.Builder(actorSystem)
             .withTutorialDomainFunctionLibraryAdapter(input -> CompletableFuture.completedStage(new DuplicateCheckResponseInput.Builder(input.getId(), AcceptOrRejectCodes.Accepted).build()))
             .withAccountingSystemActionAdapter(new SampleAccountingSystemActionAdapter())
             .withFraudSystemActionAdapter(new FraudSystemActionAdapter())
             .withDecisionLibraryAdapter(input ->
                    input.getCustomerCreditTransfer().getCdtTrfTxInf().get(0).getIntrBkSttlmAmt().getValue().compareTo(BigDecimal.TEN)>0 ?
                            RunFraudCheckDecisionOutcomes.FRAUDREQUIRED : RunFraudCheckDecisionOutcomes.SKIPFRAUD)
             .withIpftutorialflowV1AggregateFunctionAdapter(input -> new ExtractCreditorAccountForFlowIpftutorialflowV1AggregateFunctionOutput(input.getCustomerCreditTransfer().getCdtTrfTxInf().get(0).getCdtrAcct()))
             .withIpftutorialflowV2AggregateFunctionAdapter(input -> new ExtractCreditorAccountForFlowIpftutorialflowV2AggregateFunctionOutput(input.getCustomerCreditTransfer().getCdtTrfTxInf().get(0).getCdtrAcct()))
             .withSchedulerAdapter(schedulerAdapter)
             .withCSMServiceActionAdapter(new SampleCSMServiceActionAdapter())
             .withSanctionsDomainActionAdapter(new SampleSanctionsDomainActionAdapter())
             .build();
}
Here we have added into our config the addition of the sanctions system specification.
Checking our Solution
As normal let’s now check out solution works. Start up the application as previously (instructions are available in Reviewing the initial application if you need a refresher!)
For payments, we’ll just fire in a standard one:
curl -X POST localhost:8080/submit | jqThen as normal, if we now bring up the payment in the Developer GUI and bring up the flow graph (search by unit of work id, click view, click view graph) and we should see:

And we can see that our subflow has been expanded out to be part of the main running flow which has completed successfully. If we look at the events instead (click domain events):
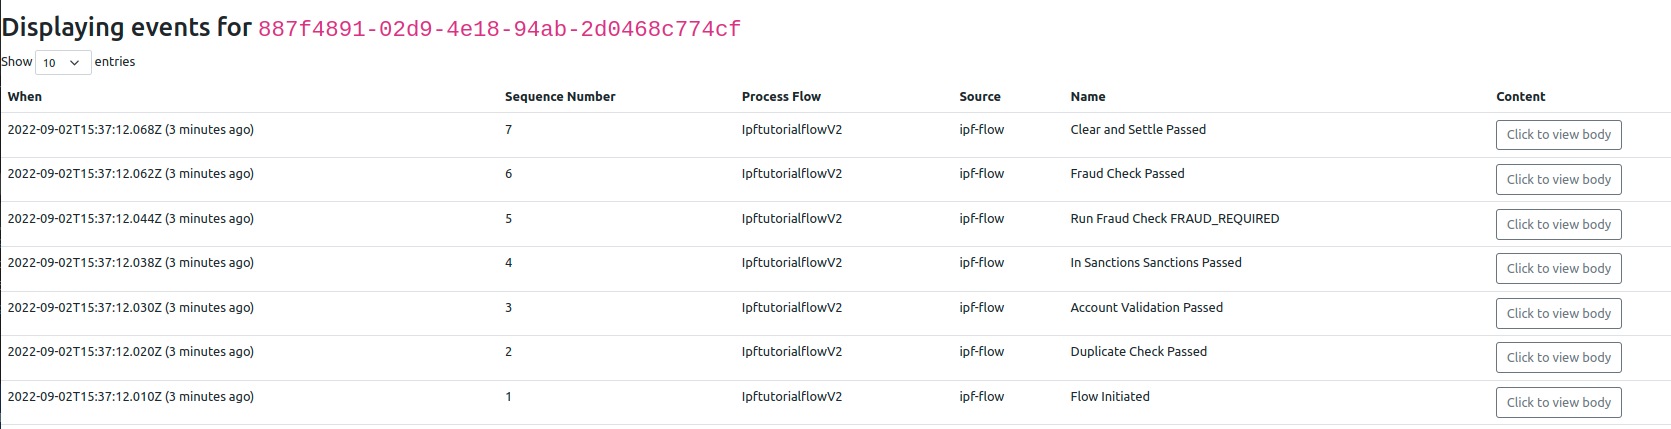
We should note that the event name is the combination of both the prefix we provided in our pseudo state together with the actual name of the event in the subflow. This is important to realise as it is this capability that allows us to use our subflow in multiple places across our flow. You can try this yourself if you want by adding a second sanctions subflow call into the flow!
Conclusions
In this section we’ve learnt how to create a subflow and invoke it from within our flow.
|
Having considered subflows and how to use them, let’s now turn our attention to other flows and how to call one flow from another in: DSL 10 - Calling other flows |