DSL 5 - Using a Decision
|
Getting Started
The tutorial step uses the "add_external_domain" solution of the project as it’s starting point. If at anytime you want to see the solution to this step, this can be found on the "add_decision" solution! |
What is a Decision?
So far we have added a domain function (internal call) and an external domain (external call). Now it’s time to consider some of the processing options available to us to determine how to process our payments.
In this section of the tutorial we need to decide when to perform a fraud check:
-
If the value of the payment is ⇐ 10, then we skip the fraud check.
-
If the value of the payment is > 10, then we execute the fraud check.
We can use "decisions" to model this behaviour.
A "decision" in the DSL is very simple, it is a function that takes in some data and returns a special type of result called an "outcome". Unlike a domain function where the result can be complex business data, an outcome can only be a simple string e.g. SKIP or CHECK. This simplicity of a decision provides us several benefits:
-
A decision does not require definition of responses
-
A decision does not require definition of input behaviour
-
A decision does not require events to be defined.
DSL Set Up
Adding a Decision
Let’s start by adding a new decision library to our model. So as previously we right click on the model and go .
This should bring up the new decision library page:
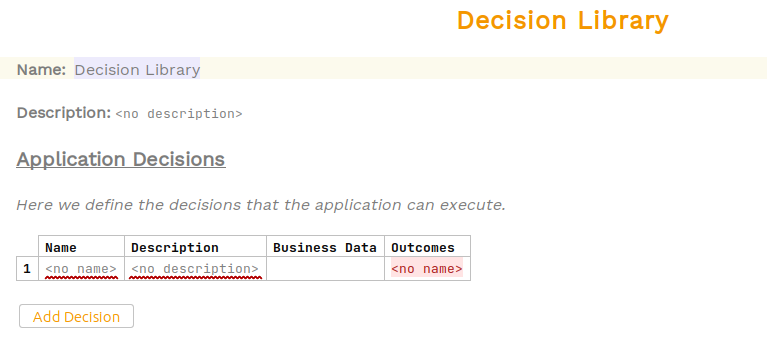
This time we’ll just leave our library with the default name "Decision Library". We could provide a different name here and have many different libraries if we needed.
So lets go ahead and add our logic for our decision. Firstly we’ll add the fields as we’ve done many times in previous steps:
-
For name we will use "Run Fraud Check"
-
For description we will use "Checks payment value requires a fraud check"
-
For business data we will use "Customer Credit Transfer"
The next field we have is "Outcomes" which is a new concept.
An "Outcome" is simply a possible result of the decision. A decision can have as many different outcomes as you like - these are very similar to the "Response Codes" we used earlier.
The outcome field is simple free text allowing us to enter a name, so let’s specify two outcomes:
-
FRAUD_REQUIRED
-
SKIP_FRAUD
To enter new outcomes we simply press the return key after completing the previous one.
Once complete, our decision should look like:

That’s our decision defined and ready to use, so the next step is to integrating it to the flow.
Using a Decision
A decision is handled slightly differently to the domain function or external domain calls that we have used to date. In those examples, we used specific concrete steps to represent the fact that the system was performing those functions. In the case of a decision however, it is only a routing position on the flow and as such we now introduce the concept of a pseudo state. These will be used in different cases later in the tutorial but for now we’ll just use the one we need for decisions which we’ll refer to as a decision state.
As mentioned in the introduction, the decision is very lightweight so there is no need to add events or input behaviours here. We can jump straight to the Event Behaviour processing.
We effectively now want to say "Once we have received the Account Validation Passed event, we should run the fraud check decision. If it requires a fraud check, we’ll execute the fraud check as before otherwise we’ll simply complete our payment".
So let’s start by editing our handing of the "Account Validation Passed" event, before we had:

Now instead of moving to the "Checking Fraud" state we will move to the "Run Fraud Check" decision state and execute our decision. For this instead of selecting a concrete state like "Checking Fraud" in the "Move To State" section we choose to "Create Decision State".

Here we can enter the name of the state as "Run Fraud Check" (noting that this does not have to be the same name as the decision we intend to use. It is a good general rule to do so but by allowing any naming here we can reuse the same decision in multiple different use cases throughout our flow).
Then in the perform action, we choose "Routing Decision" and then we simply choose the "Run Fraud Check" decision (which we created in our "Decision Library".
Once complete, we should look like this:

Now let’s handle the result of our fraud check. So, for that we will to add Event Behaviours to either complete the flow (if the check is skipped) or run the fraud check (if the check is required).
So let’s start by adding the skip case. You’ll add a new event behaviour and then specify:
-
the "With Current State" to be our "Run Fraud Check" decision state.
-
the "When" to be "On"
For the event, we use a special type of event - the "Decision Outcome Event" so we select "Decision Outcome" and then choose our "SKIP_FRAUD" outcome. Then to complete our behaviour we simply move to "Complete". Once finished it should look like:

Next we need to do the behaviour when the decision says we need to run the fraud check. In that case we simply want to move to the "Checking Fraud" state and run the "Fraud Check" request. Try and add this, or if you prefer the solution is below:

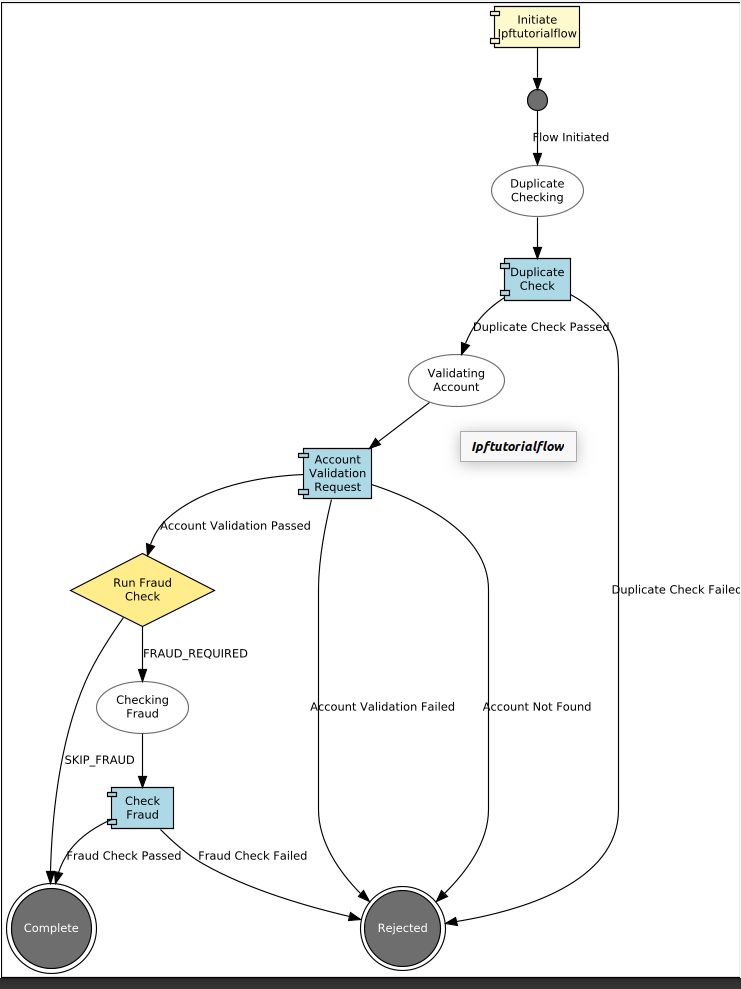
That’s it, we’ve now integrated our decision into our flow. Let’s open it in the Flow Viewer (Tools > "Open Flo Viewer") and see what it looks like:
|
Top Tip
As our graphs get more complicated there’s a few useful things to be aware of. The first is at the top we have an option to "Show Actions" by default this is on but unchecking it will change the view to only show state transitions which may be easier to view. The second is that we have the ability to manipulate the view of the diagram:
Note: If you want to reset to the default view you will need to minimise/close the flo viewer and re-open |
Java Implementation
The Decision Interface
Let’s switch to Intellij to work with the java side.
First we need to regenerate the application code to pick up the changes we’ve made in our DSL editing. You’ll do this by running the following from the root of our project (ifp-tutorial):
mvn clean installThis should take a minute or so as all the code and dependencies are generated. Once it’s complete, navigate to the target directory of the domain-root/domain project and we should find a new Decision Interface in the decisions package (& emun for generated outcomes):
package com.iconsolutions.ipf.tutorial.ipftutorialmodel.decisions;

public interface DecisionLibraryPort {
  RunFraudCheckDecisionOutcomes performRunFraudCheck(RunFraudCheckDecisionParameters decision);
}
So as with other ports we have considered previously, the check takes in a set of parameters - in our case this is a holder for just the customer credit transfer but we may be sending multiple items to business data to a decision. It will return a new enum element (RunFraudCheckDecisionOutcomes) which has been generated for each of the outcomes we defined.
As per our requirements, if the value of the payment is <10 we should skip the fraud check and if > 10 we should run the fraud check. Have a go at implementing this logic and wiring it into the domain. Once ready, you can see the solution below:
@Bean
public IpftutorialmodelDomain init(ActorSystem actorSystem) {
    // All adapters should be added to the domain model
    return new IpftutorialmodelDomain.Builder(actorSystem)
            .withDomainFunctionAdapter(input -> CompletableFuture.completedStage(new DuplicateCheckResponseInput.Builder(input.getId(), AcceptOrRejectCodes.Accepted).build()))
            .withAccountingSystemActionAdapter(new SampleAccountingSystemActionAdapter())
            .withFraudSystemActionAdapter(new SampleFraudSystemActionAdapter())
            .withDecisionLibraryAdapter(input ->
                    input.getCustomerCreditTransfer().getCdtTrfTxInf().get(0).getIntrBkSttlmAmt().getValue().compareTo(BigDecimal.TEN)>0 ?
                            RunFraudCheckDecisionOutcomes.FRAUDREQUIRED : RunFraudCheckDecisionOutcomes.SKIPFRAUD)
            .build();
}
That’s it, our implementation is now complete.
Checking our Solution
Let’s check our application changes work, as usual we’ll start up the application as previously (instructions are available in Reviewing the initial application if you need a refresher!)
Fraud Required
Now we can use our ability to send in different payment values using the values on the initiation request (see for a refresher!).
curl -X POST localhost:8080/submit -H 'Content-Type: application/json' -d '{"value": "150"}' | jqThis will send in a payment value of 150 USD. So remembering our implementation in this case a fraud check should be required. Let’s bring up the payment in the Developer GUI and bring up the domain events tab (search by unit of work id, click view, click domain events)
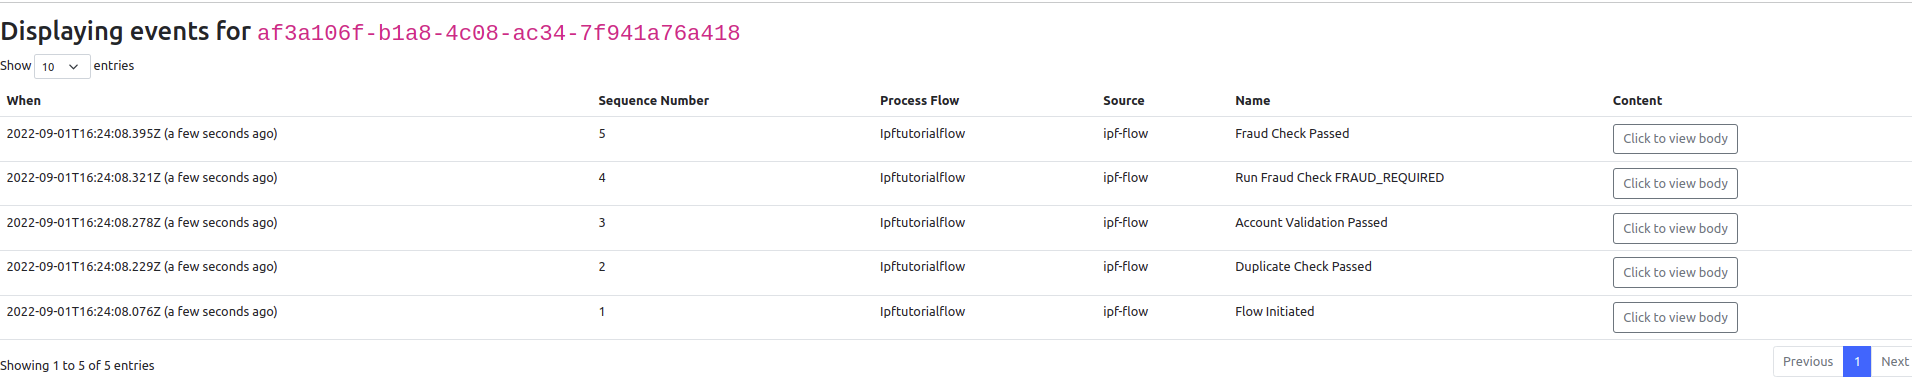
So we are now getting the new event for "Run Fraud Check FRAUD_REQUIRED" followed by the fraud check running, and we can see that our code is working as we would expect.
For interest, let’s also look at the graph here (using the "Flows" button)

Here we can see the path being taken, including the decision itself (represented as a diamond).
Fraud Skipped
Let’s now try our reverse case by sending in a payment with a value < 10 USD and then look at the events for our returned payment (remembering to replace the aggregate id with yours!):
curl -X POST localhost:8080/submit -H 'Content-Type: application/json' -d '{"value": "5"}' | jqThis time, we would expect to see the decision execute and decide that we can skip fraud and let the flow complete immediately.
Let’s bring up the payment in the Developer GUI and bring up the domain events tab (search by unit of work id, click view, click domain events)

And we find exactly what we expected! Hence we’ve shown that we’re now invoking our decision and we’re successfully skipped our fraud check!
Conclusions
In this section, we’ve:
-
Added a decision
-
provided a default implementation that checks payment value
-
used our decision to drive flow routing
-
verified our decision is working and being called
|
Now having configured our application to make decisions on how to process the payment, let’s look at an another capability: DSL 6 - Mapping Functions |