TEST1 - Adding Tests
|
Getting Started
The tutorial step uses the If at anytime you want to see the solution to this step, this can be found on the |
Upto now we’ve been focusing on experimenting with some of the different capabilities of the IPF Framework and how we can use them to quickly build up an application. During that time, we haven’t looked at how we can test our application.
Here we’ll introduce Icon’s Test Framework and show how we can use it to test the application you’ve built. We’ll assume in this tutorial a basic awareness of what the Test Framework is, and an understanding of both BDD and the Gherkin syntax.
The Icon Test Framework
Concepts
We’ll start our intro into the Test Framework by summarising some key concepts.
-
Message: An abstraction model for any 'message' that is handled by the framework implementation (request, response, payload etc). A message is typed against a known Java type that represent the contents de-serialised form, also referred to as Document Type.
-
MessageType: A representation of the messages type that can be referred to through the BDD, there should be a one to one mapping between MessageType instance and a Messages associated Document type.
-
MessageDefinition: A contextual structure that provides functionality for handling messages of the configured type, serving as a point of Inversion of Control with the test-framework. There should be a one-one mapping between the MessageDefinition instance and configured Message Type, and it is common to see both Message and MessageDefinition as arguments to core methods.
-
MessageBucket: A glorified collection that any messages received by the test-framework (either directly from Consumers, or secondary such as HTTP responses) are appended to. The internal collection is encapsulated and a predicate-based accessor methods are provided in order to "fish" correlated messages from the bucket. A successfully "fished" message is typically removed from the bucket and added to the test’s own Context object.
-
Transporter: An abstraction of a protocol on which a message may be sent to the target system e.g. HTTP, JMS etc
-
Context: A scenario context that holds test information and is accessible from any step, the internal data structure is thread local to facilitate parallelisation and is cleared down between scenarios by JBehave lifecycle hooks.
Extensions
For this tutorial we’re going to use an extension on the Test Framework that is explicitly designed to make testing easier using the IPF product suite.
<dependency>
    <groupId>com.iconsolutions.ipf.core.test</groupId>
    <artifactId>ipf-test-fw-whitebox</artifactId>
    <scope>test</scope>
</dependency>|
If opening the tutorial project from a solutions folder, the group id would be |
The ipf-test-fw provides a number of useful things:
-
A set of pre-built steps that utilise the system events structure of an IPF application to provide rich processing steps that can be used for validation.
-
A set of pre-built steps that utilise the model operations capability to interrogate the actual aggregate of any given flow.
-
A set of common steps (scenario start / end)
-
A set of transporter utilities to allow easy set up of stubbed HTTP, Kafka and JMS services.
You’ll use these features throughout this tutorial.
Project Set Up
You’ll begin by putting the basics of a new project in place for the tests.
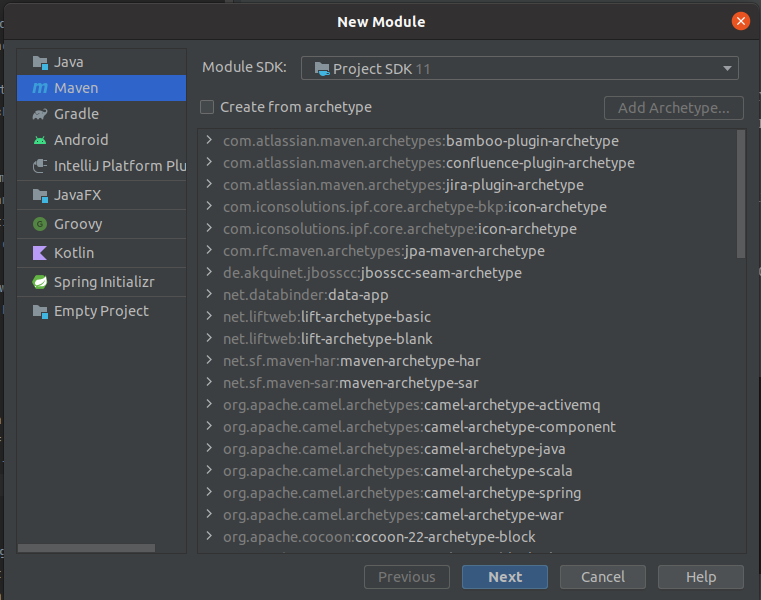
This will be a new Maven module which you’ll call ipf-tutorial-application-tests.
If you’re using IntelliJ you can do this by right-clicking on the ipf-tutorial project in the project view and selecting .
Then you should be prompted to add a new Maven module:
Then you should be prompted to add a new Maven module:
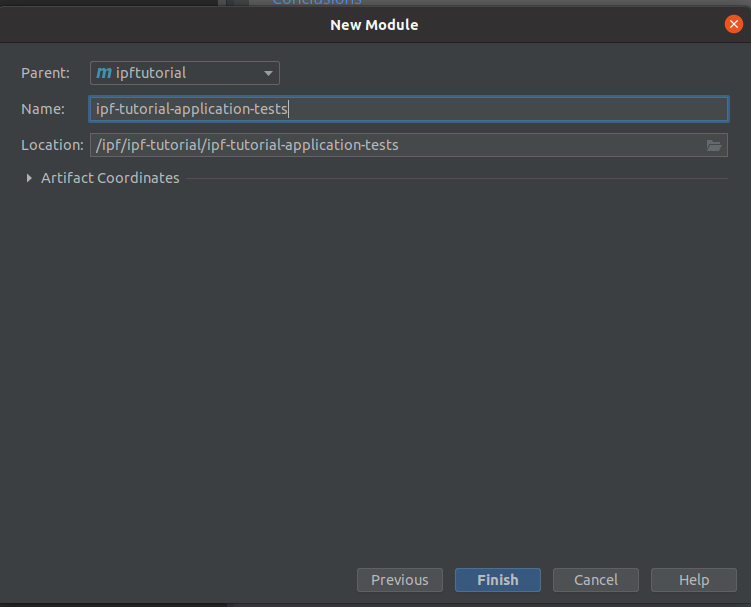
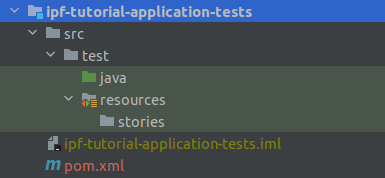
Press "Finish" to complete the project setup. Once complete if you expand the module in the navigator, you can delete the ipf-tutorial-application-tests/src/main directory as we will only be working in the test folder here.
You’ll also add a new directory "resources" under the ipf-tutorial-application-tests/src/test directory. You’ll mark this as a test resources root (right click the folder > Mark Directory As > Test Resources Root). Under the new resources directory we’ll add one more directory called "stories".
When complete our project structure should look like:
A First BDD Test
Now we have a project, let’s get on and start writing our first BDD test case.
To do this we need to create a "story" file.
Let’s create a new file called HappyPath.story and add it to the new stories directory.
|
There are some great plugins available within IntelliJ to help support the development of BDD test cases. We recommend for example this one: IntelliJBehave. When installed, it will provide ability to see which steps have already been implemented and provide click through capability to see the code. |
Let’s now populate your story file:
Meta:
Narrative:
This test covers the basic tutorial happy path flow.
Scenario: Basic Happy Path
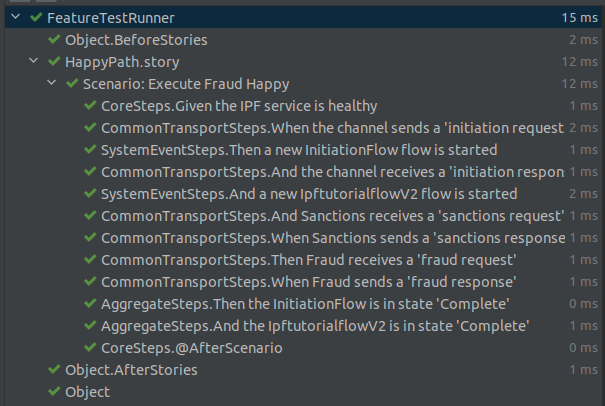
Given the IPF service is healthyThis is the basis of all the stories we’ll write for IPF. The first line of the scenario "Given the IPF service is healthy" is one of the steps we’ll use for the ipf-test-fw capabilities to check that IPF has come up and is ready to process, this will ensure that all the connectors in the application are up and running before we start a test.
|
When running a test, if this step fails, always check the logs as it will tell you which connectors have failed. This is normally down to a configuration error in your test! |
Having confirmed our application is up and running, we need to start thinking about the different steps of our payment lifecycle. You’ll do this in as minimal way as possible over this tutorial and then build out on that later. Hence the summary below, is not an exhaustive list of all the options and abilities of the test-fw, nor a full test but simply and introduction to get us started!
1. A payment is sent in (we’ll assume via the HTTP controller for now)
When the channel sends a 'initiation request' with values:
| requestId | fraud-happy-request-id |
| value | 25 |
This is an important line to digest and understand. Firstly, we use the term "channel" here, but we use this term to represent the invoker of the HTTP initiation call.
We then define the type of request we want to send in "initiation request" and we provide two values: the requestId (containing value 'fraud-happy-request-id') and the value (containing 25).
The value is easy to understand, we are sending in a value < 30 to ensure we hit the right scenario.
The request ID will be used by our test to track the specific scenario we are running here. The test framework is capable of running many tests in parallel, so we need to be able to uniquely identify our tests and it is this value that we will do that with. It’ll become more obvious how this is used later!
2. An initiation flow is created.
Then a new 'InitiationFlow' flow is started3. The HTTP response is returned to the initiating call.
And the channel receives a 'initiation response'4. The initiation flow creates a new ipftutorialv2 flow.
And a new 'IpftutorialflowV2' flow is started5. The ipftutorialv2 flow processes a couple of no-ops (duplicate check, account validation) and then calls the sanctions system.
And Sanctions receives a 'sanctions request'So here we’re telling our test that the sanctions system must receive a new message type "sanctions request"
6. The sanctions system returns a response.
When Sanctions sends a 'sanctions response'Again, here we can see we’re using another definition of a message — the "sanctions response".
7. If the payment value < 30, a call is made to the fraud system
Then Fraud receives a 'fraud request'8. The fraud system returns a response.
When Fraud sends a 'fraud response'9. The ipftutorialv2 flow uses sample no-op adapters to complete (clear and settle)
Then the 'InitiationFlow' flow is in state 'Complete'10. The execution flow returns control to the initiation flow which also completes.
And the 'IpftutorialflowV2' flow is in state 'Complete'Putting this all together we have our first full BDD test!
Meta:

Narrative:
E2E test to demonstrate testing a flow

Scenario: Execute Fraud Happy
Given the IPF service is healthy
When the channel sends a 'initiation request' with values:
| requestId | fraud-happy-request-id |
| value | 25 |
Then a new 'InitiationFlow' flow is started
And the channel receives a 'initiation response'
And a new 'IpftutorialflowV2' flow is started
And Sanctions receives a 'sanctions request'
When Sanctions sends a 'sanctions response'
Then Fraud receives a 'fraud request'
When Fraud sends a 'fraud response'
Then the 'InitiationFlow' flow is in state 'Complete'
And the 'IpftutorialflowV2' flow is in state 'Complete'
It’s quite a simple test for now, and we’ll look to add some complexity and different elements of testing within it during the course of this tutorial, but for now this will be our starting test that we’re going to run.
Test Implementation
The first thing we need to do is to add our dependency to the ipf-test-fw as discussed. The code needs to know where the application code resides, so we’ll need to add a dependency to the ipf-tutorial-app itself too.
<dependencies>
    <dependency>
        <groupId>com.iconsolutions.ipf.tutorial</groupId>
        <artifactId>ipf-tutorial-app</artifactId>
        <version>${project.version}</version>
        <scope>test</scope>
    </dependency>
    <dependency>
        <groupId>com.iconsolutions.ipf.core.test</groupId>
        <artifactId>ipf-test-fw-whitebox</artifactId>
         <scope>test</scope>
    </dependency>
</dependencies>
There are a number of key things we now need to build in order to get our tests to run:
-
A "runner" - this is a class that will provide the spring boot test runner that will execute all our story files.
-
"Config classes" for the different external services - we’ll need to tell the test framework how we want to stub out the real services that are used as part of our flow. So in our case, we’re going to have to provide config for Fraud, Sanctions and Payment Initiation.
-
"Config" file - we will need to supply configuration so that the test framework knows how to connect to the tutorial application
Let’s look at each of these now.
The Runner
The runner actually runs our tests, it’s responsibility is to determine all the available story files and execute the scenarios within them. So let’s set up a new class like the below:
@SpringBootTest(classes = Application.class, webEnvironment = SpringBootTest.WebEnvironment.DEFINED_PORT)
@Import({AllTestConfig.class})
public class FeatureTestRunner extends IPFFeatureTestRunner {
}
You’ll add this into a new package com.iconsolutions.ipf.tutorial.test
The runner we’re using here extends the out of the box IPF Feature Test runner. We’re telling it that we’re going to use our Application.class (from the ipf-tutorial-app project) as the basis of our spring boot test. Note that we’re providing it the AllTestConfig import, this will enable a number of features we’ll use in setting up the running of our test, and we’ll discuss these later.
For our test, we’re going to use mongo as our database and Kafka as the transport layer for sanctions, so we need to consider how we will use those. In this tutorial, we’re going to use test containers to supply us with the docker implementations for both Mongo and Kafka and the test will bootstrap these as part of it’s execution. To add these is really simple, firstly we need to change our class definition for the runner:
public class FeatureTestRunner extends IPFFeatureTestRunner implements KafkaIntegrationTestSupport, MongoIntegrationTestSupport {So here you can see we’ve added test support for both Kafka and Mongo. Now we also need to tell Kafka which topics we want to create and then start the containers. You’ll do this within a static block within our runner:
static {
    kafkaContainer.withEnv("KAFKA_CREATE_TOPICS", "SANCTIONS_RESPONSE:1:1,SANCTIONS_REQUEST:1:1,PAYMENT_INITIATION_REQUEST:1:1,PAYMENT_INITIATION_RESPONSE:1:1");
    SingletonContainerPattern.startAllInParallel(mongoContainer, kafkaContainer);
}
So here we’re telling our tests which topics to create (for sanctions and the payment initiation over Kafka) and then we’re simply starting the two containers.
That’s everything on our runner for now. We’ll add in additional config files later to complete it.
Configuration Classes
Payment Initiation
As discussed above, for now we’re going to use the HTTP use case for payment initiation. In our BDD, we defined two messages: the "initiation request" and the "initiation response". You’ll need to create types and definitions for how the test framework should handle these requests.
Let’s create a new package called config.
In here we will create a class called InitiationConfig.
The first thing we need to do in our initiation config is to define the message types.
These message types need to implement the MessageType interface.
So let’s construct a new enum within our config file for the message types:
public enum InitiationTypes implements MessageType {

    INITIATION_REQUEST("initiate request"),
    INITIATION_RESPONSE("initiation response");

    private final String name;

    InitiationTypes(String aName) {
        name = aName;
    }

    @Override
    public String getName() {
        return name();
    }

    @Override
    public Set<String> getAliases() {
        return Sets.newHashSet(name);
    }

}
Here we can see we’re defining two message types. The key bit to note here is that the names provided in the constructor for the types must match the names provided in your BDD story file.
Having set up a message type, we now need to define the messages. For each message type we have setup (so both our initiation request and response in this case), we need to create a new "MessageDefinition" for that type. You’ll start with the initiation response as it’s slightly easier:
@Bean
MessageDefinition<InitiationResponse> initiationResponseMessageDefinition() {
    return new DefaultMessageDefinition.Builder<InitiationResponse>()
            .withType(InitiationTypes.INITIATION_RESPONSE) (1)
            .withCausedByType(InitiationTypes.INITIATION_REQUEST) (2)
            .withDocumentTypeClass(InitiationResponse.class) (3)
            .withCorrelatingIdGet(doc -> Optional.ofNullable(doc.getDocument().getRequestId())) (4)
            .build();
}
Let’s walk through the key points here:
| 1 | Here we are defining the type that this definition applies to. In this case it’s simple — it’s the initiation response one. |
| 2 | As this is a response, we define the type that this message has been caused by - i.e. the request message. This allows correlation to take place automatically over http. |
| 3 | Here we are defining the actual java type of the class, so again a simple one that the response that comes back from the initiation controller is a InitiationResponse. |
| 4 | Here we need to define a function that tells us how to correlate this response with the initial request. So how will the test framework be able to know that a response and request are linked. We’ll simply do this by using the request ID field - so here we are saying that the "request id" on the "InitiationResponse" object will contain the same value that we will define on the initiation request definition next. |
Let’s now look at the request definition:
@Bean
MessageDefinition<InitiationRequest> initiationRequestMessageDefinition(@Value("${application.base.url}") String baseUrl) {
    return new DefaultMessageDefinition.Builder<InitiationRequest>()
            .withType(InitiationTypes.INITIATION_REQUEST) (1)
            .withDocumentTypeClass(InitiationRequest.class) (2)
            .withGenerator(props -> new InitiationRequest()) (3)
            .withCorrelatingIdGet(doc -> Optional.ofNullable(doc.getDocument().getRequestId())) (4)
            .withDestination(baseUrl + "/submit") (5)
            .withPreSend(message -> {
                ContextUtils.setClientRequestId(message.getDocument().getRequestId()); (6)
            })
            .build();
}
Again lets walk through each part of this definition:
| 1 | This time our definition is for the request message type. |
| 2 | This time our definition is for actually sending the request so we’re using the InitiationRequest object. |
| 3 | We need to supply a generator. This generator tells the test framework that when it needs to send an initiation request it will construct it using this generator method. In our case, we just want a simple brand new InitiationRequest object. You’ll use a more complicated generator definition later when looking at fraud. |
| 4 | Similarly to the response definition, we need to supply the correlation approach. So here again we’re just going to use the request id. So the two correlation functions (on the request and response) together mean that the request ID on the request object must match the request ID on the response object for the test framework to know they are the related pair. |
| 5 | For the destination, this is the HTTP address that the initiation request will be sent to.
Note here we are injecting the url path by properties so we’ll need to add a property for this into our application.conf file.
You’ll do this in the configuration file section below. |
| 6 | In the pre-send we can set any extra things that need to be done to help the test framework before the message is sent out. In our case, we’re going to set the local request ID definition on the test to the one on our message. This request id will then be available for use throughout our scenario - but will be unique to our scenario. This is key in giving us the ability to process multiple scenario’s concurrently. |
That’s our definitions done, so the final part of our initiation setup is to set the transport up, i.e. we need to provide the test framework with a mechanism to make a call to the initiation controller.
To do this we’re going to use another test-fw utility, the HttpSenderTestTransporter.
Let’s create another bean for it as follows:
@Bean
public MessageTransport initiationTransport(MessageDefinition<InitiationRequest> initiationRequestMessageDefinition, MessageDefinition<InitiationResponse> initiationResponseMessageDefinition) {
    return new HttpSenderTestTransporter.Builder<InitiationRequest, InitiationResponse>()
            .withIdentifier("initiation")
            .withRequestMessageDefinition(initiationRequestMessageDefinition)
            .withResponseMessageDefinition(initiationResponseMessageDefinition)
            .build();
}
So this is really simple, we construct a new instance and provide a unique identifier (if we have multiple sender transports each one will need a unique id, you could leave this blank but for tracing any issues a known name is better!). We also provide access to the request and response definition we set up. The transport will extract all the other information it needs from those message definitions!
That’s everything done, from an initiation viewpoint we’re all complete and ready to start testing. Let’s now look at sanctions.
The Sanctions Definition
Now we move onto sanctions, the steps are essentially the same:
-
Create the message types
-
Create the definitions for the request and response
-
Define the transport.
The only difference here is this time rather than using the HttpSenderTransport, we’ll use a KafkaMessageTransport. So let’s create a new class for our "SanctionsConfig".
Firstly let’s create our message type enum. Remember from our BDD we have defined the "sanctions request" and "sanctions response" messages. See if you can create our enum now and when ready the solution is below:
public enum SanctionsTypes implements MessageType {

    SANCTIONS_REQUEST("sanctions request"),
    SANCTIONS_RESPONSE("sanctions response");

    private final String name;

    SanctionsTypes(String aName) {
        name = aName;
    }

    @Override
    public String getName() {
        return name();
    }
    @Override
    public Set<String> getAliases() {
        return Sets.newHashSet(name);
    }
}
Now let’s think about our request definition. The first thing to realise is that from the test framework perspective it’s going to "receive" the sanctions request. So things are effectively reversed when considering the test framework - i.e. when we use a send connector to send out the message the test framework will receive it. It’s also going to receive it from a Kafka topic, so we’ll need to provide a mechanism to convert from the serialised string on the topic to the actual Sanctions Request object. Let’s see how that all works:
@Bean
MessageDefinition<SanctionsRequest> receiveSanctionsRequest() {
    return new DefaultMessageDefinition.Builder<SanctionsRequest>()
            .withType(SanctionsTypes.SANCTIONS_REQUEST) (1)
            .withDocumentTypeClass(SanctionsRequest.class) (2)
            .withSource("SANCTIONS_REQUEST") (3)
            .withFromStringMapper(s -> SerializationHelper.stringToObject(s, SanctionsRequest.class)) (4)
            .withCorrelatingIdGet(doc -> Optional.ofNullable(ContextUtils.getCorrelatingId())) (5)
            .build();
}| 1 | Here again we define our type. |
| 2 | And the java object. |
| 3 | The source field represents the Kafka topic we’re going to read from, note that it’s called source here as message definitions are protocol independent, so this would be the same definition in a jms world (replacing the topic idea for a queue name) |
| 4 | The fromStringMapper defines how we’re going to convert from the serialized string version of our message to our java class.
In our case, we’re just going to use a pre-defined stringToObject function (this is available from Icon’s SerializationHelper) which will do a simple jackson mapping. |
| 5 | This function tells the test framework where to get the correlating ID from which is used to match the response to the request message |
Next is our response definition, like with payment initiation the key here is that we will also need to provide a generator function to create the new sanctions response.
@Bean
MessageDefinition<SanctionsResponse> sendSanctionsResponse() {
    return new DefaultMessageDefinition.Builder<SanctionsResponse>()
            .withType(SanctionsTypes.SANCTIONS_RESPONSE)
            .withDocumentTypeClass(SanctionsResponse.class)
            .withDestination("SANCTIONS_RESPONSE")
            .withGenerator(props -> {
                SanctionsResponse sanctionsResponse = new SanctionsResponse();
                sanctionsResponse.setHeader(HeaderUtils.makeHeader("Sanctions", ContextUtils.getClientRequestId()));
                sanctionsResponse.setPayload(new SanctionsResponsePayload());
                sanctionsResponse.getHeader().getTechnical().setOriginalEventId(((SanctionsRequest) PreviousMessages.getLastMessage(SanctionsTypes.SANCTIONS_REQUEST, false).getDocument()).getHeader().getTechnical().getEventId());
                return sanctionsResponse;
            })
            .withCorrelatingIdGet(doc -> Optional.ofNullable(ContextUtils.getClientRequestId()))
            .build();
}
Here we can see we create a new response object and add a default header to it. The most interesting part is that we set the original event Id… WHY?
Finally we need to consider the transport again. This time we’ll just use a KafkaMessageTransport implementation. Let’s look at this:
@Bean
public MessageTransport sanctionsKafkaTransport(MessageDefinition<SanctionsRequest> sanctionsRequestMessageDefinition,
MessageDefinition<SanctionsResponse> sanctionsResponseMessageDefinition,
ClassicActorSystemProvider actorSystem) {
    return new KafkaTestTransporter.Builder<SanctionsRequest,SanctionsResponse>()
            .withIdentifier("sanctions") (1)
            .withPropertiesPath("sanctions") (2)
            .withRequestMessageDefinition(sanctionsRequestMessageDefinition) (3)
            .withResponseMessageDefinition(sanctionsResponseMessageDefinition) (4)
            .withActorSystem(actorSystem) (5)
            .build();
}
Let’s take a look at the key parts of this:
| 1 | Again we provide a unique identifier for the transport. |
| 2 | For Kafka we’re going to retrieve our configuration from a properties file, we’ll look at the details of the configuration in the next section, here all we need to do is specify the path within the config file that our sanctions properties will be. |
| 3 | Here is simply our request message definition |
| 4 | Here is simply our response message definition |
| 5 | And finally we pass the actor system |
That’s all our sanctions setup done, so let’s move onto Fraud.
The Fraud Definition
As normal, we’ll create a FraudConfig class and then start by adding the fraud message types and definitions. T
Just like with Sanctions, the main complexity is the generation of the response object. The most important point on the generation of the olaf response is that we need to ensure that the originalEventId field contains the original id from incoming request message. This is required in order to be able to correlate.
private OlafResponse createAndEnrichResponseFrom(OlafRequest olafRequest) {
    String originalId = olafRequest.getHeader().getTechnical().getEventId();
    com.iconsolutions.samplesystems.shared.model.header.Header header = Header.copy(olafRequest.getHeader());
    header.getTechnical().setEventId(UUID.randomUUID().toString());
    header.getTechnical().setOriginalEventId(originalId);
    header.getTechnical().setEventType("FraudFeedback");
    OlafResponse response = new OlafResponse();
    response.setHeader(header);
    response.setPayload(new FraudFeedbackPayload(new FraudFeedback(new FraudFeedback.PaymentStatusChanged("FraudFeedbackOK", "0"), null)));
    return response;
}
The next key point to consider is how we find the olaf request to send to our message. For this we’re going to use the "PreviousMessages" capability of the test framework which allows us to retrieve the last fraud request message.
That’s all the information we need to create our definitions. See if you can do this and when ready the solution is below:
@Bean
MessageDefinition<OlafResponse> fraudResponseMessageDefinition() {
    return new DefaultMessageDefinition.Builder<OlafResponse>()
            .withType(FraudTypes.FRAUD_RESPONSE)
            .withCausedByType(FraudTypes.FRAUD_REQUEST)
            .withDocumentTypeClass(OlafResponse.class)
            .withCorrelatingIdGet(response -> Optional.of(ContextUtils.getClientRequestId()))
            .withGenerator((param) -> createAndEnrichResponseFrom((OlafRequest) PreviousMessages.getLastDocumentReceived(FraudTypes.FRAUD_REQUEST).getDocument()))
            .build();
}

@Bean
MessageDefinition<OlafRequest> fraudRequestMessageDefinition() {
    return new DefaultMessageDefinition.Builder<OlafRequest>()
            .withType(FraudTypes.FRAUD_REQUEST)
            .withDocumentTypeClass(OlafRequest.class)
            .withFromStringMapper(s -> SerializationHelper.stringToObject(s, OlafRequest.class))
            .withCorrelatingIdGet(fraudRequest -> Optional.of(ContextUtils.getClientRequestId()))
            .build();
}

public enum FraudTypes implements MessageType {

    FRAUD_REQUEST("fraud request"),
    FRAUD_RESPONSE("fraud response");
    private final String name;

    FraudTypes(String aName) {
        name = aName;
    }

    @Override
    public String getName() {
        return name();
    }
    @Override
    public Set<String> getAliases() {
        return Sets.newHashSet(name);
    }
}
Now for transports, we’ll use the FraudConsumerTransport. Note that this is effectively the opposite way round to the way we were working in the payment initiation space. There we were sending a message to IPF and reading the response. Here IPF is sending us a message and reading the response. Hence it is a consumer transport and not a sender one as in the payment initiation case.
@Bean
    public MessageTransport fraudTransport(FlowIdentifiersFinder finder,
                                           @Value("${fraud.http.client.port}") String port,
                                           MessageDefinition<OlafRequest> fraudRequestMessageDefinition,
                                           MessageDefinition<OlafResponse> fraudResponseMessageDefinition,
                                           ClassicActorSystemProvider actorSystem) {
        return new HttpConsumerTestTransporter.Builder()
                .withIdentifier("fraud") (1)
                .withPort(Integer.parseInt(port)) (2)
                .withOperation(new HttpOperation.Builder<>("v1", fraudRequestMessageDefinition, fraudResponseMessageDefinition).withHttpMethod(HttpMethod.POST).build()) (3)
                .withActorSystem(actorSystem)
                .build();

    }
The transport here is very similar to the other test transports we’ve done to date. The key differences are:
| 1 | We need to define the identifier |
| 2 | We need to define the port which it will be on. |
| 3 | We need to define the function that needs to be performed, i.e. the 'HttpOperation'.
To construct this we use the builder and specify these four parameters:
|
That’s all our fraud setup done.
Processing Data
We also need to provide something that will listen to the processing data.
You’ll do this by adding a simple wiremock consumer.
<dependency>
    <groupId>com.github.tomakehurst</groupId>
    <artifactId>wiremock</artifactId>
    <version>2.27.1</version>
</dependency>
<dependency>
    <groupId>com.github.tomakehurst</groupId>
    <artifactId>wiremock-jre8-standalone</artifactId>
    <version>2.27.1</version>
</dependency>
@Configuration
public class DummyODSConsumer {
@Bean
public WireMockServer odsMock() {
WireMockServer wireMockServer = new WireMockServer(
new WireMockConfiguration()
.port(8093)
.needClientAuth(true)
);
wireMockServer.start();
wireMockServer.stubFor(WireMock.post(WireMock.urlEqualTo("/ipf-processing-data"))
.willReturn(WireMock.aResponse()
.withStatus(200)));
return wireMockServer;
}
}Here we are simply ignoring and returning a success response for the ODS call.
Configuration file
During the setup of configuration classes (initiation request message definition), we referenced an application property (application.base.url). Lets define that in an application.conf
under src/test/resources. By default the tutorial application listens on port 8080, so let’s set the value to localhost:8080
application.base.url="http://localhost:8080"Updating the Runner
Now we have all our configuration files, we need to add them to our runner:
@SpringBootTest(classes = Application.class, webEnvironment = SpringBootTest.WebEnvironment.DEFINED_PORT)
@Import({AllTestConfig.class, FraudConfig.class, SanctionsConfig.class, InitiationConfig.class, DummyODSConsumer.class})
public class FeatureTestRunner extends IPFFeatureTestRunner implements KafkaIntegrationTestSupport, MongoIntegrationTestSupport {
Updating Maven Dependencies
Typically, for spring boot projects, tests are written using JUnit5. Therefore, this is the engine that’s included on the classpath by default. However, the tests are executed using jBehave, which utilises JUnit4 so we need to add an
additional dependency so that our tests run correctly. Add the following dependency to the ipf-tutorial-application-tests pom
        <dependency>
            <groupId>org.junit.vintage</groupId>
            <artifactId>junit-vintage-engine</artifactId>
        </dependency>
Executing our Test
Now we should just be able to run our test by right clicking on the FeatureTestRunner class and clicking run. Once run we should see something like:
Running in Maven
Finally, if we want to run in Maven we need to add an extra build plugin to ensure they are executed. For this, we simply add the Maven failsafe plugin to our pom.xml as follows:
    <build>
        <plugins>
            <plugin>
                <groupId>org.apache.maven.plugins</groupId>
                <artifactId>maven-failsafe-plugin</artifactId>
                <version>2.22.2</version>
                <executions>
                    <execution>
                        <goals>
                            <goal>integration-test</goal>
                            <goal>verify</goal>
                        </goals>
                    </execution>
                </executions>
                <configuration>
                    <includes>
                        <include>**/*Runner.java</include>
                    </includes>
                    <excludes>
                        <exclude>**/*Test.java</exclude>
                        <exclude>**/*Tests.java</exclude>
                        <exclude>**/*InProgressRunner.java</exclude>
                        <exclude>**/*RepeatRunner.java</exclude>
                    </excludes>
                </configuration>
            </plugin>
        </plugins>
    </build>