How to implement a basic debulk
To complete this guide, you’ll need the following:
-
To know your current IPF Version
-
To know the appropriate IPF Scaffolder Version
Creating the project
We’ll start by creating a new project just like any other.
mvn com.iconsolutions.ipf.build:ipf-project-scaffolder-maven:<your-scaffold-version>:scaffold \
-DgroupId=com.icon.ipf \
-DartifactId=debulk-example-1 \
-DsolutionName=DebulkSolution \
-DprojectName=DebulkProject \
-DmodelName=DebulkModel \
-DincludeApplication=y \
-DflowName=BulkFlow \
-DipfVersion=<your-ipf-version> \
-DoutputDir=/build/debulk-example-1
Once built, we’ll build the project.
mvn clean install -DskipTestsWe’ll structure our debulker example using a standard pain001 as our input. We’ll treat it as a set of four flows:
-
A 'File' flow to represent the handling of the file that arrives.
-
A 'Bulk' flow to represent the top level envelope of the pain001 itself.
-
A 'Batch' flow to represent the instruction part of the pain001.
-
A 'Transaction' flow to represent the transaction part of the pain001.
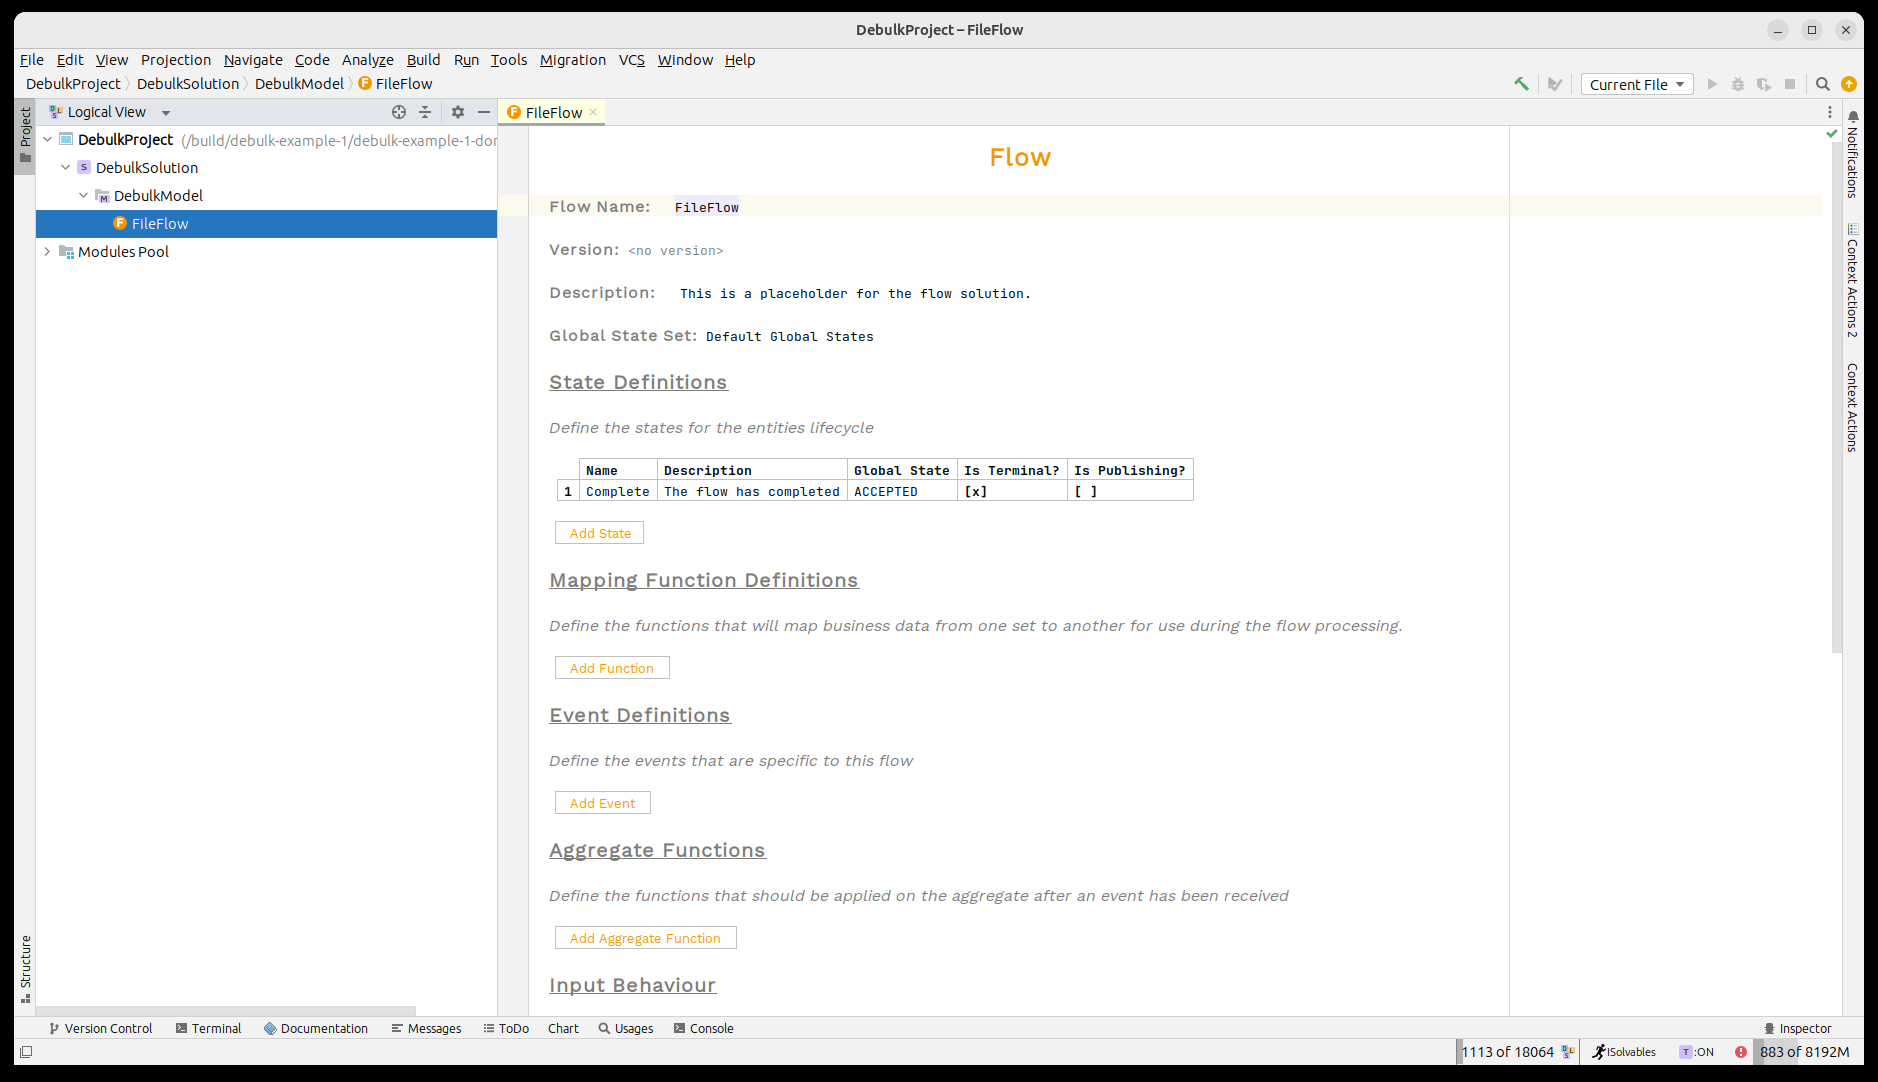
Now let’s open the project in MPS. We’ll see that our 'File Flow' has already been provided for us.
A brief reminder on the IPF Component Store
The IPF component store is used to debulk large files into components that can then be used within the normal flo system. In our case, we are going to use pain001 files and split them into the different levels of the file.
The component store requires the configuration to tell it how to split up any given file structure it receives. This configuration is provided in the form of hocon, in the pain001 case an example is given below:
ipf.debulker {
  archiving.path = "/tmp/bulk_archive"
  configurations = [
    {
      name = "pain.001.001.09"
      splitter = "xml"
      processing-entity = "BANK_ENTITY_1"
      archive-path = "/tmp/bulk_archive"
      component-hierarchy {
        marker = "Document"
        children = [
          {
            marker = "CstmrCdtTrfInitn.PmtInf"
            children = [
              {
                marker = "CdtTrfTxInf"
              }
            ]
          }
        ]
      }
    }
  ]
}
The key points to note here:
-
The name 'pain.001.001.09' when an instruction to process a file is received, this name must then be provided to tell the component store to use this configuration.
-
Each 'marker' level represents the different levels of our pain001 as described above.
Modelling the Process
Creating the 'Bulk' flow.
The bulk flow will be responsible for receiving some kind of instruction including details of where the pain001 file is stored. It will then interact with IPF’s component store to read the file and debulk it into the appropriate component before kicking off the processing of top level flows.
From an instruction viewpoint, the component store needs the following key information to be provided:
-
A unique ID for the debulk - this is modelled by the 'Debulk ID' data element.
-
The name of the config to use - this is modelled by the 'Debulk Config Name' data element.
-
The file location of data - this is modelled by the 'Debulk Source' element.
So let’s start by adding those three data elements as initiation data into our flow. To do so we first need to import the debulker business data library. This can be done by pressing CTRL+R twice and then searching for 'IPF Debulker Business Data'.
Once done we should look like:
| Here we are using the data points directly, but it is perfectly reasonable to absorb your own file type and then use an aggregate function to extract the IPF fields required. |
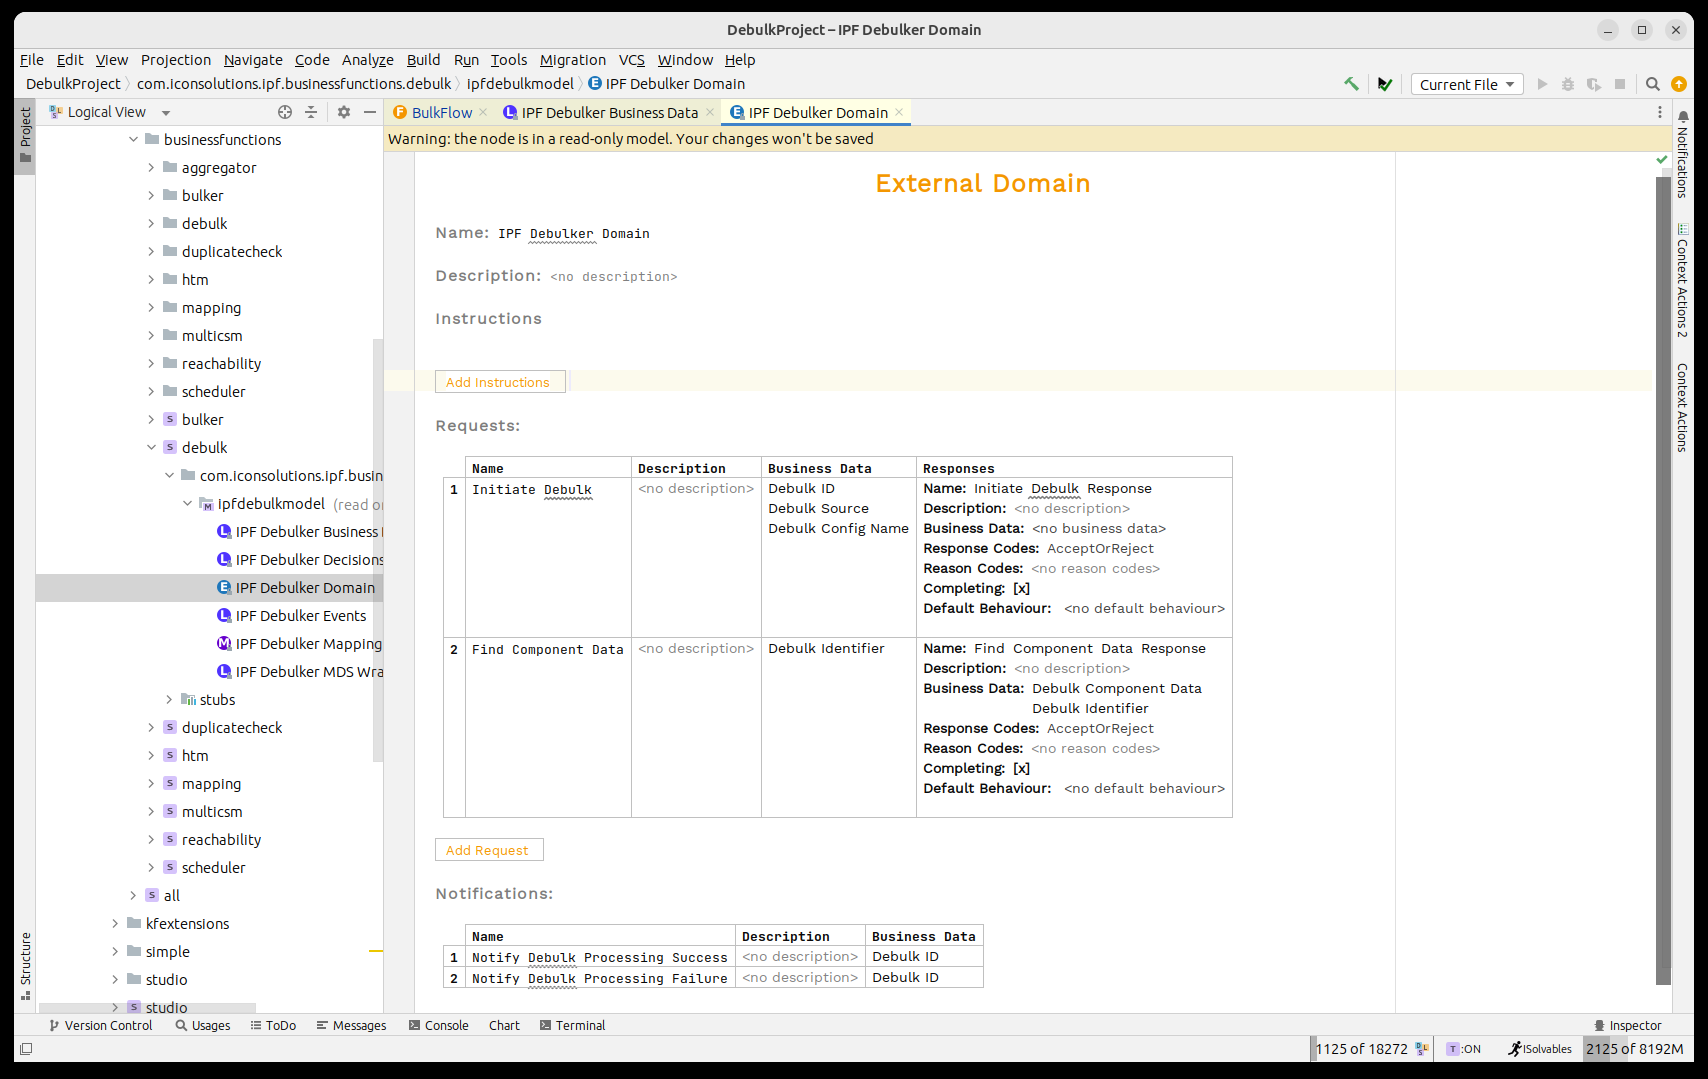
Next up we need to invoke the 'IPF Component Store' to process the bulk file. The component store has been modelled as the 'IPF Debulker Domain'. This has a function available 'Initiate Debulk' which takes the three fields we’ve made available and will process the file as a result.
So just like any normal process we need to call this domain. To do so we’ll think through the standard integration points:
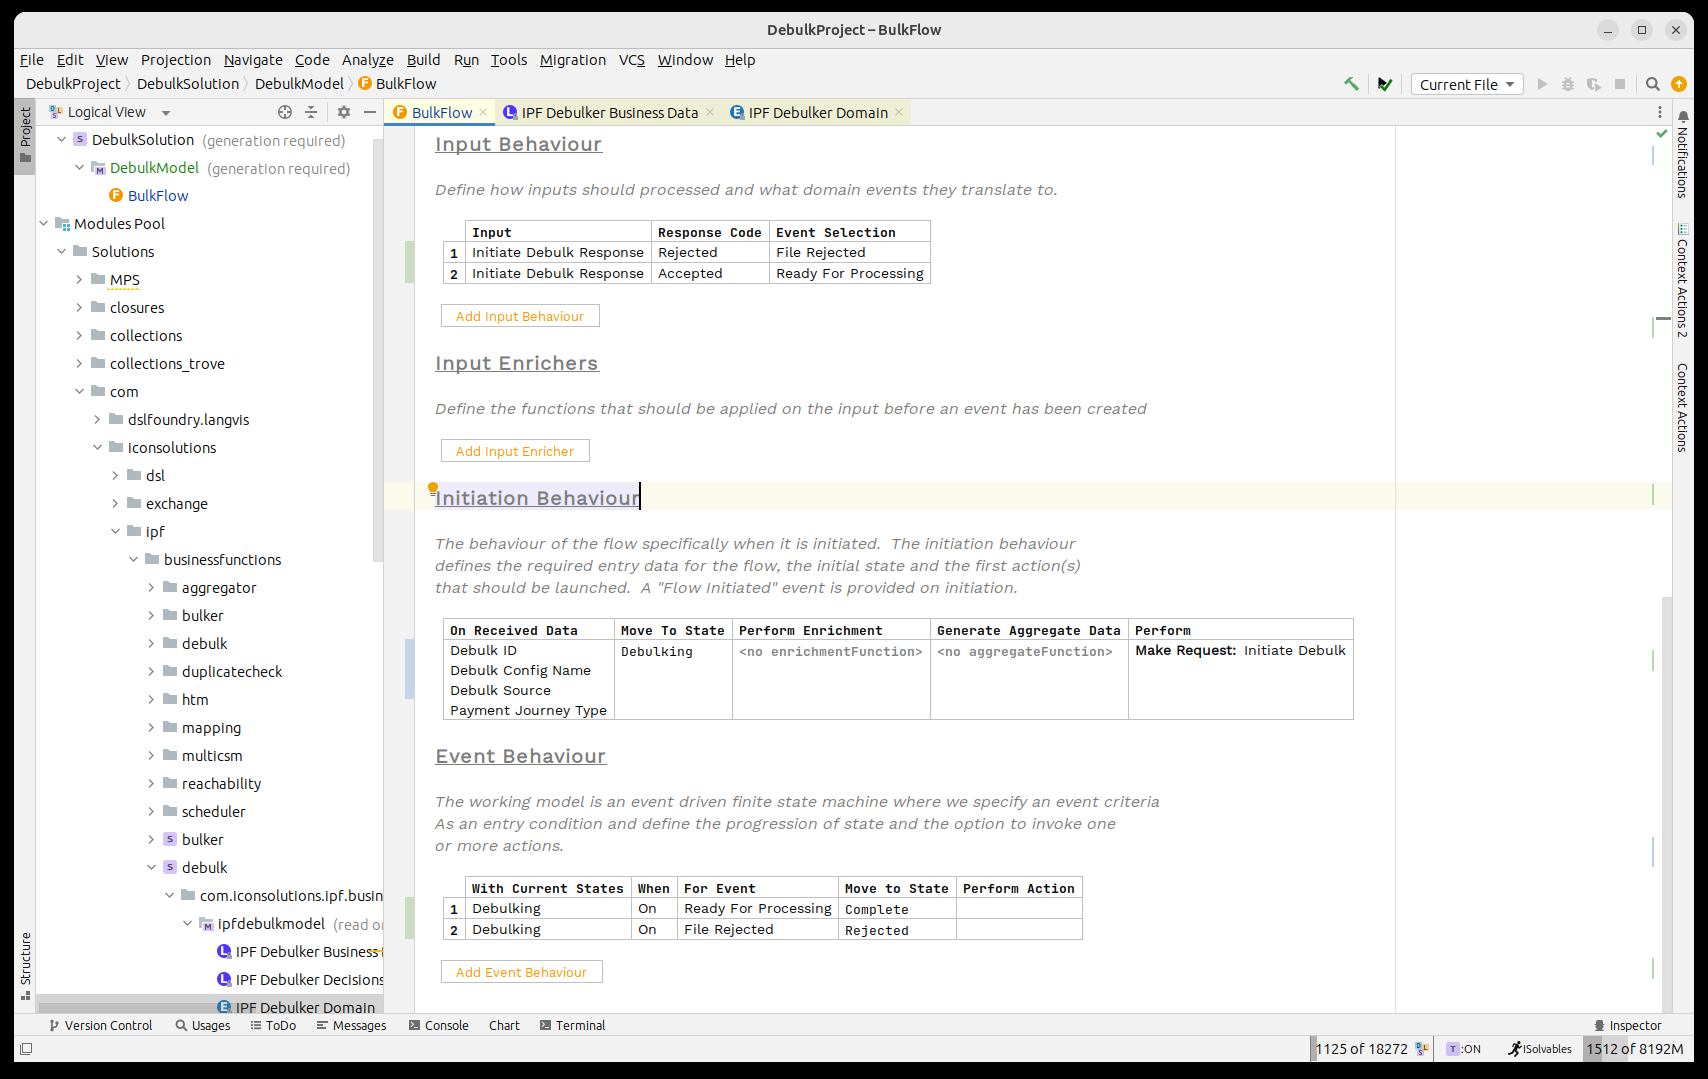
-
We’ll need a state to handle whilst the component store is being called, we’ll call this 'Debulking'. We’ll also need a state to handle failure, we’ll call this 'Rejected'.
-
The file can debulk successfully or fail validation, so we’ll need two events 'Ready for Processing' and 'File Rejected'.
-
We’ll use the 'Ready for Processing' event on receipt of the 'Initiate Debulk Response' with the 'Accepted' code and similarly use the 'File Rejected' on the 'Rejected' code.
-
We’ll call the component store on initiation.
-
When the successful event is raised we’ll move to Complete, on failure we’ll move to Rejected.
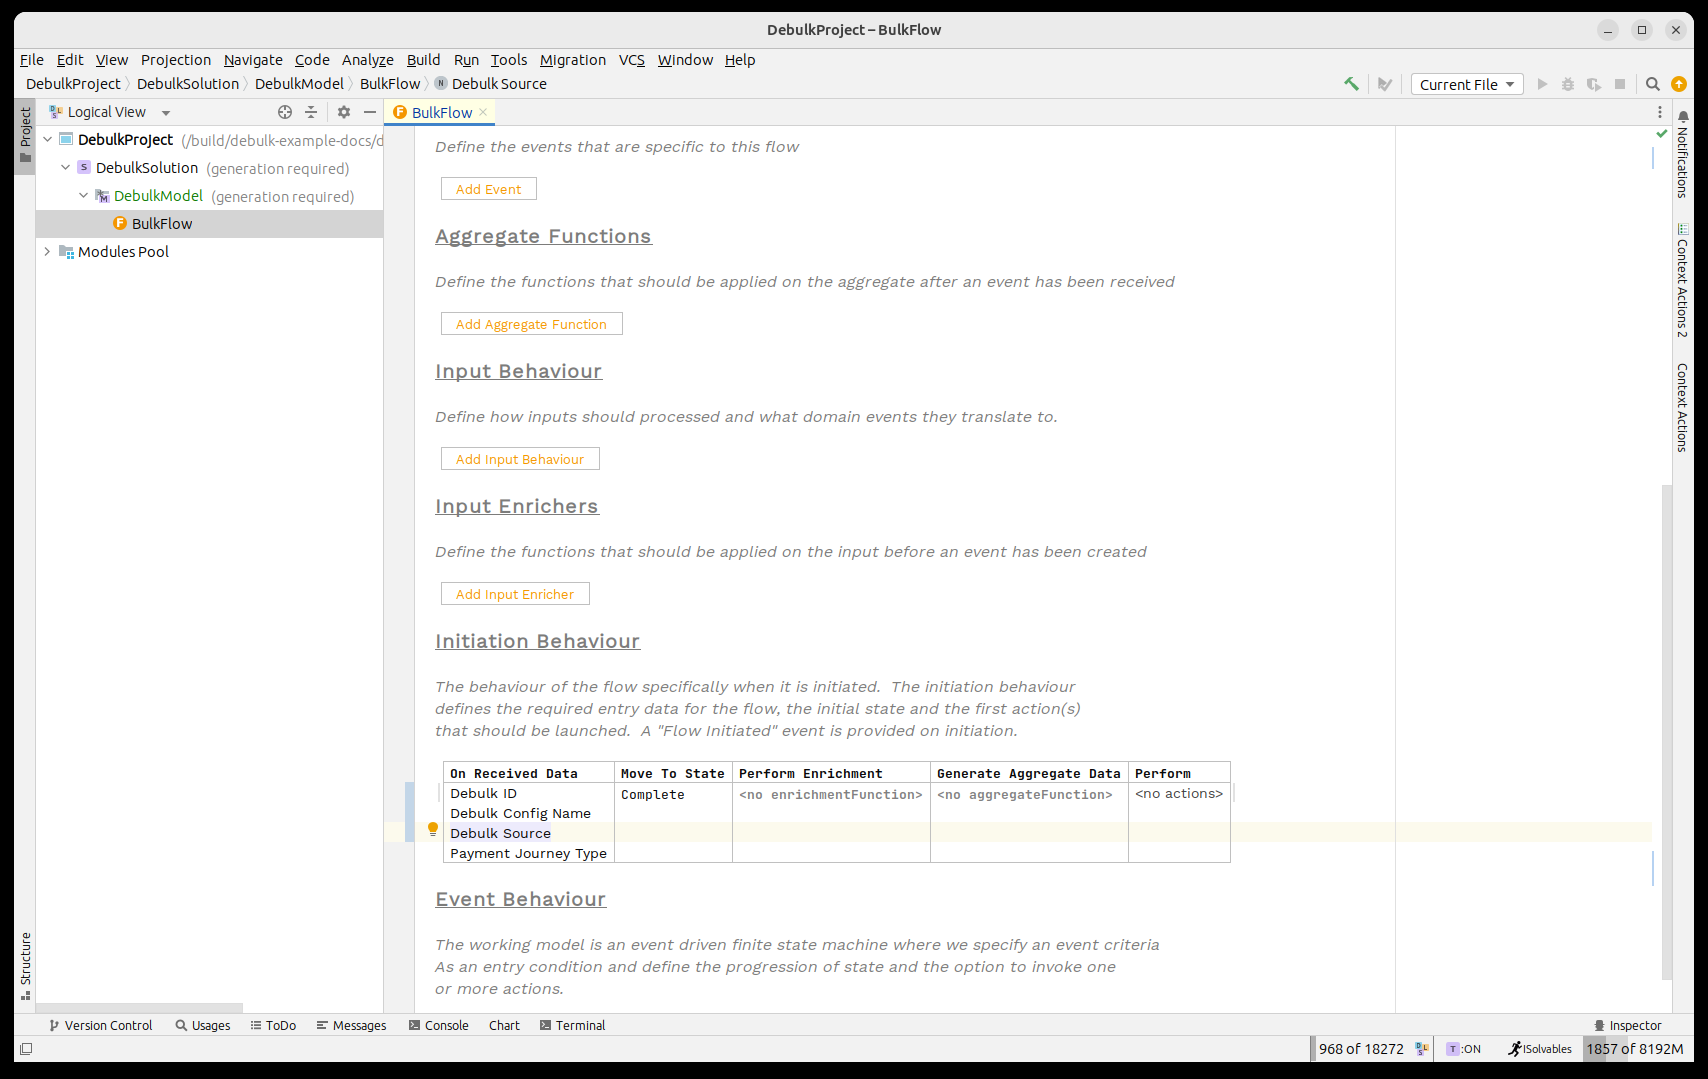
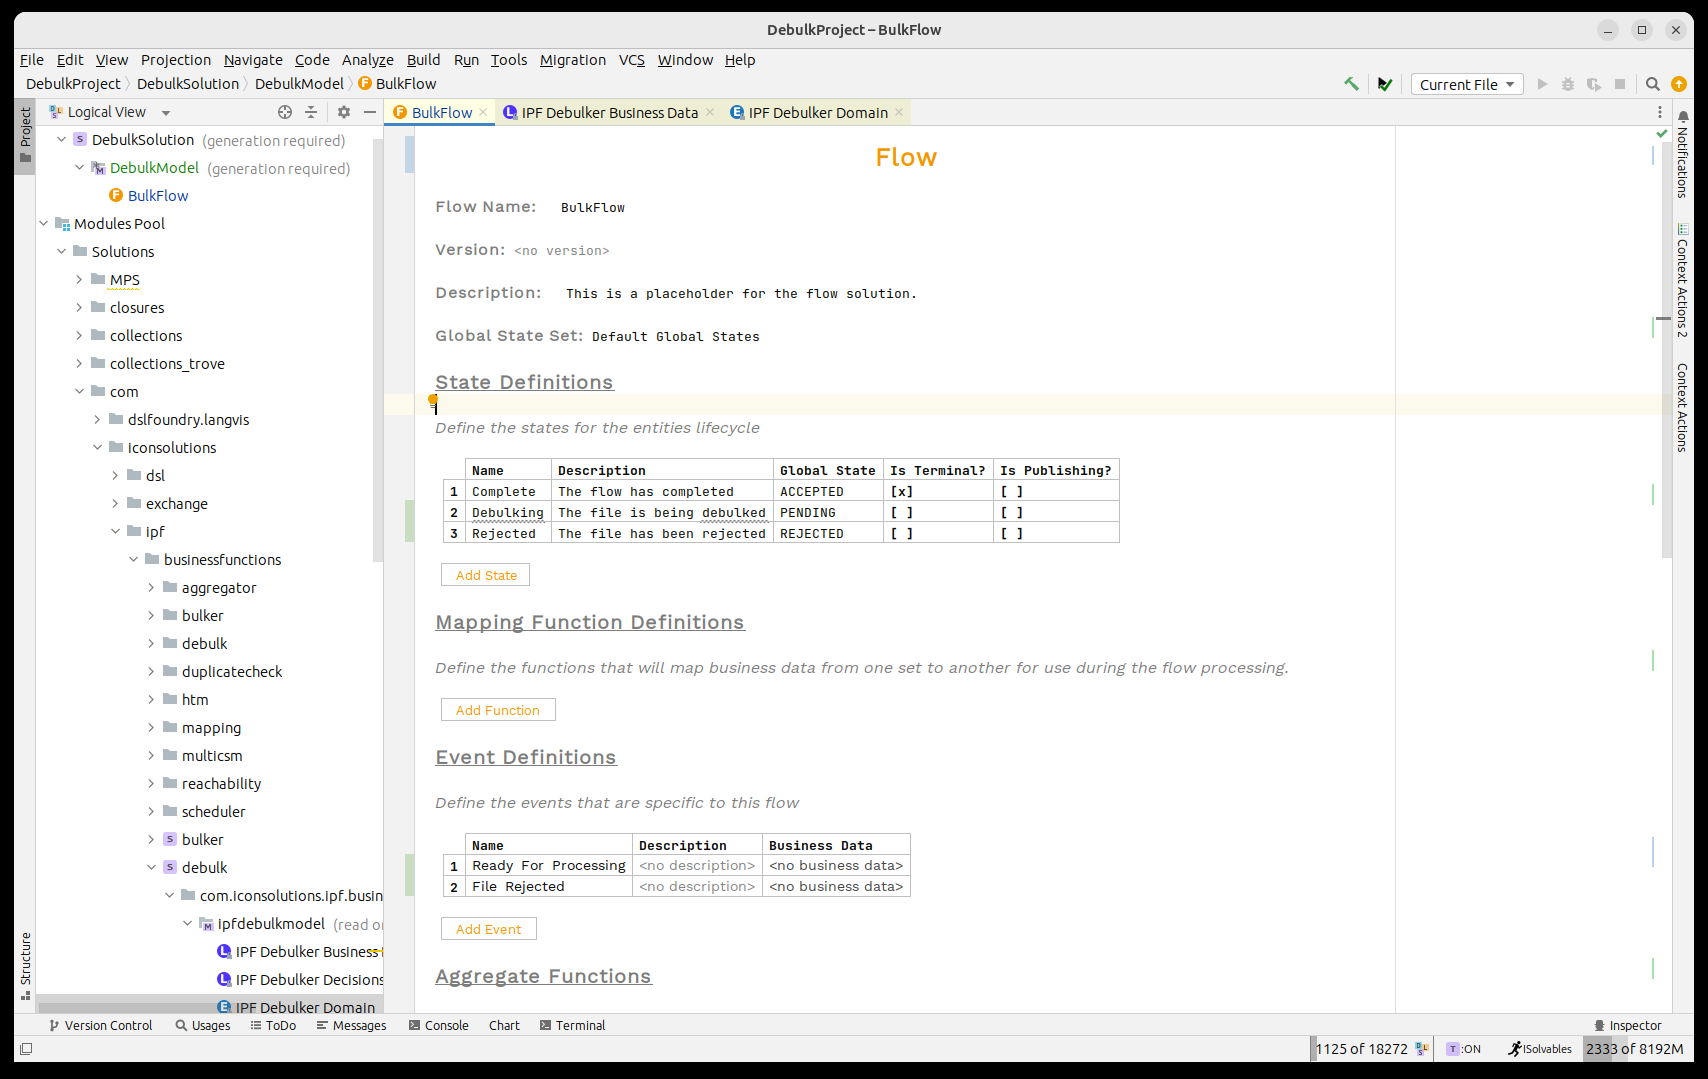
Let’s go ahead and add all these capabilities in.
Firstly the states and events:
And then the behaviours:
Now we need to think about how to process the debulked file in the component store.
Initiating flows via the component store is very similar to initiating standard flows. The only difference here is that we may be initiating more than one flow at a time depending on how many records are in the component store entry.
So to use this we need to know two things:
-
The marker from the component store that the child records will be under.
-
The flow we wish to call.
In our case, the marker is 'Document.CstmrCdtTrfInitn.PmtInf' - this represents the point in the pain001 that the batch transactions are held.
For the flow, we’ll create a new 'Batch' flow.
Creating the 'Batch' flow
So before we start editing the bulk flow, let’s create the shell for the batch flow.
To do this, we’ll create a flow just like we did previously creating the bulk flow.
-
It will be called 'Batch Flow'
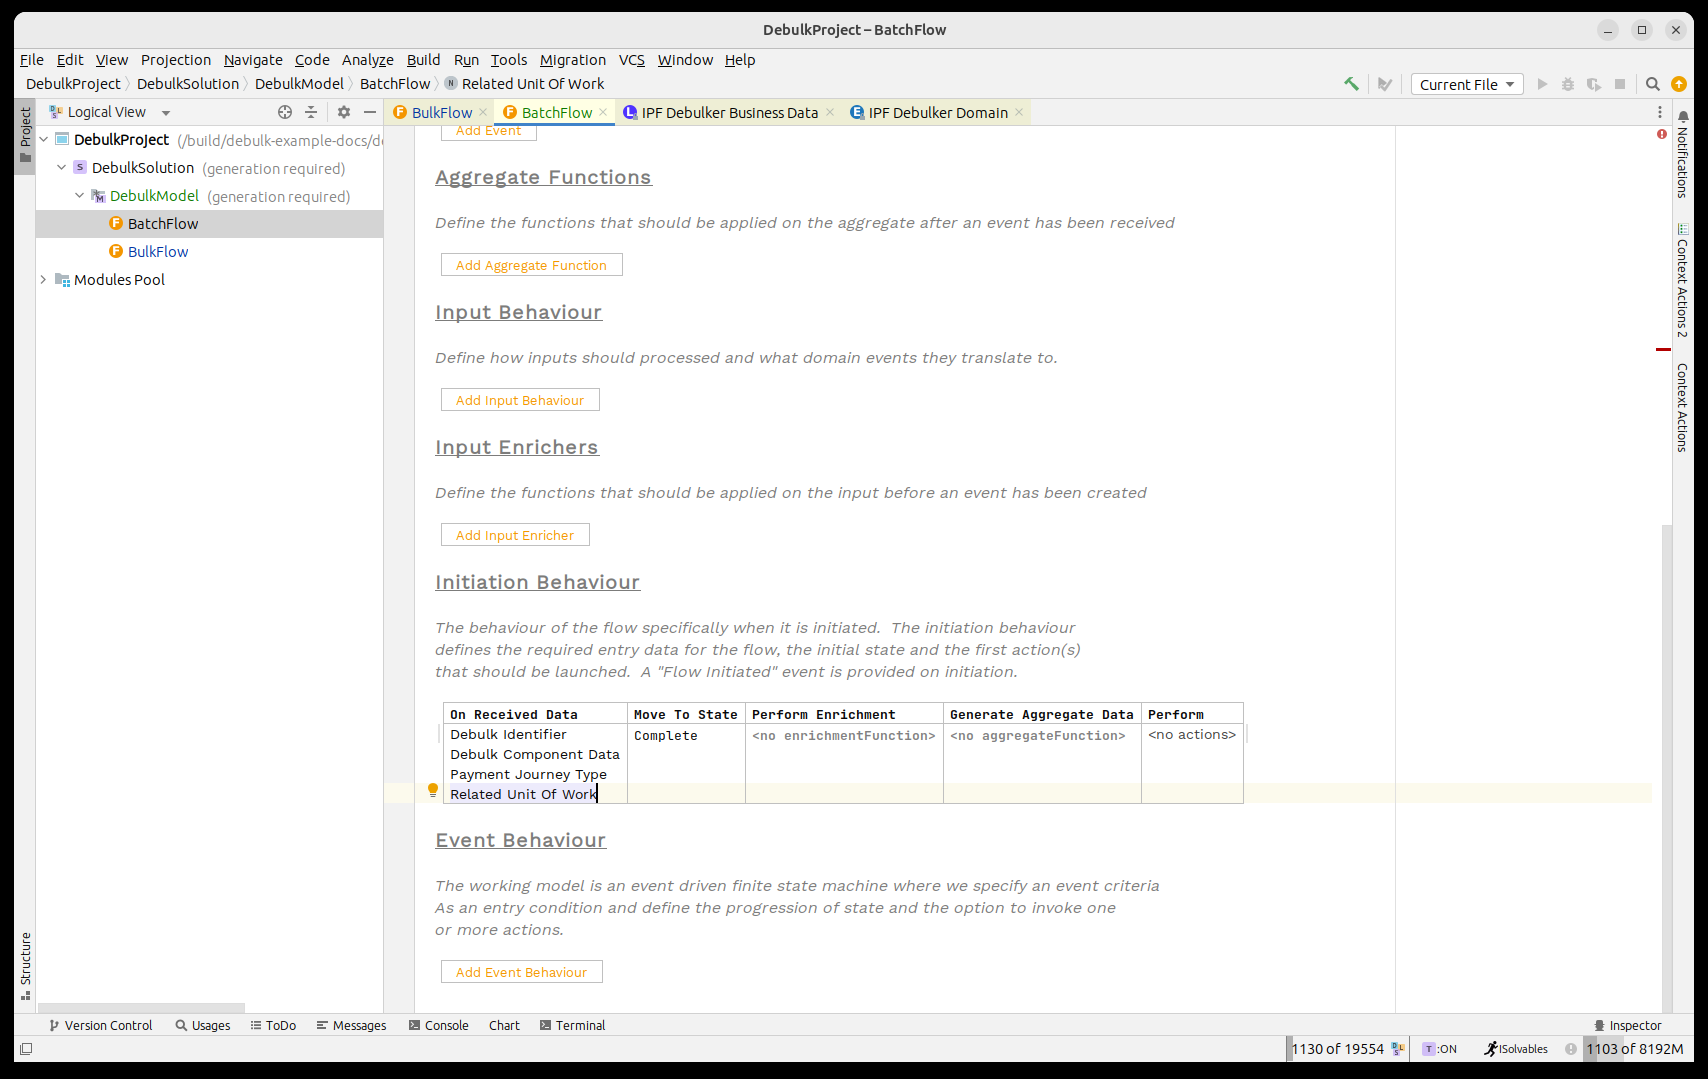
-
It will take in:
-
Debulk Identifier
-
Debulk Component Data
-
Payment Journey Type
-
Related Unit of Work
-
-
It will have terminal, publishing states for:
-
Complete
-
Failed
-
Before we create it’s worth mentioning the new business data element here 'Related Unit of Work'. This field is used to tie the different work streams of the bulk together - i.e. to establish the relationship between child and parent flows. From a processing perspective it is not required, and will be published automatically by the process. If it’s missing however, you won’t be able to navigate between the flows using the operational UI.
Let’s now add in all the elements to our flow:
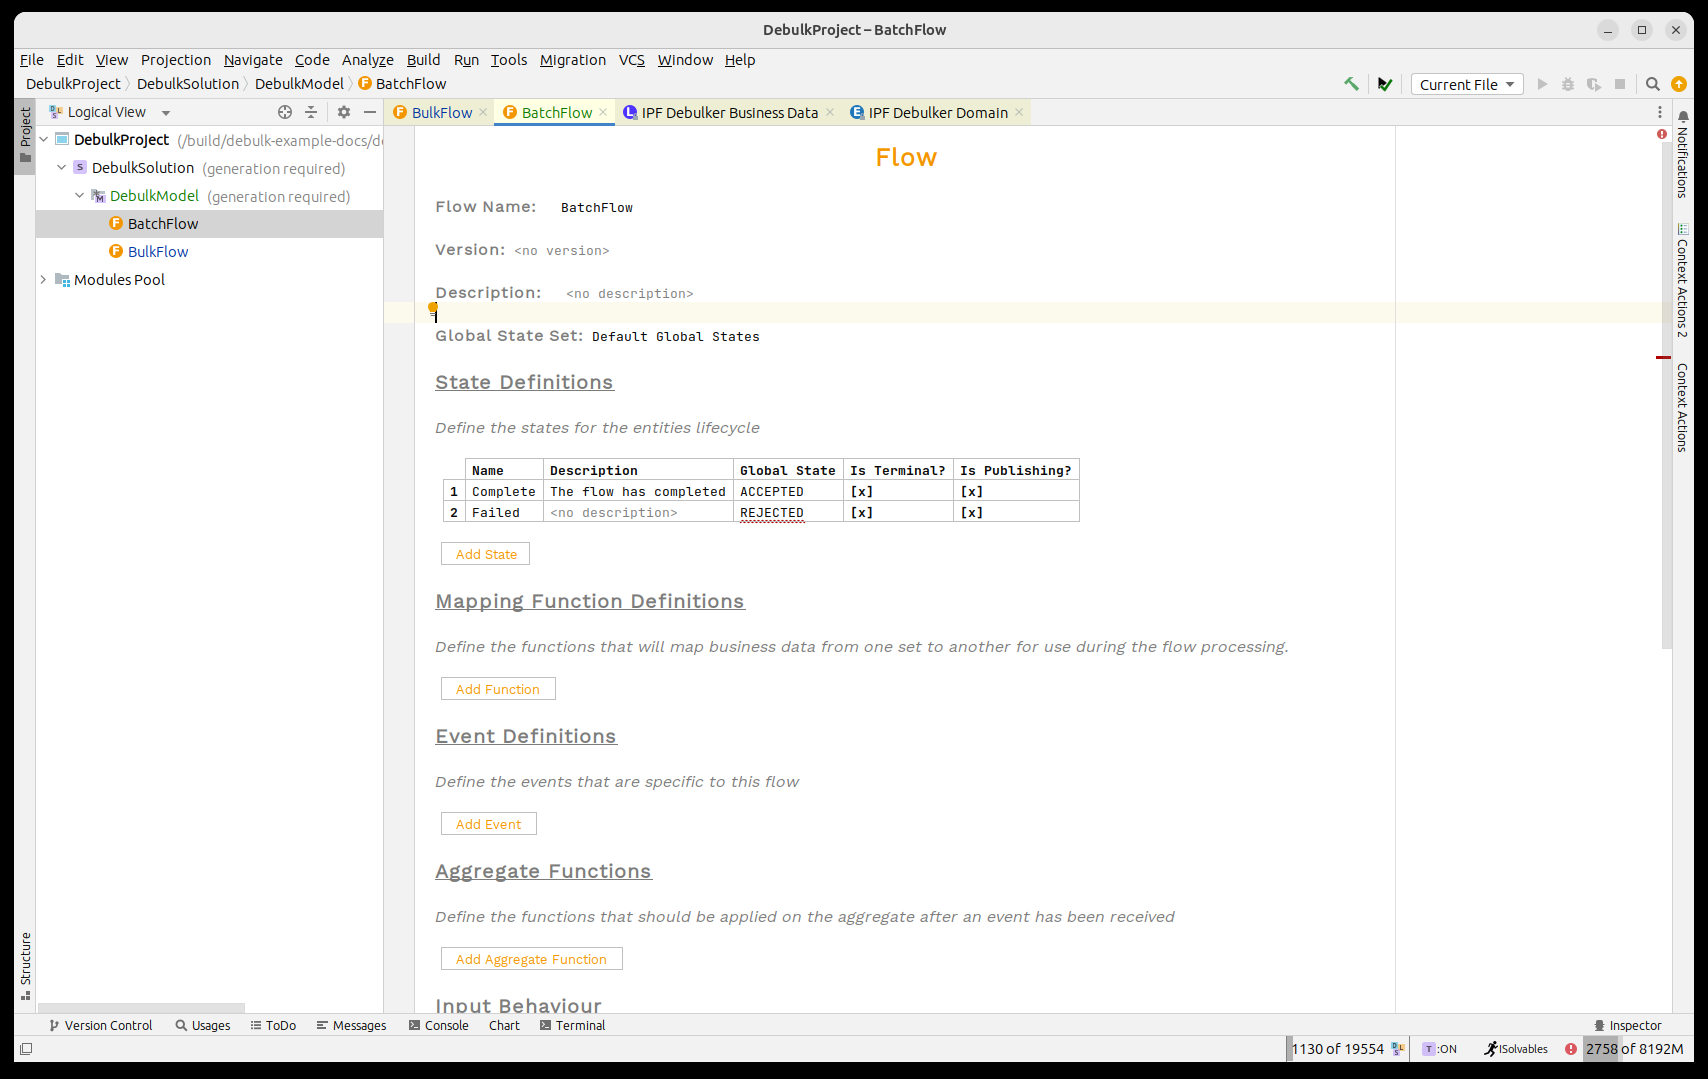
with the initiation setup:
That’s our batch flow shell defined, so let’s return to the bulk flow and add in the start of our debulking process.
Calling the File Flow
So for this we use the concept of a 'Bulk Flow Call'. It works just like a normal flow call except also requires us to state which level of the bulk it needs to process on.
So we’ll start by changing our flow so that on receipt of the 'Ready for Processing' event we’ll call the 'Batch Flow' for each 'Document.CstmrCdtTrfInitn.PmtInf' element in the bulk.
Let’s change the processing now so that we move to a new 'Flow State'. We’ll give this the identifier of 'Initiate Batch Flow' and then in the 'Perform Action' box we’ll call our 'Bulk Flow' using the call bulk flow capability. Finally we’ll specify the marker as 'Document'.

By using the 'Call Bulk Flow' capability we’ll invoke the component store and then it will fire of as many flows as we need that match the provided marker.
Once it has been invoked, it will return an acknowledgement back to say that the request has been accepted.
So the first thing we need to do is handle that acknowledgement. It comes back as a special 'Bulk Acknowledgment' event type. To handle this we’ll create a new state 'Awaiting Results' that we move to on receipt of the acknowledgement, we’ll do nothing as an action here as we’ll then wait for our bulk flow results to come back.
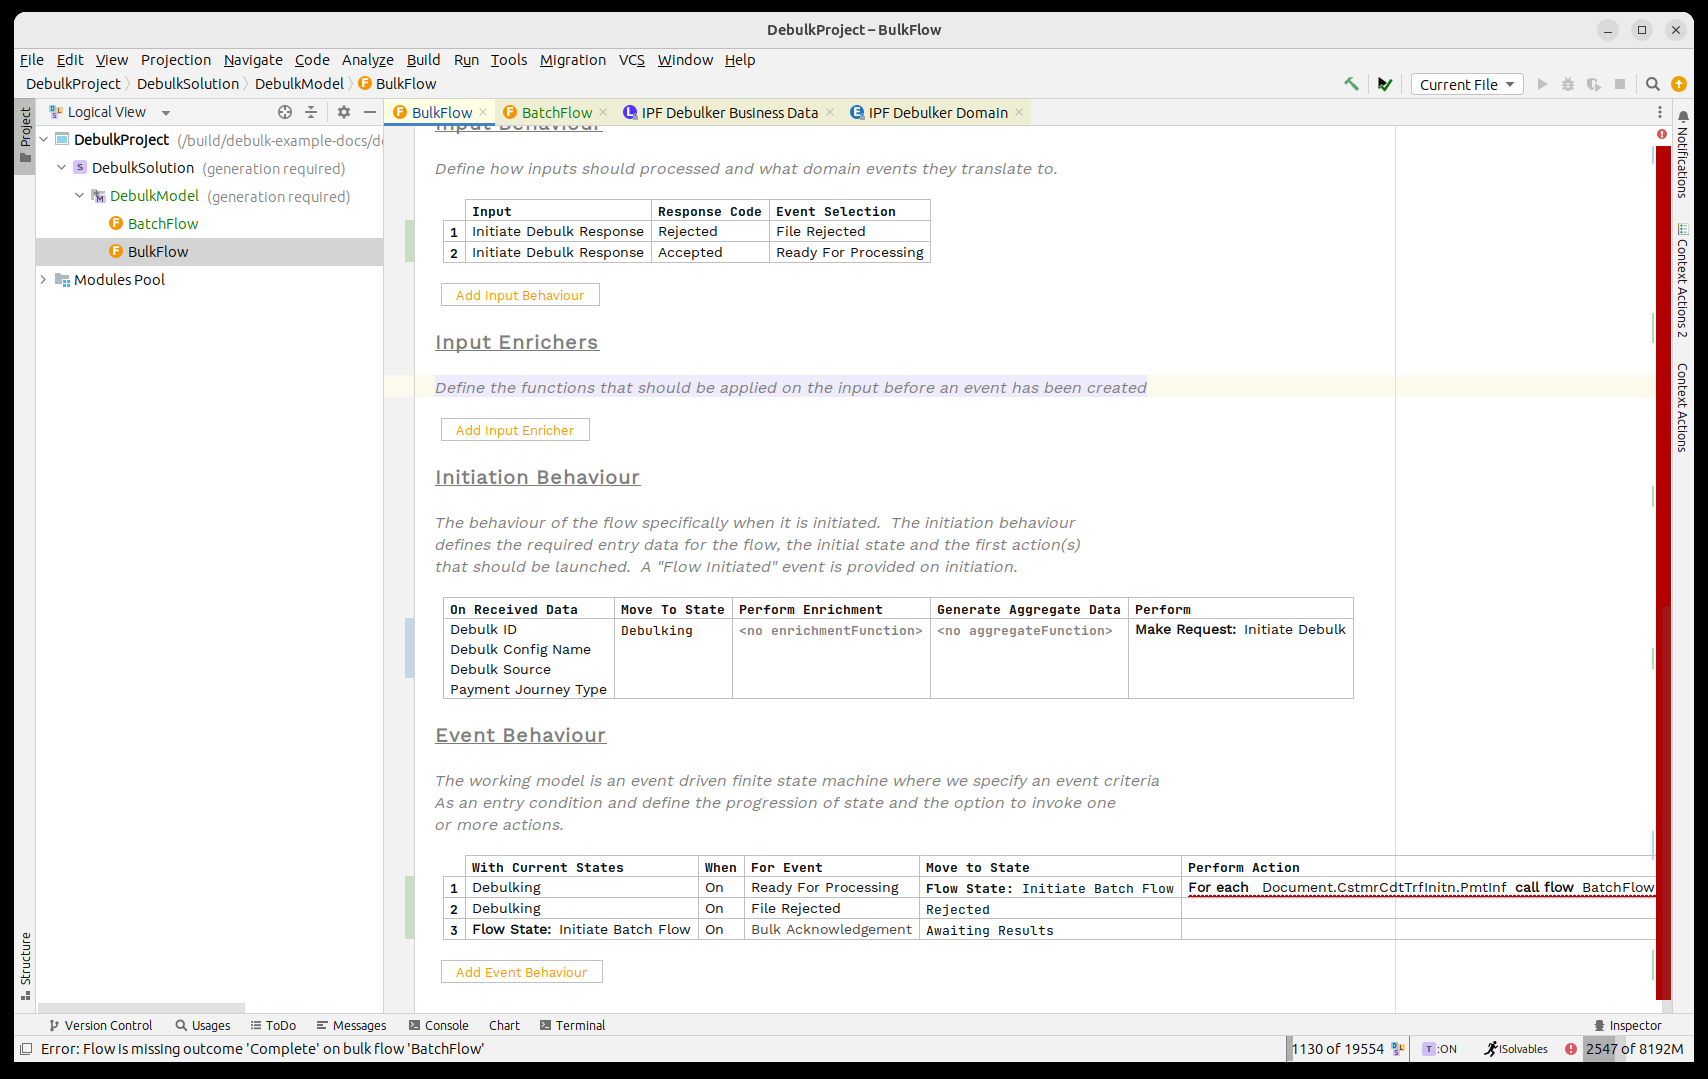
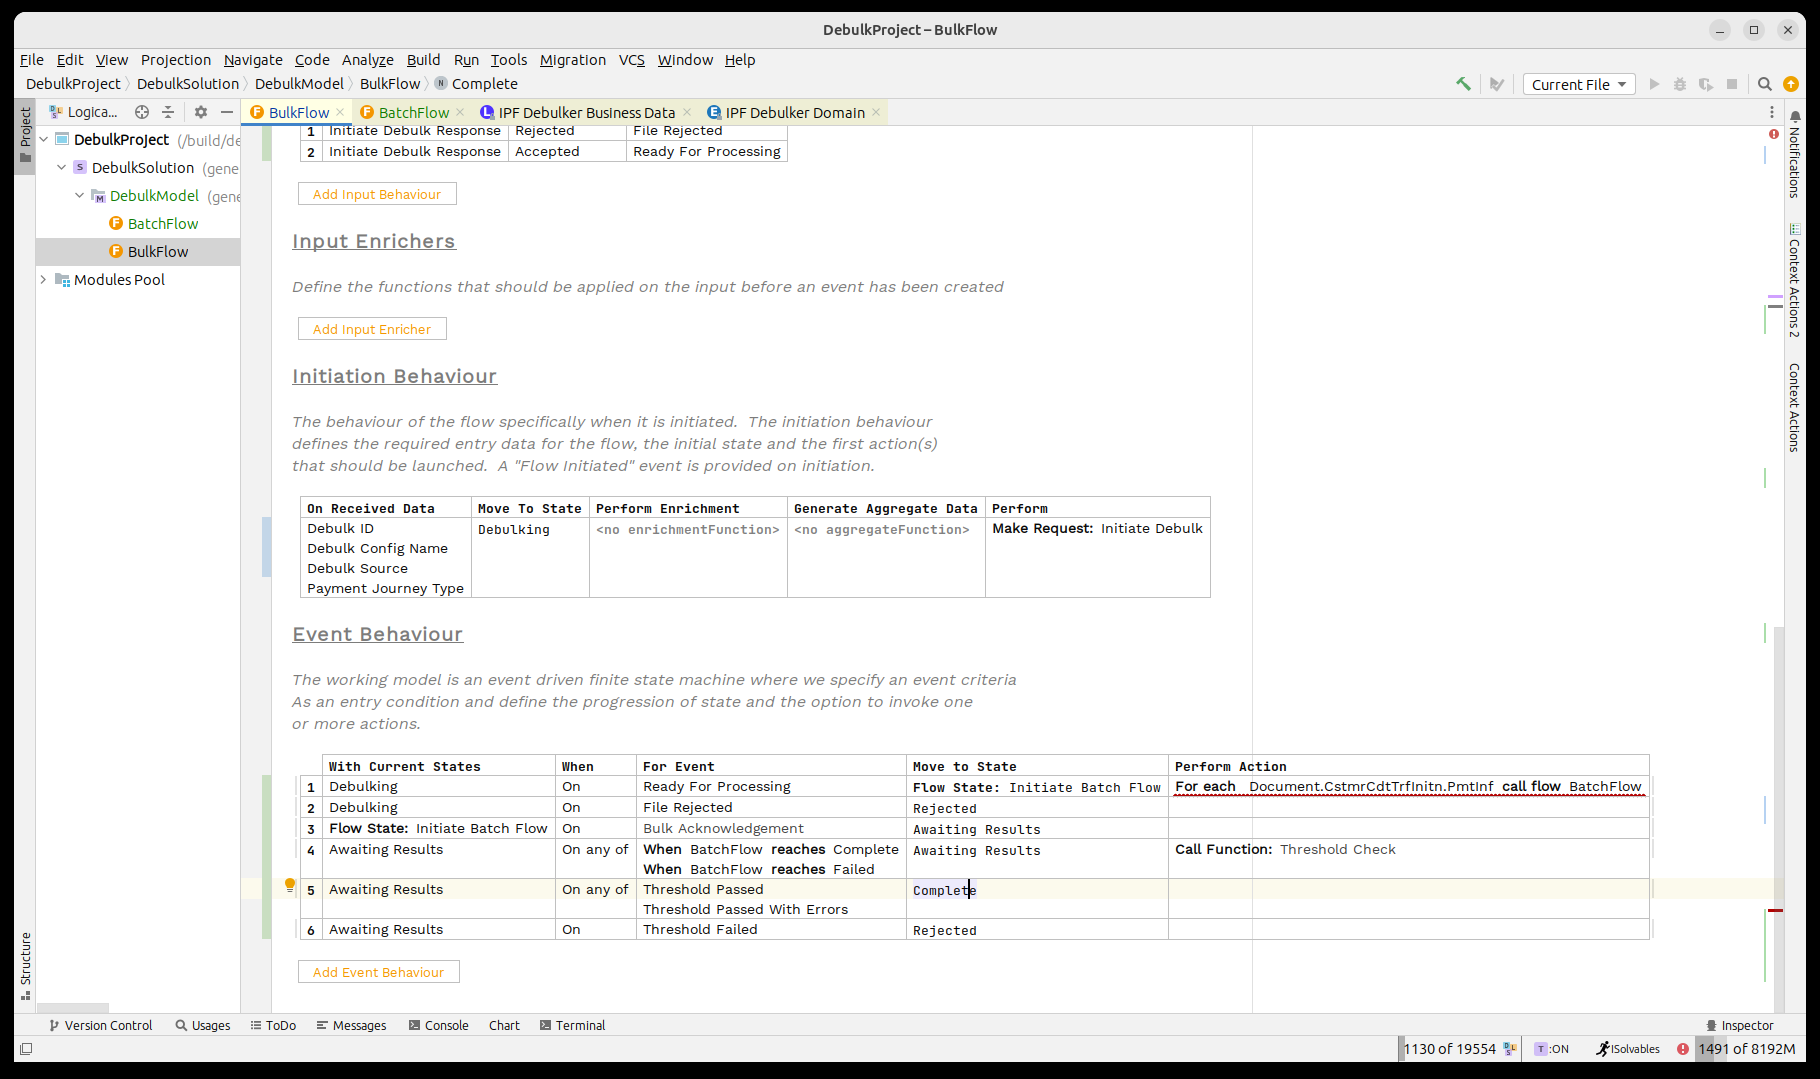
Next we need to consider the outcomes of our child batch flows coming back. For this we will use the threshold check to monitor when they have all returned.
So first, on receipt of a child result we stay in the same state and call the threshold check.
The Threshold Check function maintains a count of the results that have come back the child flows, it’s configurable but by default will assume that it has completed when ALL flows have returned successfully and has failed when a SINGLE element has failed.
Then we have to handle the three possible results, in our case when one of the passed events is returned we’ll move to complete and if the failure event arrives we’ll move to rejected.
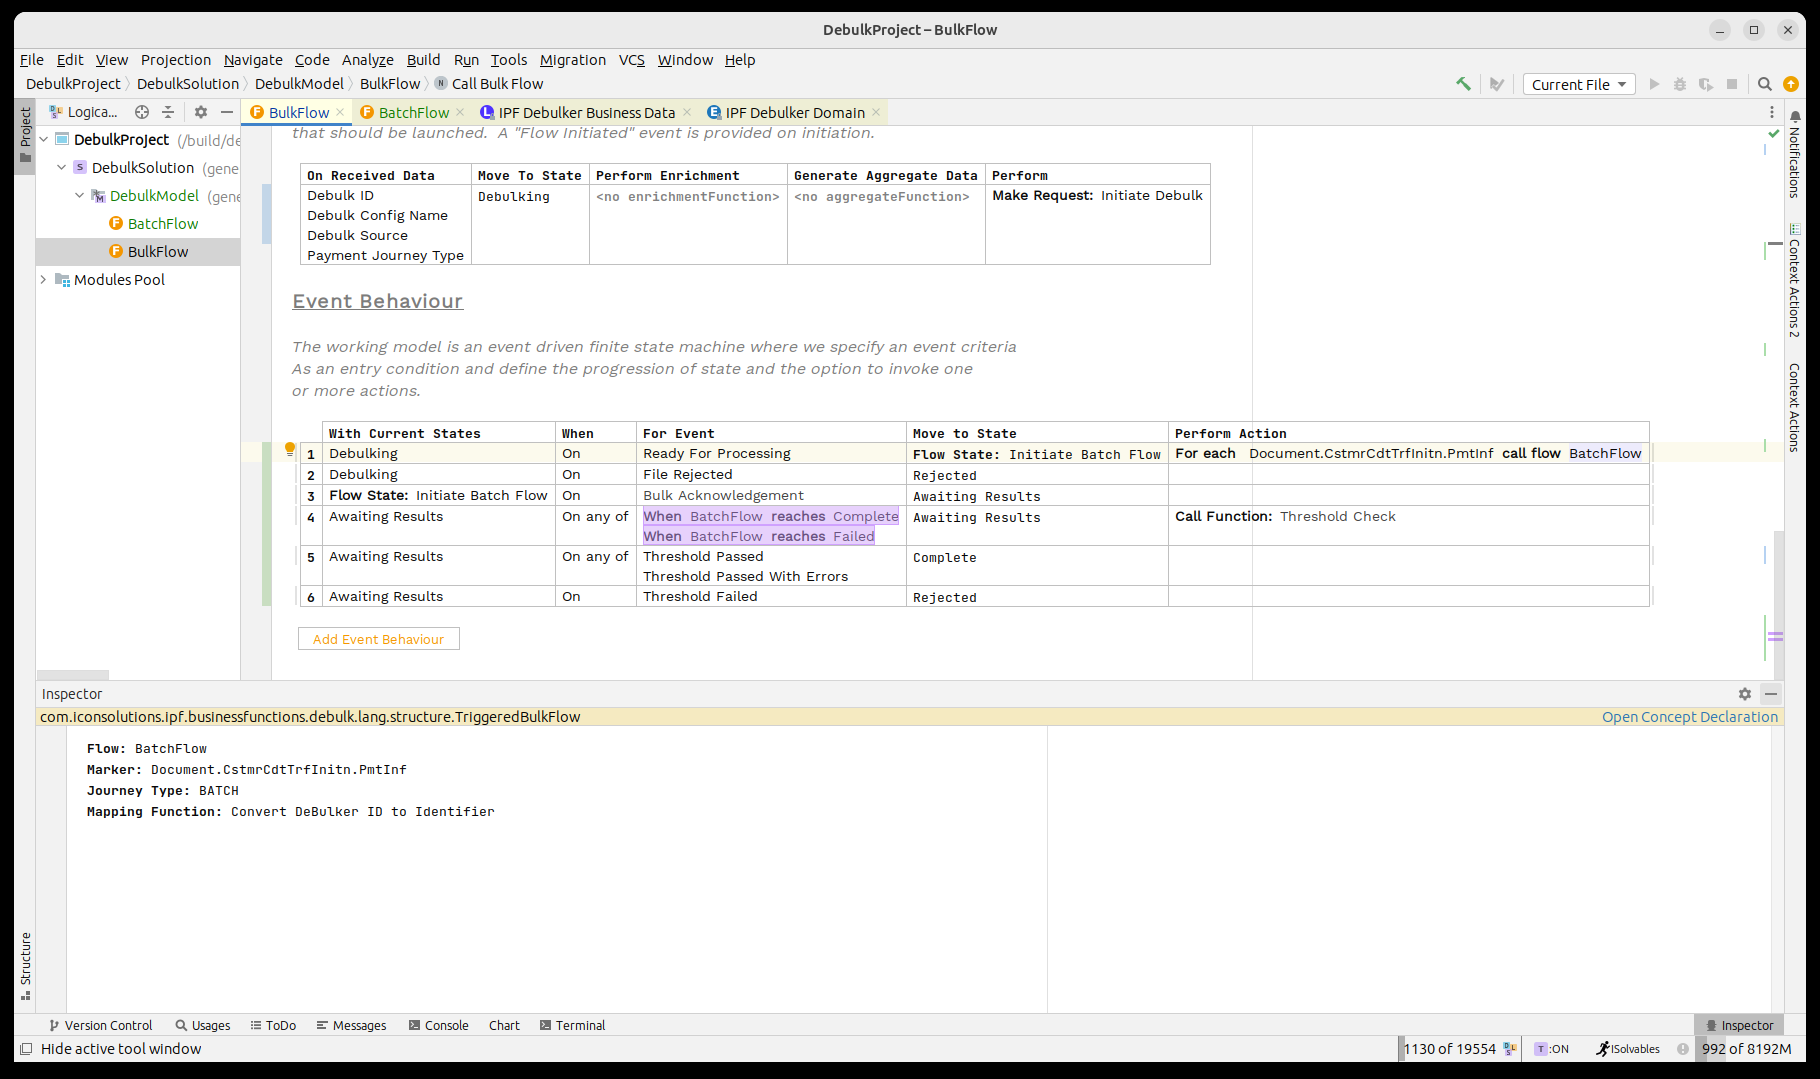
Finally, we note that the call to the batch flow is still showing in red. Let’s bring up the inspector for it by pressing CTRL+ALT+I.
Here we need to set the journey type for our child flow, in this case 'BATCH' and then we’ll use the pre-built mapping function 'Convert Debulker ID to Identifier' which will map our 'Debulk ID' into the relevant identifier format.
That’s it we’ve now completed basic integration between our bulk and batch flows.
Now we think about how the batch flow will work. It needs to call the next level down, the 'Payment' level. So again we need to create a new flow.
Creating the 'Payment' flow
Next up we’ll create a payment flow to handle the final level of our pain001.
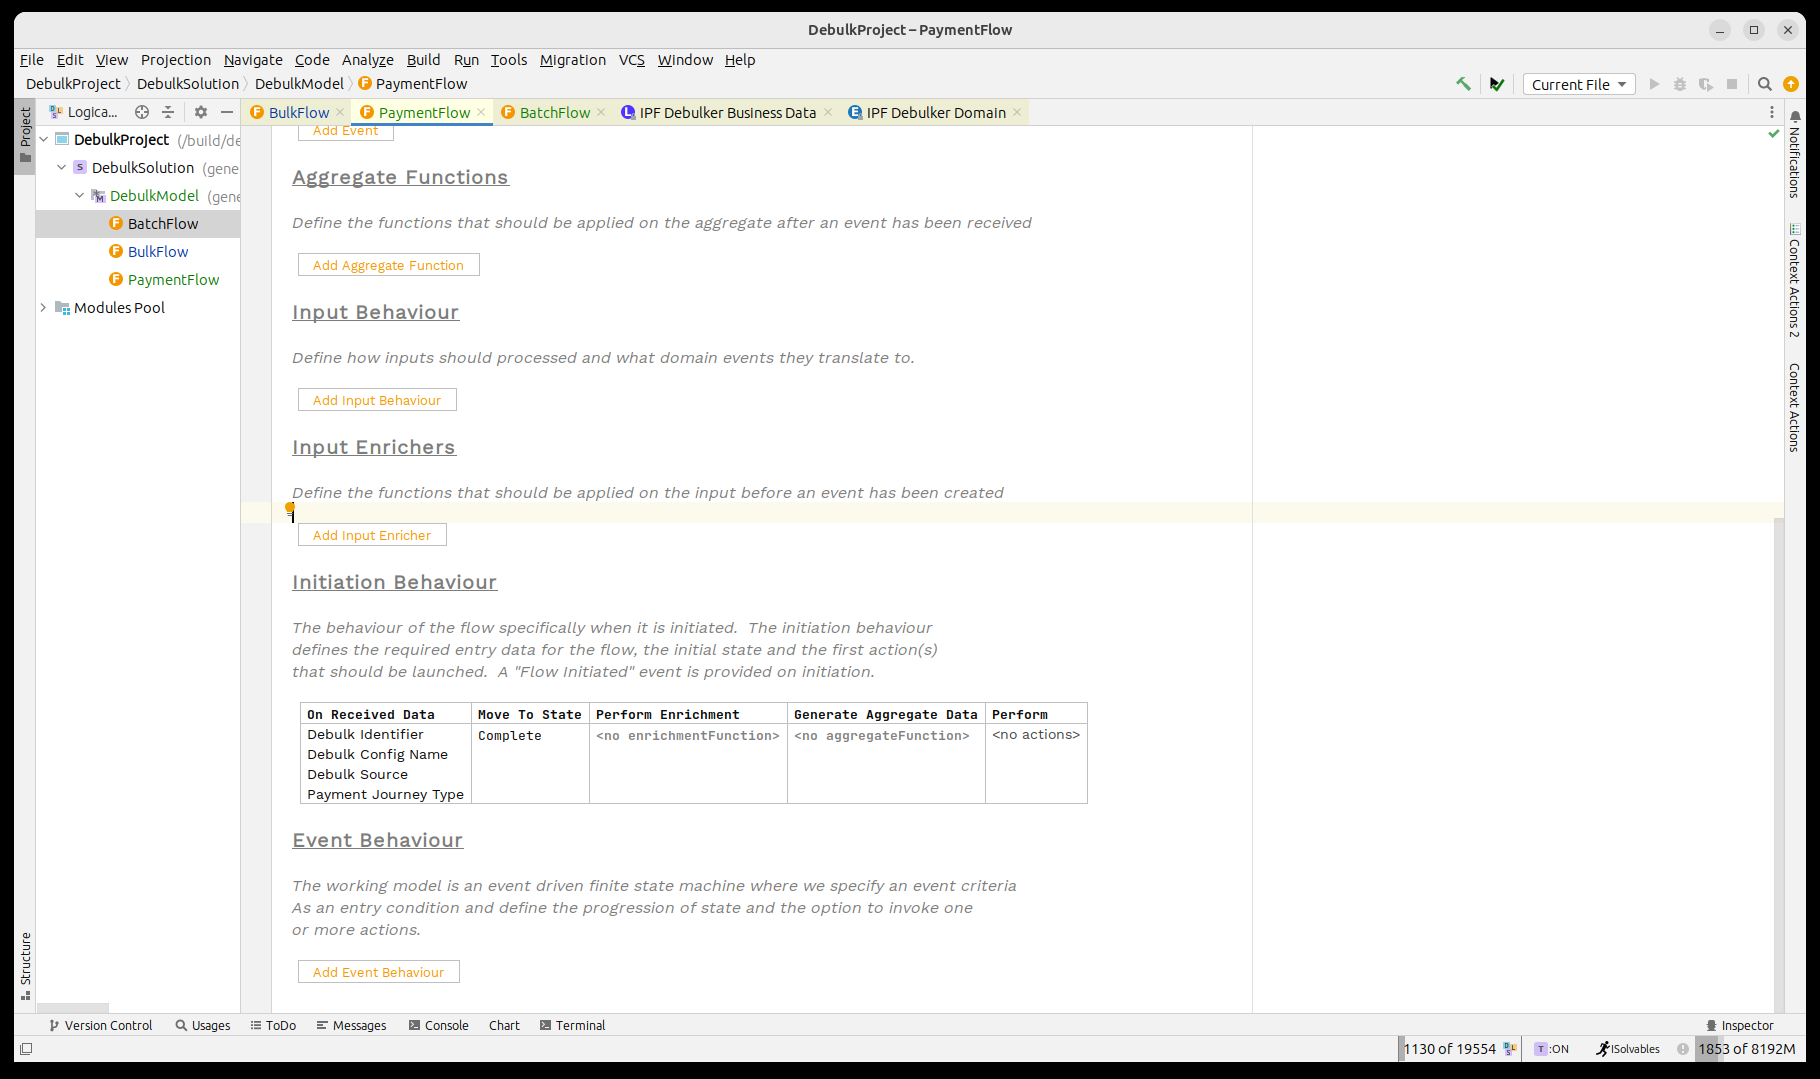
In this case our payment flow we’ll leave for now as just a simple default flow that will immediately complete.
From a data perspective it has the same elements as the batch flow:
-
Debulk Identifier
-
Debulk Component Data
-
Payment Journey Type
-
Related Unit of Work
Let’s create this flow now.
Implementing the 'Batch' flow
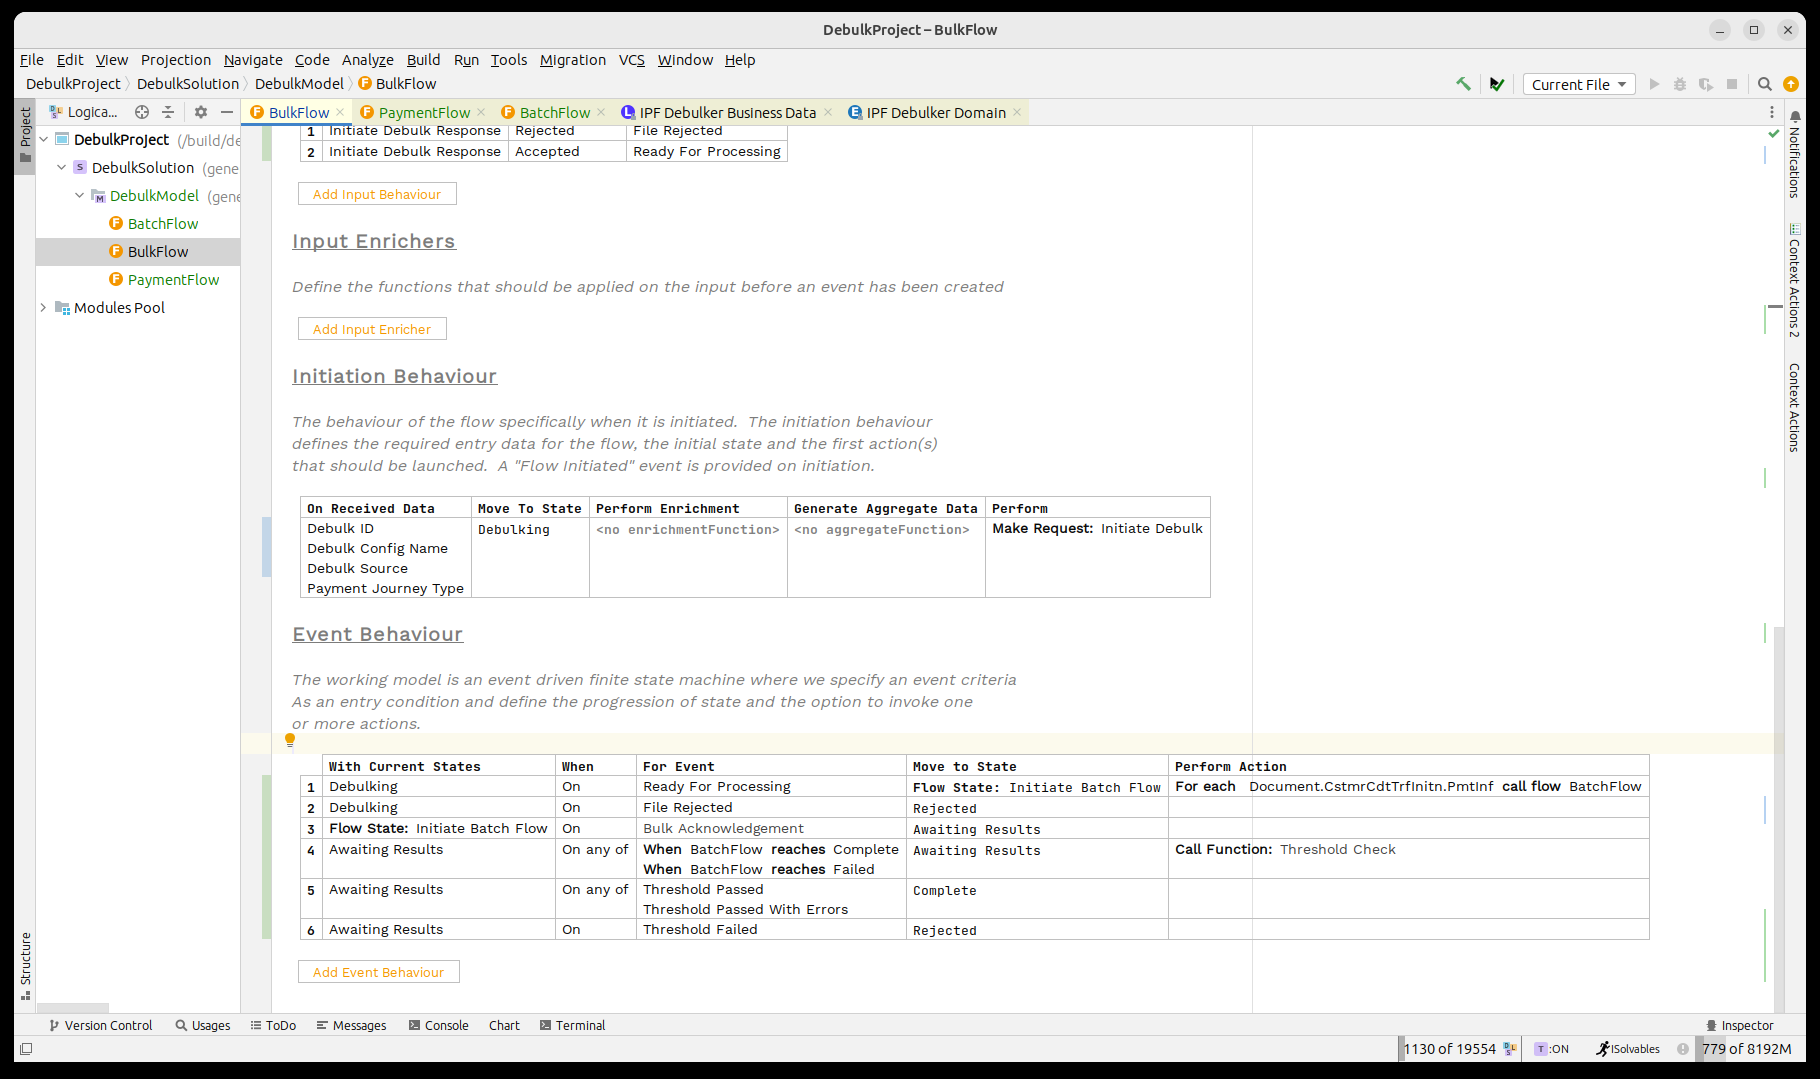
Now we can call the payment flow from the batch flow. The process is identical to that we set up for the bulk flow. As a reminder:
-
On initiation we’ll make a bulk flow call to the payment flow and use marker 'Document.CstmrCdtTrfInitn.PmtInf.CdtTrfTxInf'.
-
When the bulk acknowledgement is received we’ll move to an 'Awaiting results' state.
-
When results from the payment flow are received we’ll perform the Threshold Check.
-
When the threshold check completes, we’ll move to Complete.
Let’s add all that in now:
Finally, just as with the previous flows we need to define the journey type of the child flow. We do this by bringing up the inspector (pressing CTRL+ALT+I) and then setting the value to 'PAYMENT'.
That’s it, we’ve now completed our DSL implementation for the debulking of our pain001.
Java Implementation
The next step would be to complete the implementation side of our flow.
Adding dependencies
Now that we’ve finished modelling our bulk process, it’s time to start working on the implementation side.
Firstly we’ll need to add in the dependency for the debulker client into our service project’s pom.xml.
<dependency>
    <groupId>com.iconsolutions.ipf.businessfunctions.debulk</groupId>
    <artifactId>ipf-debulker-floclient-service</artifactId>
</dependency>
We’ll also delete the 'SampleController' from the application project as this is intended for use with normal single transaction files. We’ll add a replacement in later.
Having done that, lets rebuild the project.
maven clean install -DskipTestsAdding sample controllers
That’s our example ready to run, but before that we need to work out how to initiate a new flow. In a real world there are many different ways we might want to feed the initiation process but here we’ll simply make a sample controller that allows us to fire in transactions.
To do this we’ll start by creating a simple bean to represent our initial data fields:
@AllArgsConstructor
@NoArgsConstructor
@Data
@Builder
public class SampleDebulkInstruction {

    private String filePath;
    private String fileName;
    private String configName;
    private String bulkId;

}
Then we’ll use this in a standard spring controller function that will call the initiation of our file flow:
@RestController
public class FileController {

    @RequestMapping(value = "/submit", method = RequestMethod.POST)
    public Mono<InitiationResponse> submit(@RequestBody final SampleDebulkInstruction request) throws IOException {

        final String processingEntity = "BANK_ENTITY_1";
        final String unitOfWorkId = UUID.randomUUID().toString();
        final String filePath = Optional.ofNullable(request.getFilePath()).orElse("/tmp/");
        final String fileName = Optional.ofNullable(request.getFileName()).orElse(UUID.randomUUID() + ".xml");
        final String configName = Optional.ofNullable(request.getConfigName()).orElse("pain.001.001.09");
        final String debulkId = Optional.ofNullable(request.getBulkId()).orElse(UUID.randomUUID().toString());
        if (request.getFileName() == null) {
            // file not provided, so generate a dummy one.
            generateFile(filePath, fileName, 2, 10);
        }

        return Mono.fromCompletionStage(DebulkModelDomain.initiation().handle(new InitiateBulkFlowInput.Builder()
                        .withDebulkID(debulkId)
                        .withDebulkConfigName(configName)
                        .withDebulkSource(DebulkerFileSource.builder().fileProvider("local").filePath(filePath).fileName(fileName).build())
                        .withPaymentJourneyType("BULK")
                        .withProcessingContext(ProcessingContext.builder().unitOfWorkId(unitOfWorkId).clientRequestId(debulkId).processingEntity(processingEntity)
                                .build())
                        .build())
                .thenApply(done -> InitiationResponse.builder().requestId(request.getBulkId()).uowId(unitOfWorkId).aggregateId(done.getAggregateId()).build()));
    }

    private void generateFile(String filePath, String fileName, int batches, int transactionPerBatch) throws IOException {
        var xmlMapper = ISO20022MessageModel.init().xmlMapper();
        xmlMapper.setPruneWhitespaceOnSerialization(true);
        var generator = new Pain001Generator();
        var doc = new Document();
        doc.setCstmrCdtTrfInitn(generator.generate(batches, transactionPerBatch));
        var xml = xmlMapper.toXML(doc);
        File file = new File(filePath + fileName);
        FileUtils.writeStringToFile(file, xml, StandardCharsets.UTF_8);
    }
}
The key points to note here are that we call our Debulk Domain and just pass it the relevant data just as we do on any normal initiation flow. It also provides a file generator for pain001’s so that if required a new file is generated for testing purposes.
Finally as the component store uses Kafka, we need to add our normal default kafka properties.
common-kafka-client-settings {
  bootstrap.servers = "localhost:9093"
}

akka.kafka {
  producer {
    kafka-clients = ${common-kafka-client-settings}
    restart-settings = ${default-restart-settings}
    kafka-clients {
      client.id = ipf-tutorial-client
    }
  }
  consumer {
    kafka-clients = ${common-kafka-client-settings}
    restart-settings = ${default-restart-settings}
    kafka-clients {
      group.id = ipf-tutorial-group
    }
  }
}

default-restart-settings {
  min-backoff = 1s
  max-backoff = 5s
  random-factor = 0.25
  max-restarts = 5
  max-restarts-within = 10m
}
You’ll also need to include the pain001 debulking configuration.
That’s our implementation done, time to try and run our bulk process!
Running the process
For the process to run we need access to Kafka and Mongo. We’ll use the standard setup for this and run:
docker compose -f minimal.yml -f kafka.yml up -dThen once up we can simply start our application as a standard springboot one. Once it’s up the simplest thing is to fire a new record using the little sample controller we created:
curl -X POST localhost:8080/submit -H 'Content-Type: application/json' -d '{}' | jqThen we can check our output by looking in the developer app:
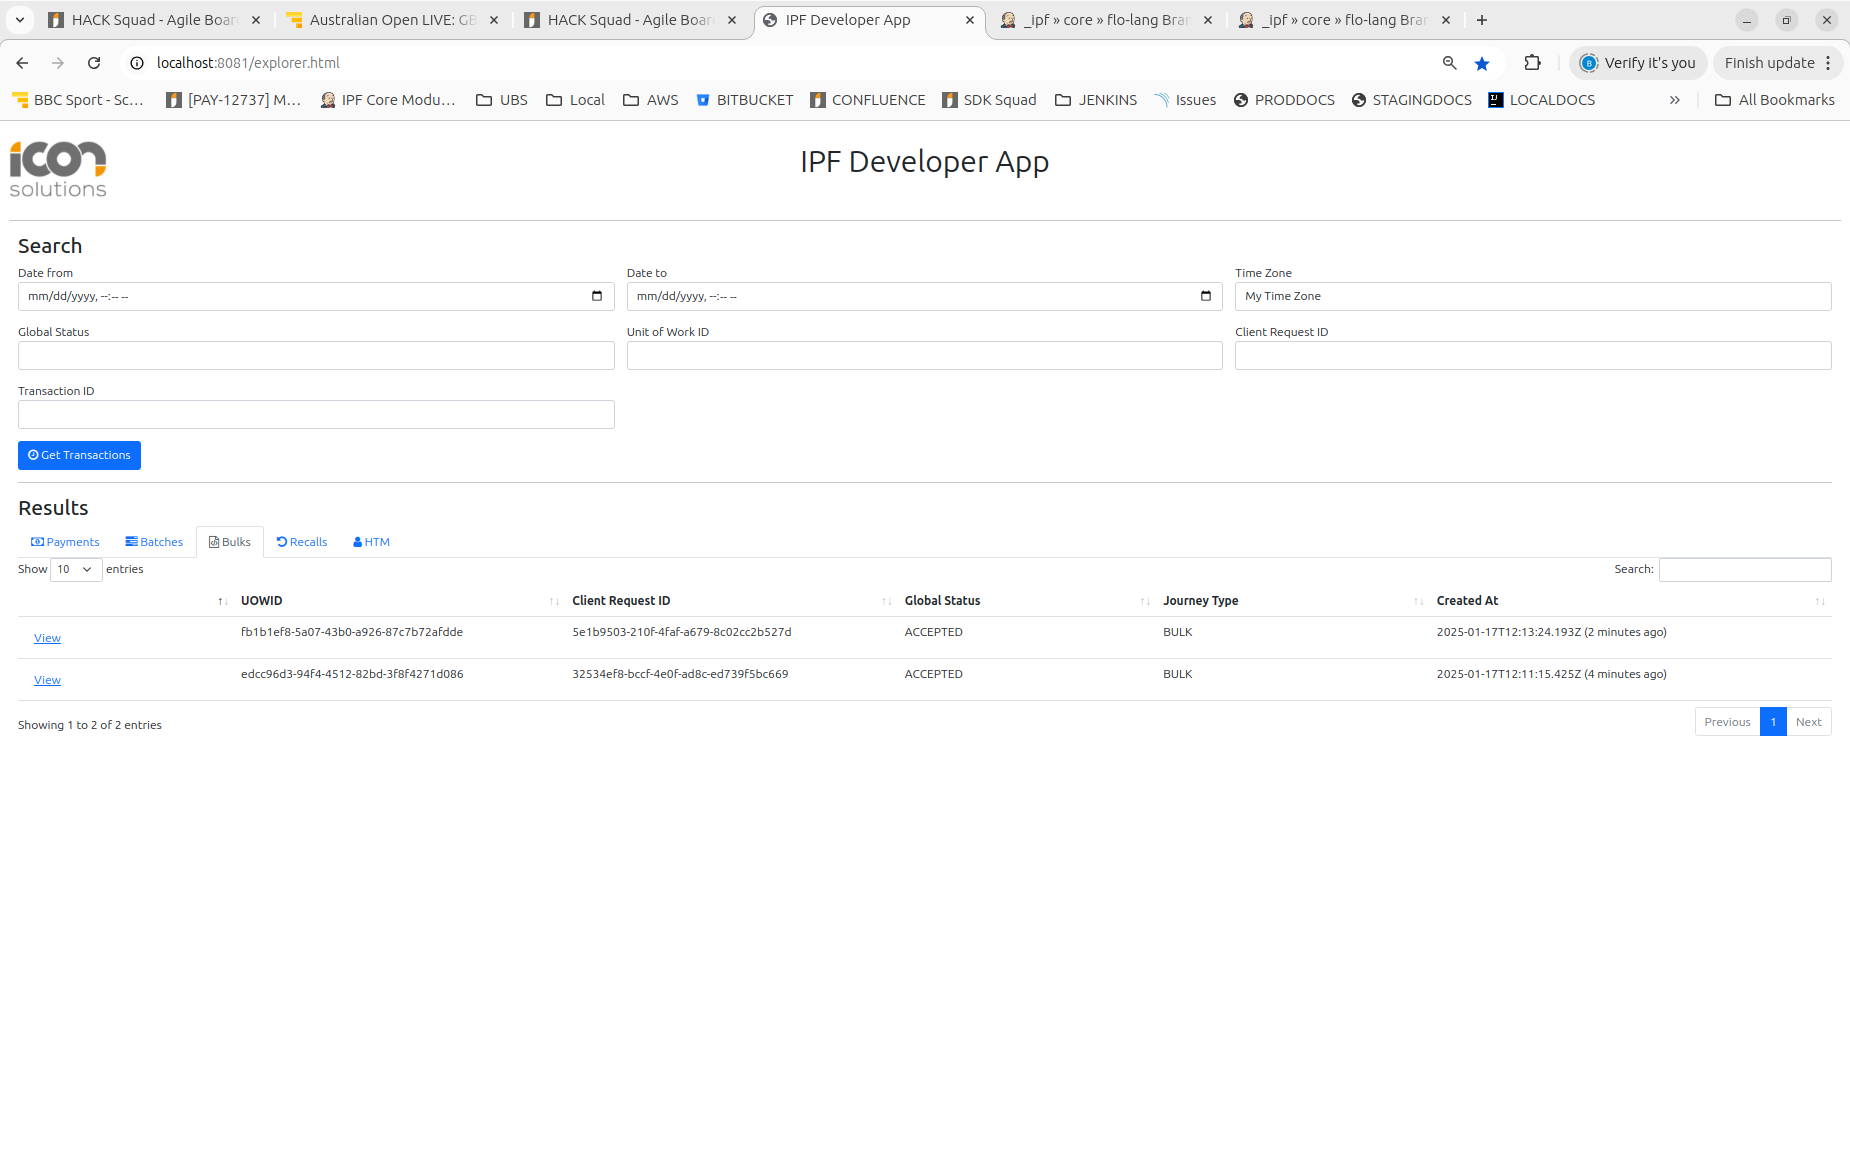
Here we can see the different levels of the processing: 'Payments', 'Batches' and Bulks.