Step 5 - Add Request/Response to an External Domain
Introduction to Step 5
Requests and their corresponding responses are at the heart of a process flow - they are usually what generates events, which in turn drive state changes in the finite state machine.
In this step you will be adding a new domain for the debtor agent’s accounting system, and then a request/response to determine if the debtor account is active or closed.
The flow will need to be updated with a new state and business data and you will be adding events, input behaviour and event behaviour for the first time.
The debtor agent’s accounting system will provide either an accept or reject response:
-
If 'Accept' then the flow will continue
-
If 'Reject' then the transaction will be rejected and the flow terminated
An accept response will indicate that funds have been earmarked and will contain a reference that will be required in later steps in the flow.
Create a new External Domain
First let’s add a new external domain to represent the accounting system of the debtor agent that you will call to determine the status of the account.
This will mean, once this step is completed, there will be two external domains: one to represent the payment monitoring system and another for the debtor agents accounting platform. Others will be added in subsequent steps.
You have already created an external domain in previous stem so all you need to do is right click on your model then select New>v2Flo>External Domain.
Set up the domain as follows:

Add a Request to the External Domain
With the Debtors Accounting System tab open, click on Add Request
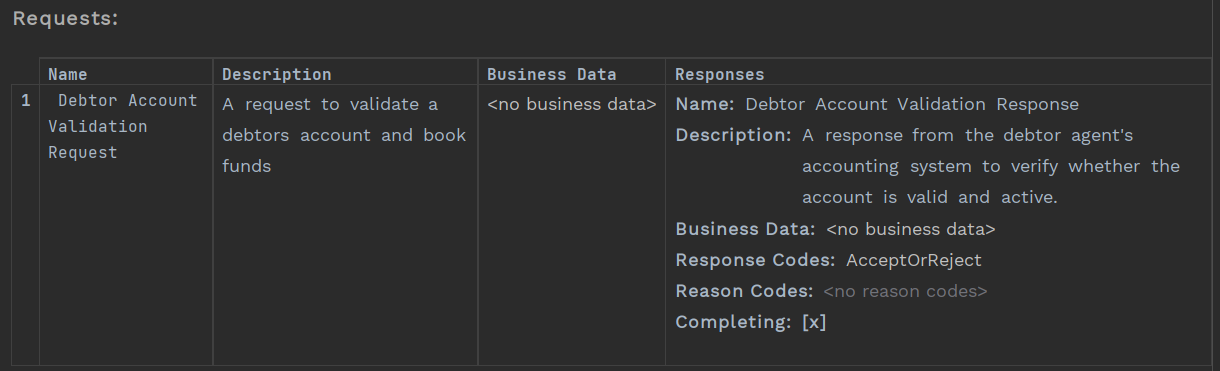
Add the details of the request that will be made to verify that the account is valid and active:
-
Add the name of request (e.g. Debtor Account Validation Request)
-
Add a description for the request
Add a Response
Now you need to set the response on the request. Complete as follows:
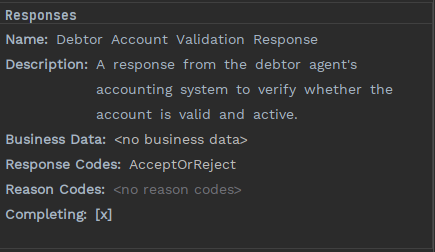
Note here you have pre-selected the response codes "AcceptOrReject", you could define any other set of response codes you want to make it more enriched via adding a response code library. You will do this in a later step.
Also note that 'Completing' is automatically ticked. There are circumstances where you may get more than one response, and you can only complete the original request when a final response is received - and so need a way of saying whether more than response is expected in response to a request. If timeouts are configured, then the timeout will only be cancelled when a completing response arrives.
Example: A sanctions system can provide a 'holding response' while an investigation is being carried out. The 'holding' response would be the first response, and Completing would be set to the 'false'. The second response would be the result of the investigation and in this case Completing would be set to 'true'. You will explore this in a later step of the tutorial.
The Request should now look like this:
Adding new states
Now you have created a new external domain, you need to plug it into the flow that you created in Step 3. First, open up the flow.
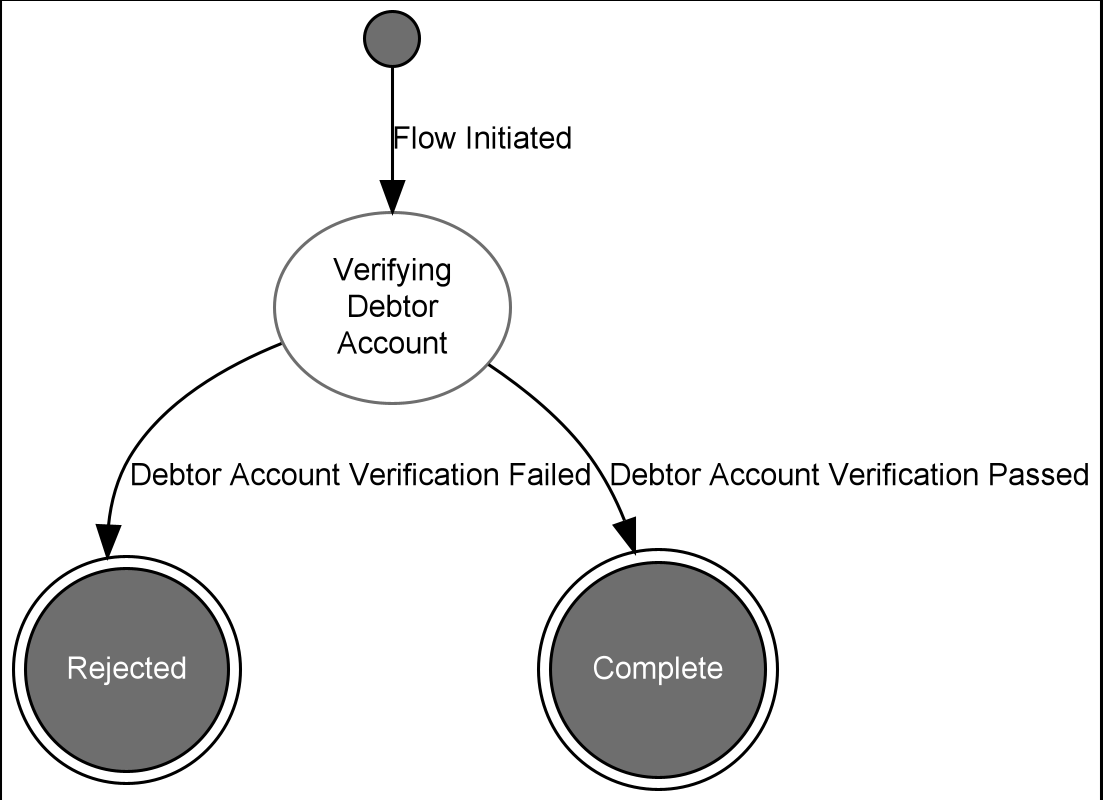
Lets create two new states for the flow. One for while you are waiting for a response from the debtor agent’s accounting system, and another to represent a rejected payment.
You’ll note here, that there is a red underline (1), if you hover over the red tag on the sidebar at the right of the window (2), or on the names themselves, you can see why:

This is warning us that your state is not used anywhere, so you’ll fix this by adding the states to the event behaviour. Before you do that though, you will need to define the events.
Adding Events
Next you need to define events. An event represents something that has happened to the object of your flow and drives the transition between states. So let’s add that by clicking the "Add Event" button and add two events, one for when the account validation check passes and one for when it fails:
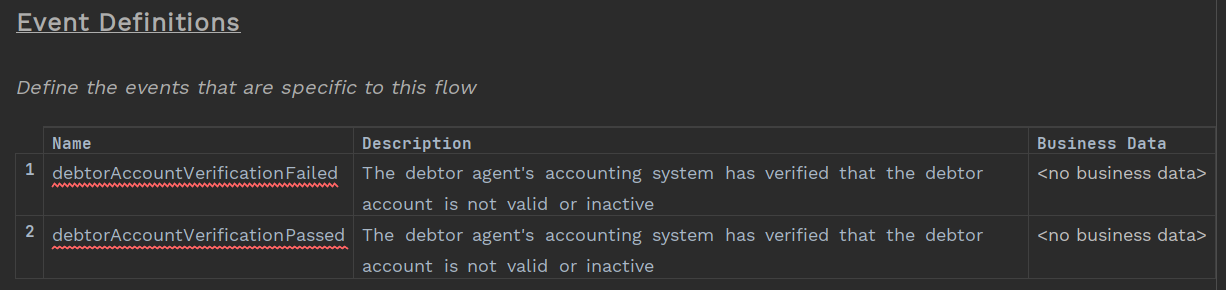
You see warnings on the event definitions to indicate that the events haven’t been used yet in the flow. You will soon be fixing this.
Input Behaviour
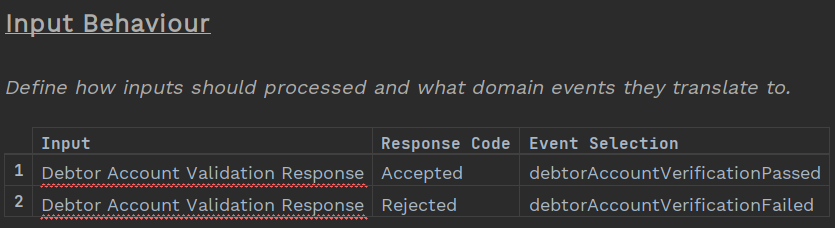
The input behaviour tells the flow what to do when it receives something - normally this will be either from an instruction or from a response to a request sent from the flow.
You have a new input - the response to the debtor account verification request - so you need to add what event should be created when you get that response back.
Remember, you selected AcceptOrReject for the response code, so you are only expecting two possible responses back.
Don’t forget, you are using Ctrl+Space to select the input, response code and event
Initiation Behaviour
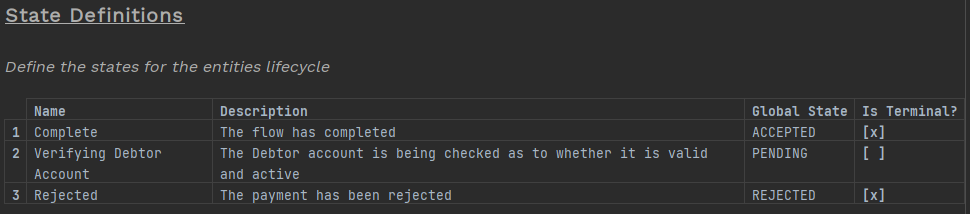
Now you have added a non-terminal state (Verifying Debtor Account) you need to update the initiation behaviour. In previous steps you had moved straight to a 'complete' terminal state…now you are adding this new state you should update the initiation behaviour accordingly by adding the state, and removing the notification.
Your updated initiation behaviour should now look like this:

Event Behaviour
Finally, you can finish off the flow by adding in the event behaviour.
An event behaviour tells the flow what to do when it is in a given state and an event is received. There are a number of things that can happen here, some typical ones are:
-
You can perform a "state transition" - i.e. move to a new state.
-
You can call any action - this could be a call to an external domain or a different internal function.
-
You could raise a separate event.
From initiation behaviour you defined the first state to be 'Verifying Debtor Account' - so you need to add that as the first 'With Current States' state.
And then you need to add the behaviours for when the two new events that you have just added in input behaviour occur:
-
When the current state is Verifying Debtor Account and the event is Debtor Account Verification Passed then move to state Complete
-
When the current state is Verifying Debtor Account and the event is Debtor Account Verification Failed then move the state to Rejected
Don’t forget to add the notifications in…..one for when the payment is accepted and another for when a payment is rejected.
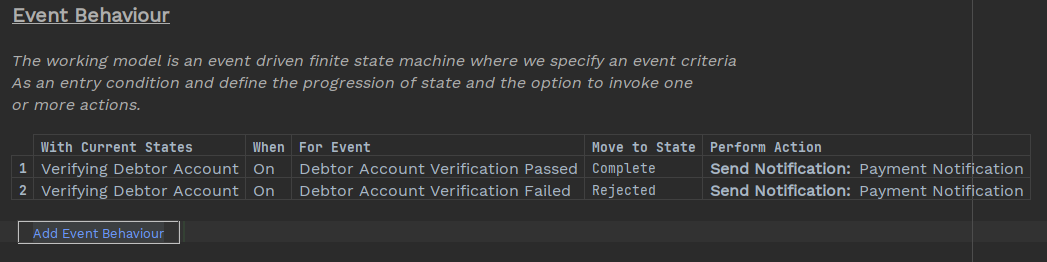
| Don’t forget to add the mapping for the send notification action back in. |
Validating the Model
At any point you can validate the entire flow and get a list of the errors (if any) in the flow.
There are two ways of doing this
Use Intentions:
Click the cursor anywhere in the Flow, press ALT+Enter and and the Intentions pop up box will appear on screen.
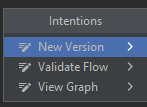
Select 'Validate Flow'.
OR
Check Model:
Right click on the model in the left hand pane and then select 'Check Model'
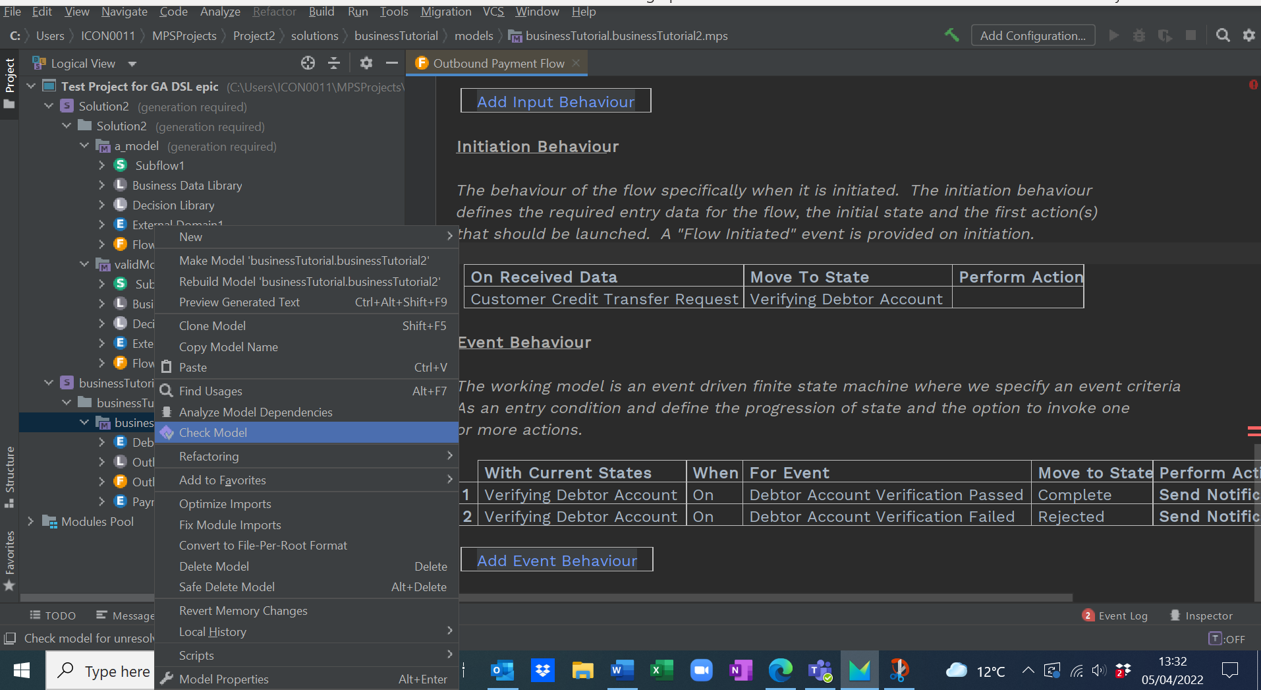
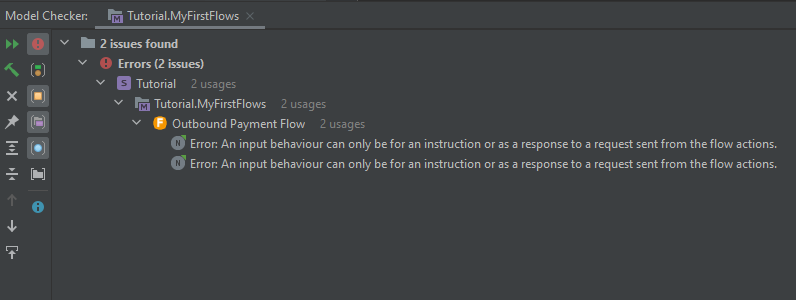
The result is a list of all the issues with the model appear in a Model Checker pop-up window. In your model there are two issues with the Input Behaviour
Fixing the Issues
You can see from the Model Checker that there is something wrong.
The error message tells us that the Debtor Account Validation Request is not present in the flow, so the event behaviour is throwing out an error.
If you look at initiation behaviour you can see that, although you added an initial state, you failed to add the action to send a request to the debtor agent’s accounting system.
Lets fix the initiation behaviour now by adding that action.
Your initiation behaviour should now look like this:

And if you check the model again, you will find there are no errors.